Set Up a Basic TCP Proxy with socat
By Blogger
· 120 views
Thu, 15 May 2025 15:44:09 +0530
A TCP proxy is a simple but powerful tool that sits between a client and a server and is responsible for forwarding TCP traffic from one location to another. It can be used to redirect requests or provide access to services located behind a firewall or NAT. socat is a handy utility that lets you establish bidirectional data flow between two endpoints. Let's see how you can use it to set up a TCP proxy.
A lightweight and powerful TCP proxy tool is socat (stands for "SOcket CAT)". It establishes a bidirectional data flow between two endpoints. These endpoints can be of many types, such as TCP, UDP, UNIX sockets, files, and even processes.
As a former developer and sysadmin, I can't count the number of times I've used socat, and it's often saved me hours of troubleshooting.🤯
Whether it's testing a service behind the company firewall, redirecting traffic between local development environments, or simply trying to figure out why one container isn't communicating with another. It's one of those tools that, once you understand what it can do, is amazing. How many problems can be solved with just one line of command?
In this tutorial, you will learn how to build a basic TCP proxy using socat. By the end of the tutorial, you'll have a working configuration that listens on a local port and forwards incoming traffic to a remote server or service. This is a fast and efficient way to implement traffic proxying without resorting to more complex tools.
Let's get started!
Prerequisites
This tutorial assumes you have a basic knowledge of TCP/IP networks.
# Debian/Ubuntu
sudo apt-get install socat
# macOS (Homebrew)
brew install socat
Understanding the basic socat command syntax
Here’s the basic socat syntax:
socat <source> <destination>These addresses can be in the following format:
- TCP4-LISTEN:<port>
- TCP4-<host>:<port>
The point is: all you have to do is tell socat “where to receive the data from” and “where to send the data to,” and it will automatically do the forwarding in both directions.
Setting up a basic TCP proxy
Let’s say you have a TCP server working on localhost (loopback interface). Maybe some restrictions prevent you from modifying the application to launch it on a different interface. Now, there’s a scenario where you need to access the service from another machine in the LAN network. Socat comes to the rescue.
Example 1: Tunneling Android ADB
First, we established a connection with the Android device via ADB, and then we restart the adb daemon in TCP/IP mode.
adb devices
adb tcpip 5555
On some devices, running this adb tcpip 5555 command will expose the service on LAN interface, but in my setup, it doesn’t. So, I decided to use Socat.
socat tcp4-listen:5555,fork,reuseaddr,bind=192.168.1.33 tcp4:localhost:5555A quick reminder, your LAN IP would be different, so adjust the bind value accordingly. You can check all your IPs via ifconfig.
Example 2: Python server
We’ll use Python to start a TCP server on the loopback interface just for demonstration purposes. In fact, it will start an HTTP server and serve the contents of the current directory, but under the hood, HTTP is a TCP connection.
python -m http.server --bind 127.0.0.1This starts an HTTP server on port 8000 by default. Now, let’s verify by opening localhost:8000 in the browser or using a curl request.
curl http://localhost:8000
What if we do curl for the same port, but this time for the IP assigned by the LAN? It’s not working, right?

socat tcp4-listen:8005,fork,reuseaddr,bind=192.168.1.33 tcp4:localhost:8000Now, establish the connection on port 8005.
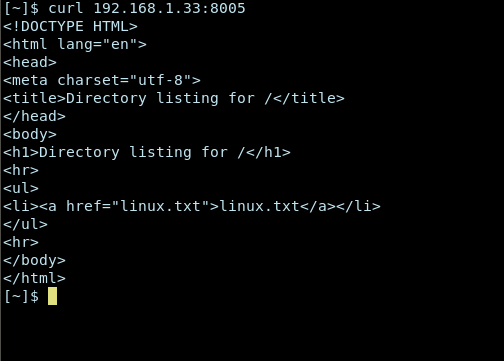
When establishing a connection through the different devices to http://192.168.1.33:8005, you might get a connection refused error because of firewall rules. You can add a firewall rule to access the service in that case.
You can refer to our tutorial on using UFW to manage firewall for more details. Here are the commands to do the job quickly:
sudo ufw allow 8005/tcp
sudo ufw status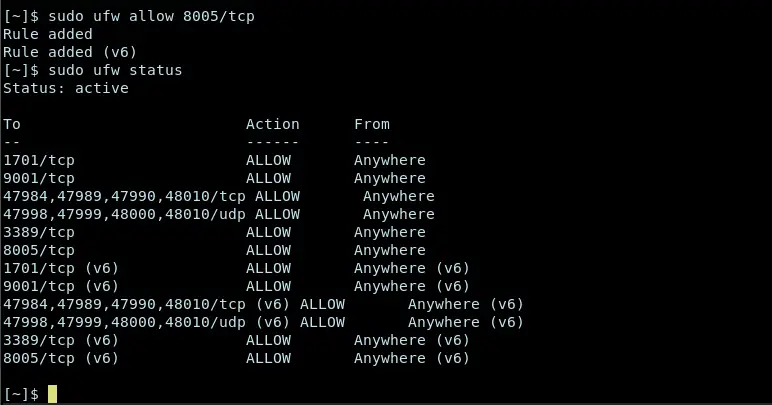
Conclusion
Whether you are proxying between containers or opening services on different ports, socat proves to be a versatile and reliable tool. If you need a quick and easy proxy setup, give it a try — you'll be amazed at how well it integrates with your workflow.

Bhuwan Mishra is a Fullstack developer, with Python and Go as his tools of choice. He takes pride in building and securing web applications, APIs, and CI/CD pipelines, as well as tuning servers for optimal performance. He also has a passion for working with Kubernetes.
Recommended Comments