Hello, Guest! 👋 You're just a few clicks away from joining an exclusive space for tech enthusiasts, problem-solvers, and lifelong learners like you.
🔐Why Join? By becoming a member of CodeNameJessica, you’ll get access to: ✅ In-depth discussions on Linux, Security, Server Administration, Programming, and more ✅ Exclusive resources, tools, and scripts for IT professionals ✅ A supportive community of like-minded individuals to share ideas, solve problems, and learn together ✅Project showcases, guides, and tutorials from our members ✅Personalized profiles and direct messaging to collaborate with other techies
🌐Sign Up Now and Unlock Full Access! As a guest, you're seeing just a glimpse of what we offer. Don't miss out on the complete experience! Create a free account today and start exploring everything CodeNameJessica has to offer.
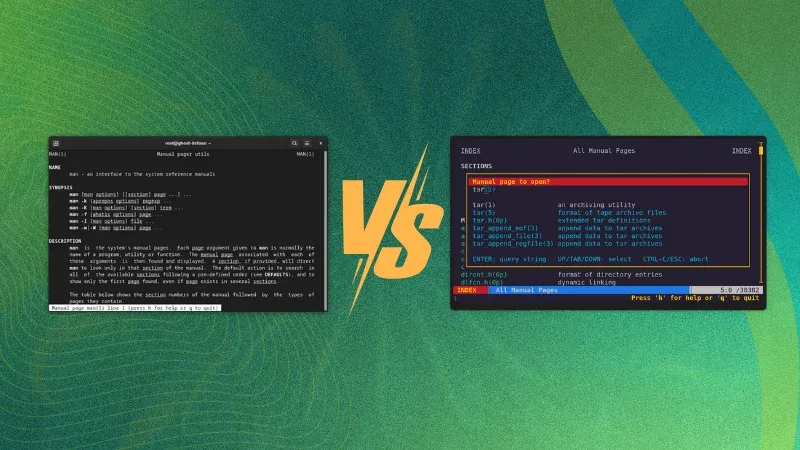
Desktop Linux is mostly neglected by the industry but loved by the community. For the past 13 years, It's FOSS has been helping people use Linux on their personal computers. And we are now facing the existential threat from AI models stealing our content.
If you like what we do and would love to support our work, please become It's FOSS Plus member. It costs $24 a year (less than the cost of a burger meal each month) and you get an ad-free reading experience with the satisfaction of helping the desktop Linux community.
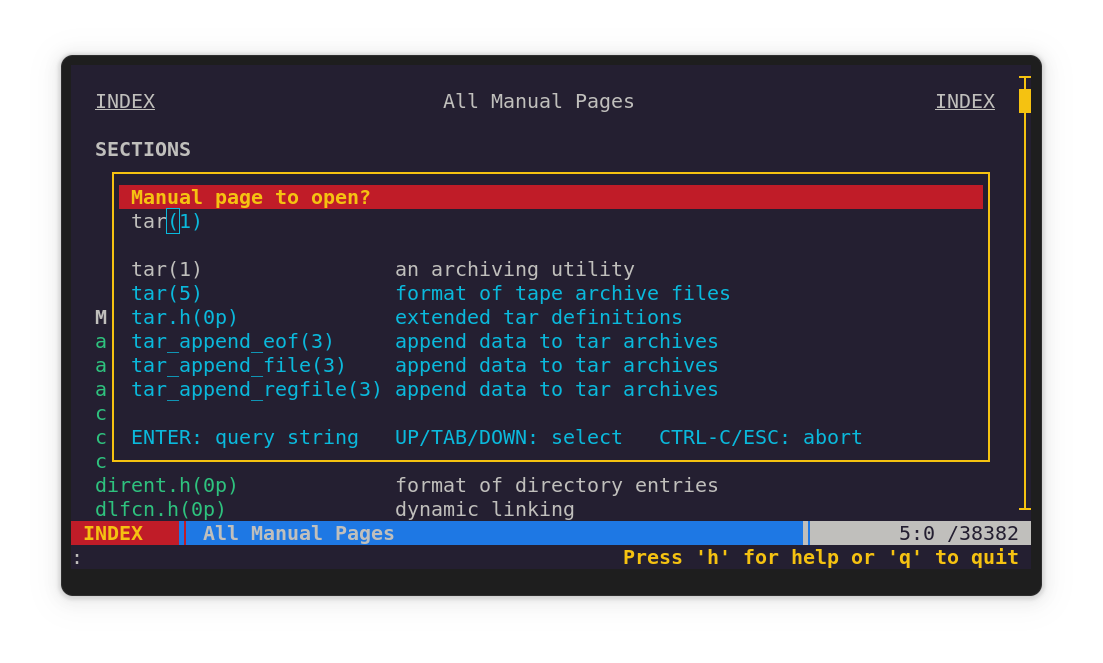
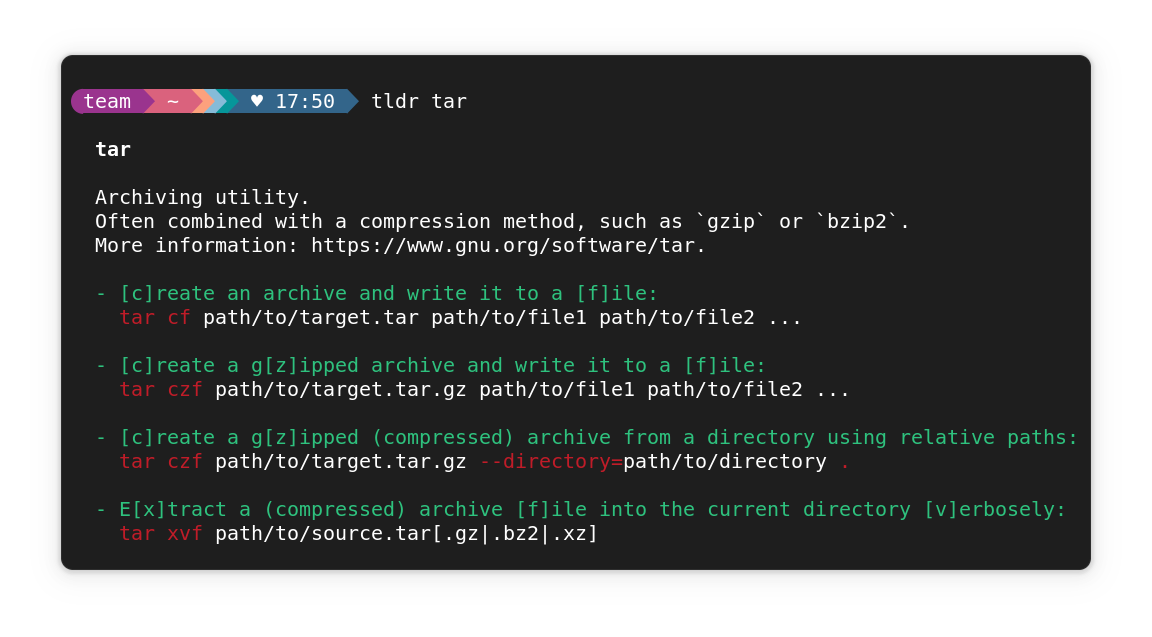
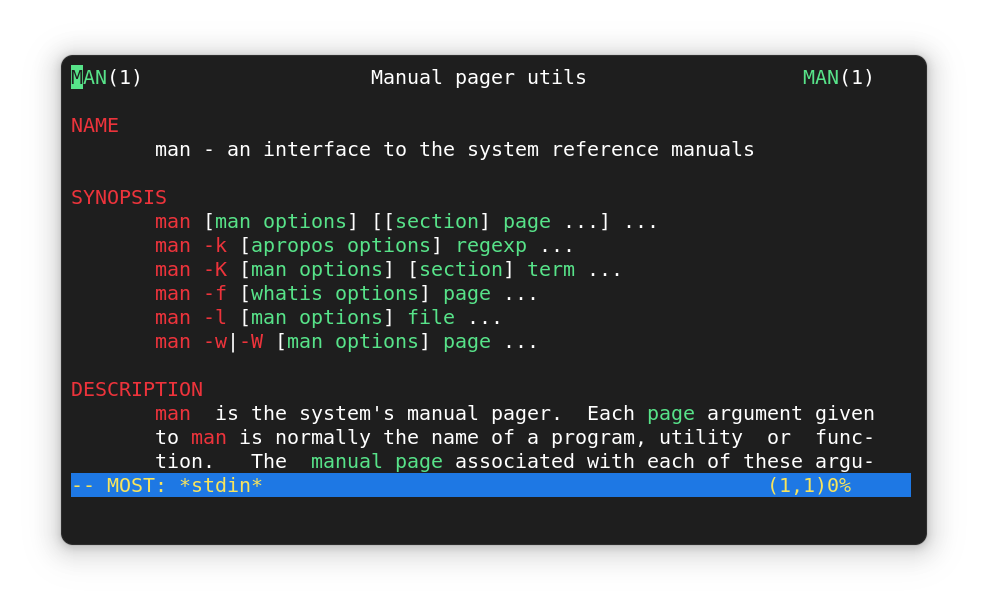
Are you good with Git? Prove it, or Git good (pun intended).
💡 Quick Handy Tip
On Dolphin file manager, you can quickly find specific files by enabling the filter bar with Ctrl+I or via Edit → Filter. Type text like .mp3 to show only matching files. Press Esc to hide the filter when done.
🤣 Meme of the Week
🗓️ Tech Trivia
The German Army began using the Enigma machine on July 15, 1928, to send secret messages. It looked like a typewriter but scrambled letters into code. Years later, Alan Turing helped figure out how to break it.
The rise of AI-powered coding tools has reshaped developer workflows worldwide. Interactive development environments are becoming more intelligent, adapting to how programmers work.
Microsoft is actively evolving VS Code into an AI-first IDE by integrating powerful language models and automation. Meanwhile, Amazon recently launched Kiro, aiming to simplify coding with a fresh approach.
Amidst all this, Windsurf, the most popular AI code editor out there, has found itself in murky waters, with its founders and top talent being poached by Google and its assets being quickly acquired by Cognition.
If all this has made you rethink using Windsurft, then you are not alone. With this list, I will be highlighting some of the most promising AI IDEs and developer tools available for Linux users.
🚧
This list includes both FOSS and non-FOSS apps. We included the latter as they are available for Linux.
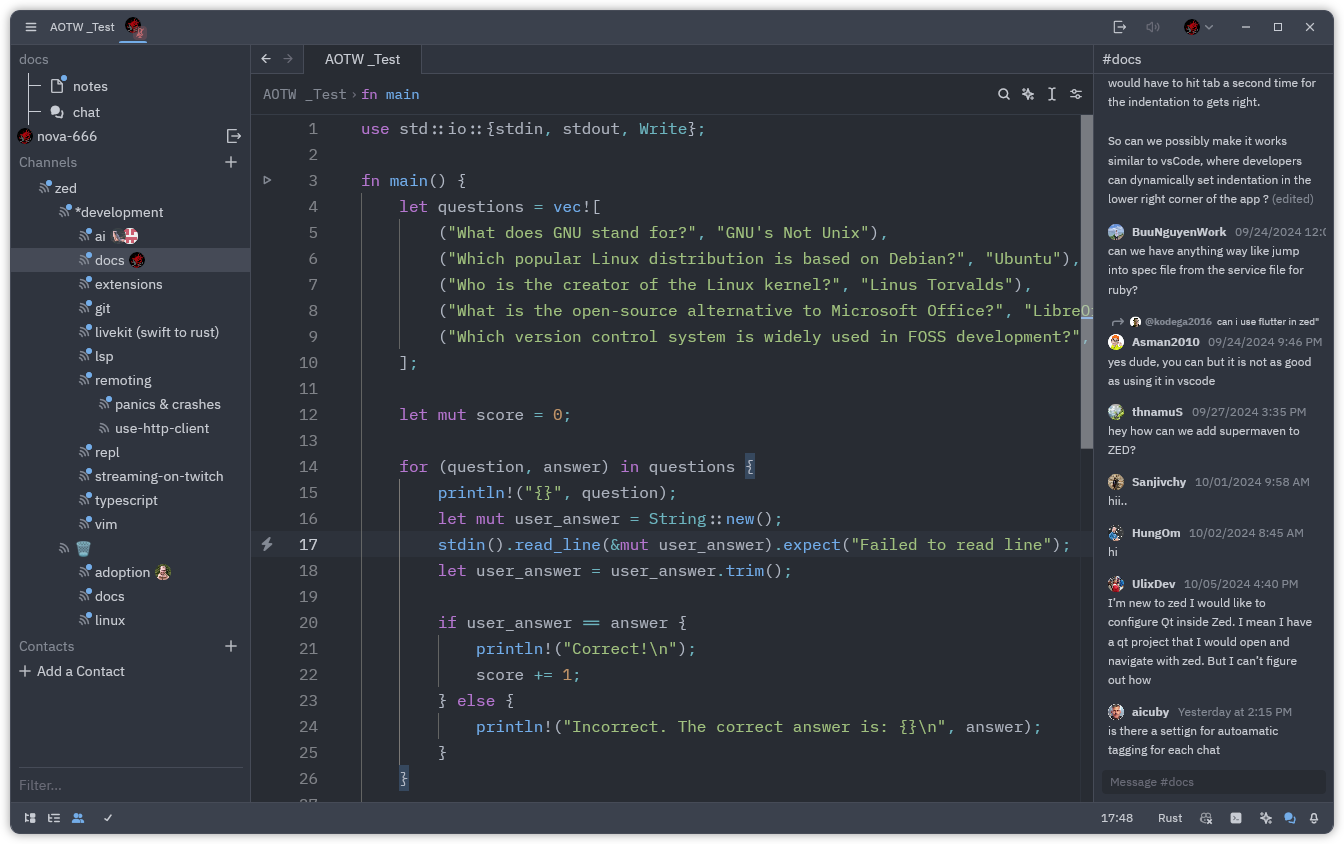
1. Zed
Zed is a fast, open source code editor built with Rust and designed for modern developer workflows. It supports Linux natively and aims for low latency, real-time collaboration features.
Besides core editing, Zed integrates with AI assistants like Copilot, Anthropic, and Gemini, letting you speed up coding with AI-powered completions and code analysis. It also includes native Git support and a built-in terminal for seamless development.
Cursor is a popular AI-powered code editor built as a fork of VS Code, designed to provide advanced AI-assisted coding features. It integrates AI models for multi-file code understanding, generation, and chat-based support.
Widely adopted by developers seeking a more intelligent IDE experience, Cursor supports Linux natively and offers seamless integration with common development workflows.
⭐ Key Features
Native Linux app with regular updates
VS Code fork with built-in AI capabilities
Advanced multi-file code understanding and generation
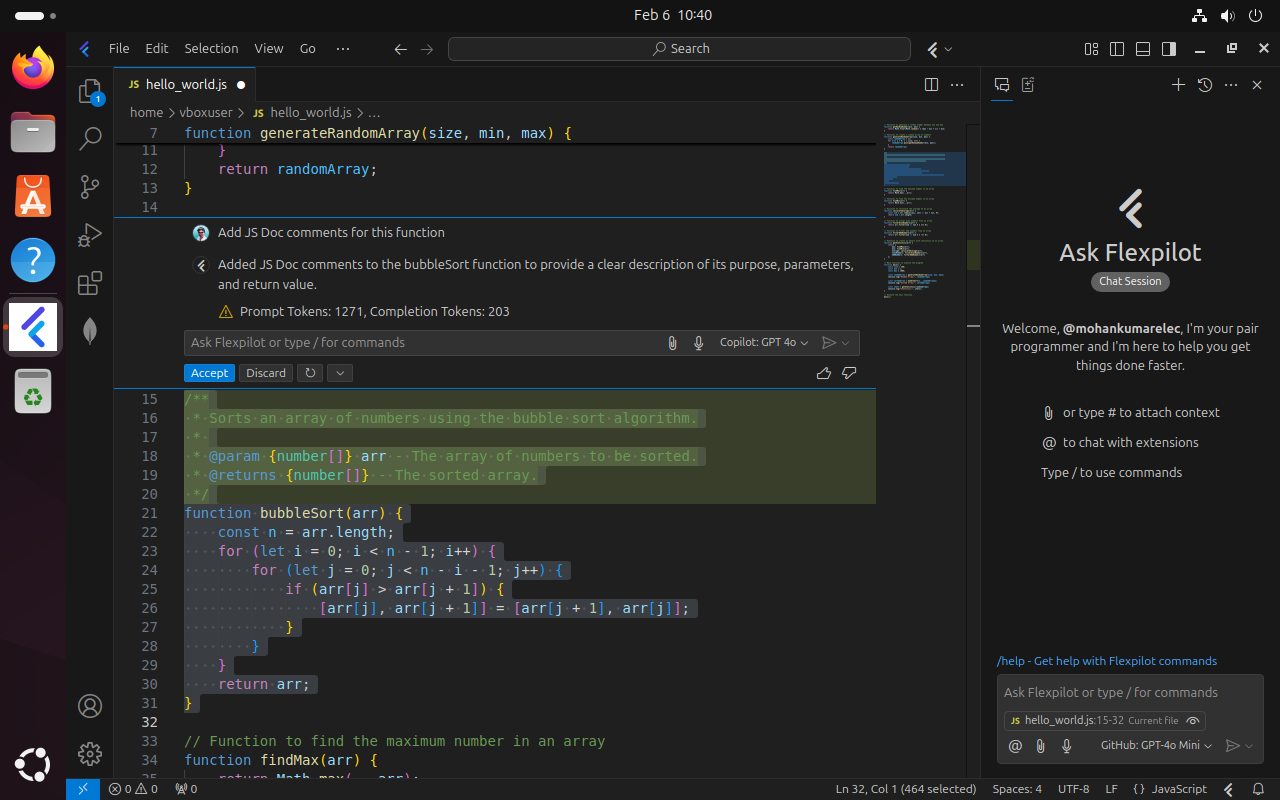
3. Flexpilot IDE
Flexpilot IDE is a free, open source AI-native IDE that’s a fork of VS Code. It supports Linux and lets you choose your own LLM from providers like OpenAI, Anthropic, Google Gemini, Mistral, and local models via Ollama and LMStudio.
It offers features like inline completions, panel chat, multi-file edits, and AI-powered commit messages. Not only that, but it also supports extensions from the VS Code ecosystem, making it easy to adapt to existing workflows.
Kiro is an AI-powered IDE developed by Amazon Web Services (AWS) that focuses on spec-driven development to help development teams quickly move from prototyping to production.
It is powered by Anthropic's Claude Sonnet 4, with Sonnet 3.7 as a backup option. Kiro is also built on an open source VS Code base, allowing it to leverage a solid foundation to support familiar workflows, seamless plugin compatibility, and effortless migration of user settings.
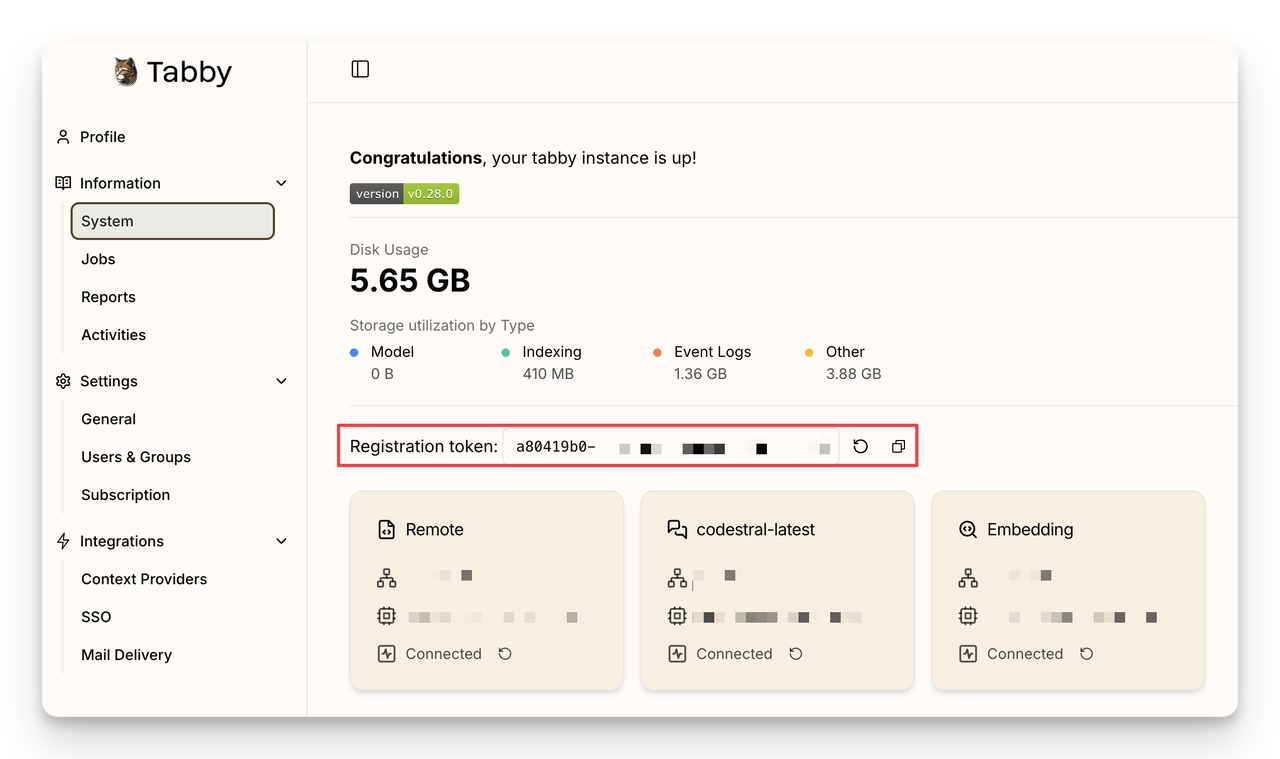
Tabby is an open source, self-hosted AI coding assistant designed to integrate seamlessly into development workflows. It offers features like code completion, an answer engine, and inline chat to help developers write and debug code more efficiently.
In addition to its technical capabilities, Tabby prioritizes transparency and data control.
By enabling users to deploy the assistant on their own local infrastructure or private cloud, Tabby allows organizations and individuals to maintain complete ownership of their code and sensitive information.
⭐ Key Features
Self hosted, open source solution
AI-powered code completion and contextual suggestions
Integrated answer engine and inline chat for quick answers
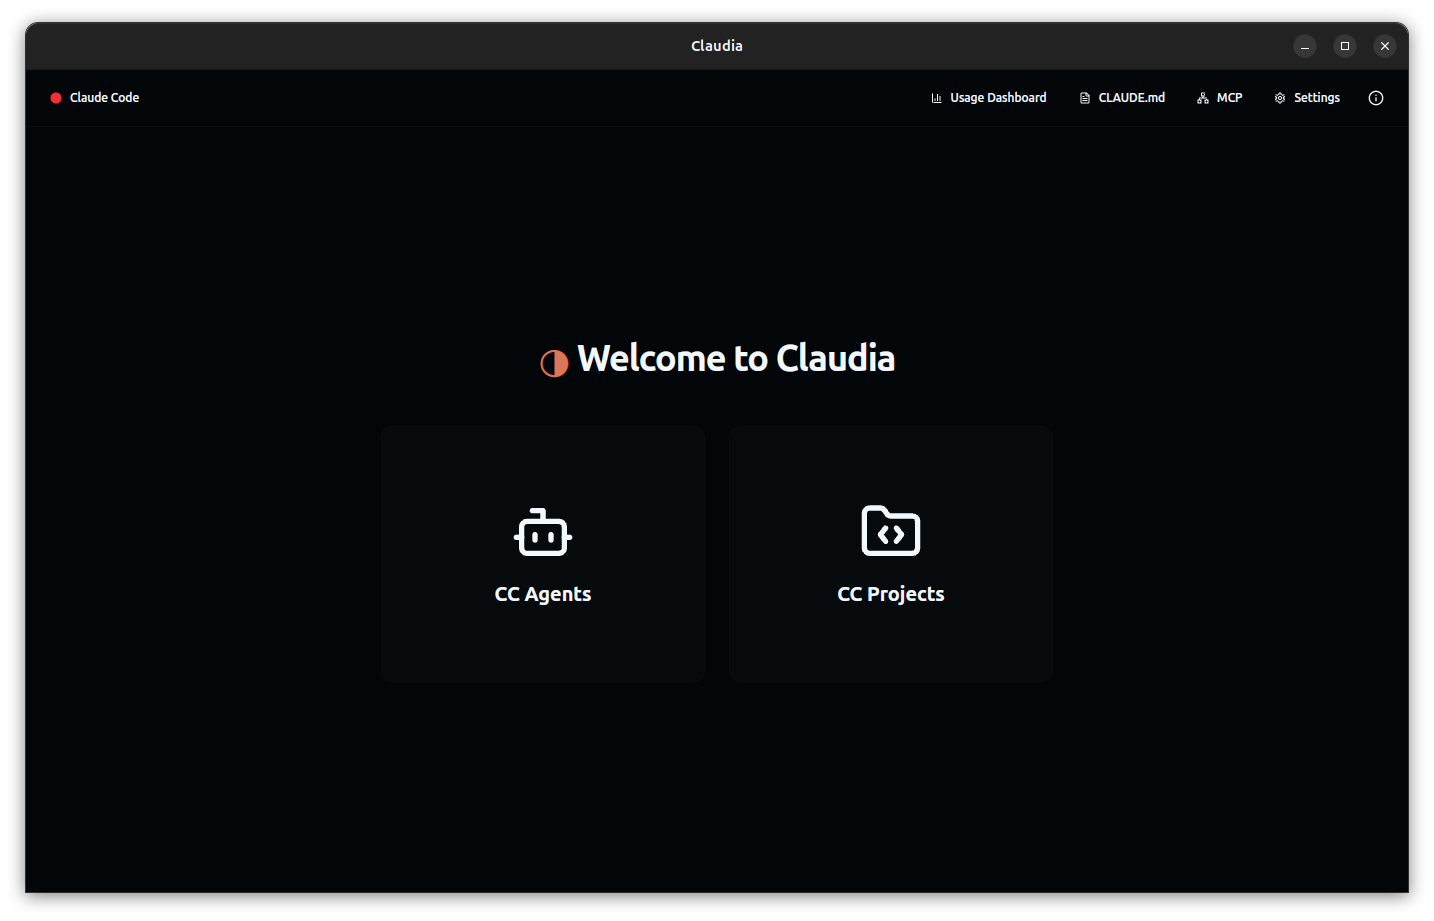
Claudia is a GUI-based toolkit for Claude Code AI development built as a desktop app. It is designed to make working with Claude-powered code assistants approachable and efficient for developers.
It includes essential tools like a visual project browser for organizing sessions with metadata and previews, custom AI agent creation using tailored system prompts, and a session timeline with checkpoints that allow users to branch, save, and review past work using visual diffs.
⭐ Key Features
Detailed usage analytics view
GUI for Claude Code AI development
Built-in tools for creating and editing custom AI agents
Warp (partner link) is a modern terminal built for teams, designed to improve developer productivity with a powerful and collaborative command-line experience.
Unlike traditional terminals, Warp provides a fast, native UI built in Rust and introduces features like input blocks, autocomplete, and AI command suggestions to streamline workflows and reduce context switching.
It includes built-in support for team collaboration, allowing users to share commands, access reusable workflows, and leverage AI assistance directly in the terminal.
Tabnine is an AI-powered code completion assistant designed to accelerate and simplify software development while keeping your code private, secure, and compliant. It offers highly personalized, context-aware code completions for snippets, lines, and full functions.
Unlike other coding assistants, Tabnine lets you control where and how it’s deployed, whether SaaS, VPC, or on-premise. This ensures that your intellectual property remains protected without storing or sharing your code externally.
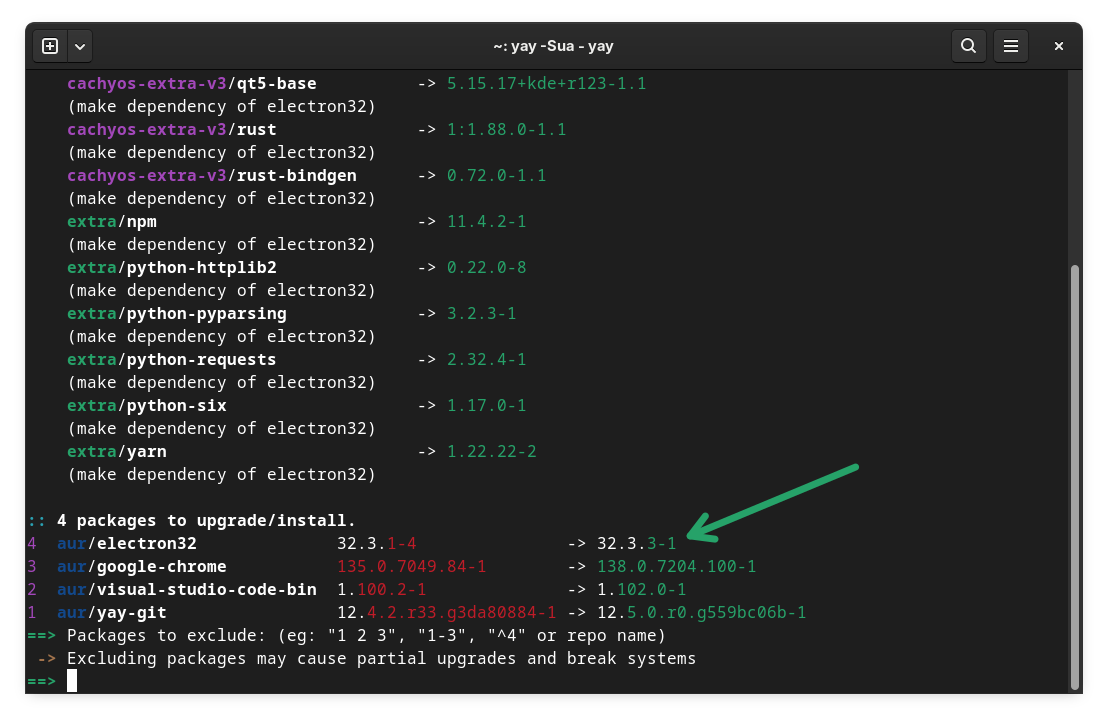
While updating, it showed me a few packages that required upgrades.
I did not pay attention as there was nothing alarming and pressed the usual enter keys one after another.
Only when it reached a certain stage that I realized that it was taking a lot longer to install these updates. I paid close attention at this stage and noticed an issue.
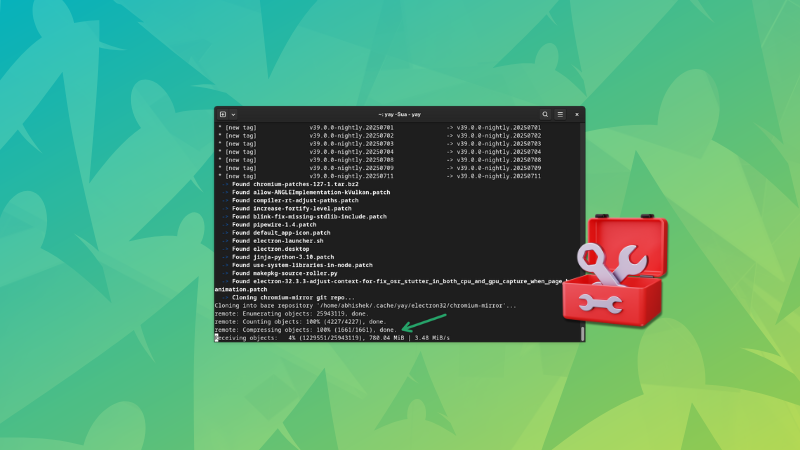
It was trying to download GBs of data for Electron.
More than 25GB of updates? That's not usual
✅
Since it was fetching electron version 32, getting the binary from AUR itself easily fixed the issue:
yay -S electron32-bin
But there is more to it that I would like to discuss.
What's going on here?
In simpler terms, Elecron is a JavScript framework that builds a graphical interface of an application on top of the Chromium web browser. From VS Code to Discord, tons of popular applications are built on Electron.
When you run these applications, you are basically running a web browser underneath, and not everyone likes that. But it is easier to package an application, and the interface looks modern, and that's why it is popular.
Anyways, it is the functioning of AUR that complicates the issue here. It tries to build all the dependencies of a package.
It seems like at some point in the past, I just pressed enter keys without paying attention and somehow the AUR system thought that it needed to download a specific version of electron as a dependency.
The next problematic thing is that since it tries to build the package from source, it tries to get the entire source code of the Chromium project, which is in GBs.
What should you do in such case?
🚧
I am using electron32 in the example here. Your electron version might be different and thus, you MUST change the commands in the examples here to reflect the correct electron version.
First check what goes on with the troubled electron version. Where was it installed from and which packages require it?
pacman -Qi electron32
It gave me two interesting details. Electron32 came from the 'Extra' (cachyos-extra) repository and it was not required by any packages, not even as an optional dependency.
This was interesting and gave me the idea that perhaps it was of no use getting electron's other version using AUR. So, what I did was to exclude electron from the AUR update.
I entered 4 here to exclude electron from the update
And as I had guessed, rest of the three packages were updated without any issues. I wonder why AUR wanted to get it in the first place.
But your case might not be as smooth as mine and you may actually need to get the electron version it needs. But downloading 30GB of update is surely not the way forward.
Instead of getting the entire source code and then building the binaries from it, you can directly install the binary itself.
So, if it was complaining about elctron32 in my case, I would get the binary in this manner:
yay -S electron32-bin
And as you can see in the image below, it only needed a package of around 100 MB.
I did this for demonstration purpose and since I had an existing electron version from another source, it showed me a potential conflict and asked me to remove the existing electron version.
Once that was done, it installed the electron32-bin package successfully.
Summary
When you are in a situation where AUR is downloading GBs of electron/chromium source code, you should do this:
See if you can exclude electron from the AUR update and the rest goes fine.
Otherwise, install the binary of the required electron version instead of getting the source code.
After Denmark, now the news is that French city Lyon is ditching Microsoft to set up a collaborative office with a few open source software. Now that calls for a 'fest for the luminieries' 😉
This is my favorite article that explains the concept of Linux distributions in an easy to understand way by using an interesting anology. I have shared it a few times in the past newsletters too.
Here's another explainer on sources.list concept in Ubuntu. Although, I have to update it as things have changed with Ubuntu 24.04.
Desktop Linux is mostly neglected by the industry but loved by the community. For the past 13 years, It's FOSS has been helping people use Linux on their personal computers. And we are now facing the existential threat from AI models stealing our content.
If you like what we do and would love to support our work, please become It's FOSS Plus member. It costs $24 a year (less than the cost of a burger meal each month) and you get an ad-free reading experience with the satisfaction of helping the desktop Linux community.
Spotted this new GaN charging station on Kickstarter. The real time visuals on power output is excellent for people who like to keep track of data on all things possible.
✨ Project Highlight
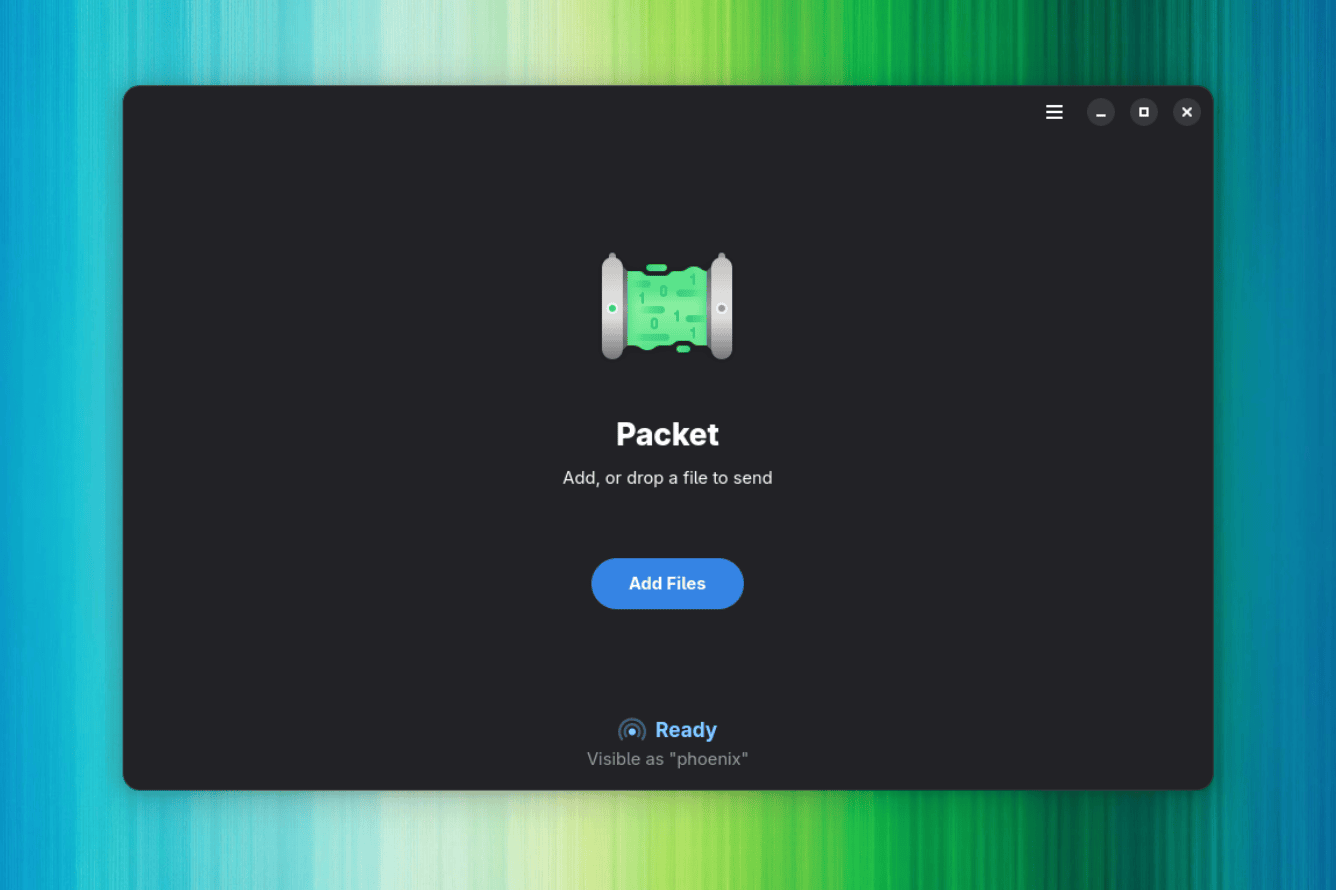
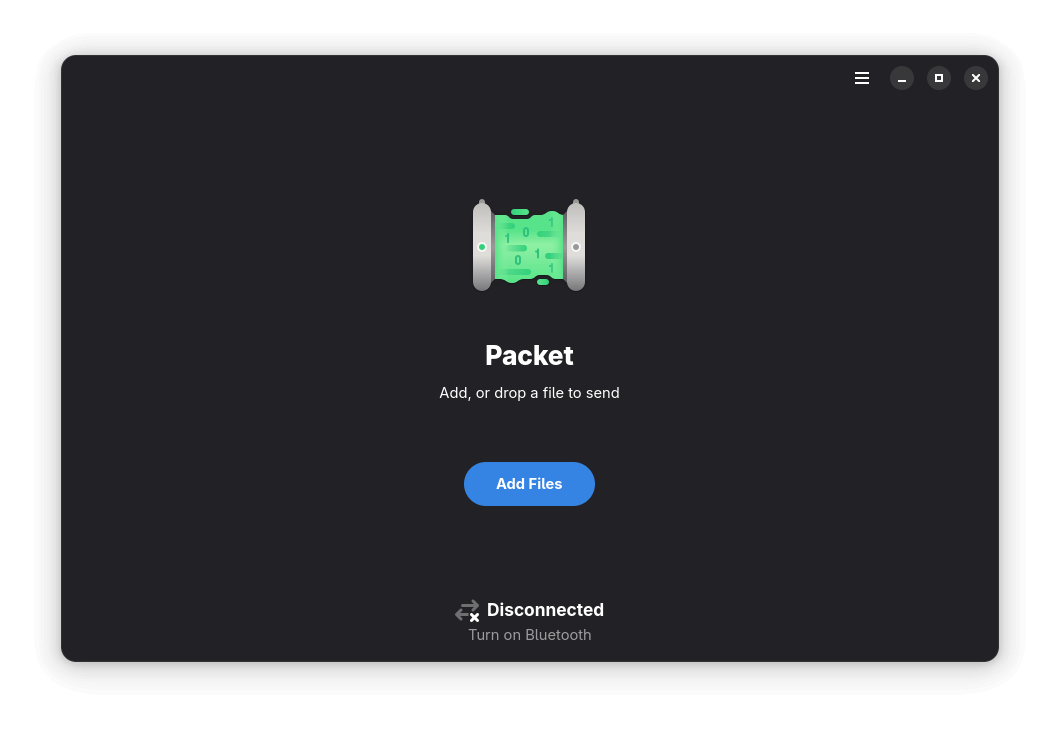
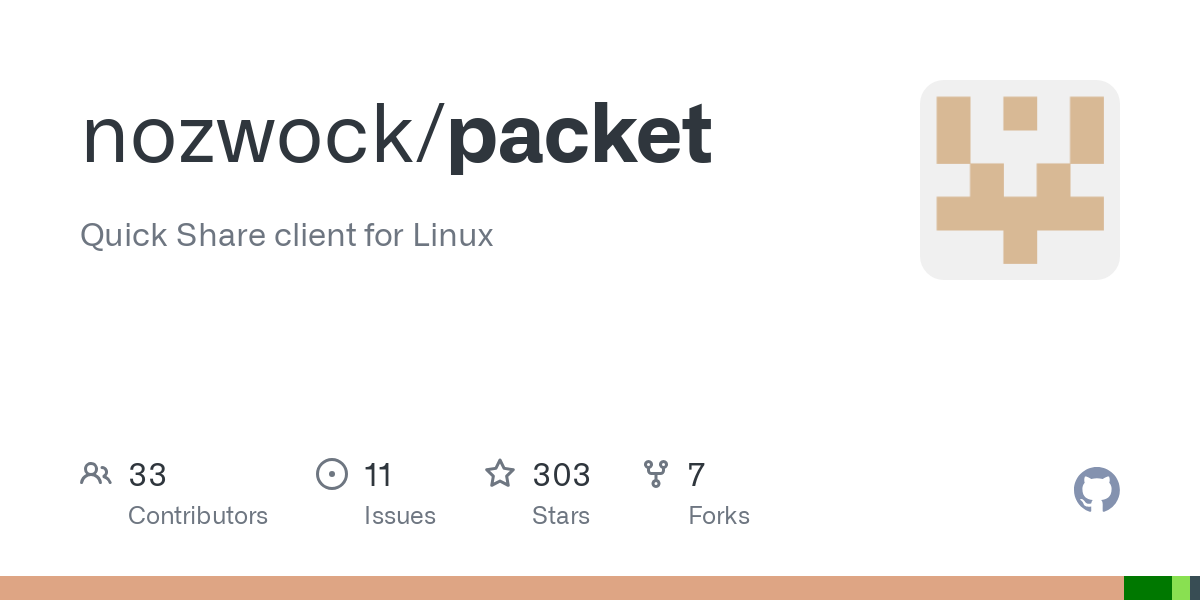
Packet offers a convenient method for wirelessly transferring files between Linux and Android and vice versa.
In Xfce, you can minimize all other windows except the current one. For doing this, right-click on the titlebar and then select "Minimize Other Windows".
🤣 Meme of the Week
🗓️ Tech Trivia
On July 8, 1946, the Moore School of Electrical Engineering at the University of Pennsylvania hosted the first-ever formal lecture series on electronic digital computers. These influential lectures on computer design directly inspired the development of some of the world’s earliest stored-program computers, including the groundbreaking EDSAC.
Most file sharing today takes place through cloud services, but that's not always necessary. Local file transfers are still relevant, letting people send files directly between devices on the same network without involving a nosy middleman (a server, in this case).
Instead of uploading confidential documents on WhatsApp and calling it a day, people could share them directly over their local network. This approach is faster, more private, and more reliable than relying on a third-party server.
Remember, if you value your data, so does Meta. 🕵️♂️
That’s where Packet comes in, offering an easy, secure way to transfer files directly between Linux and Android devices.
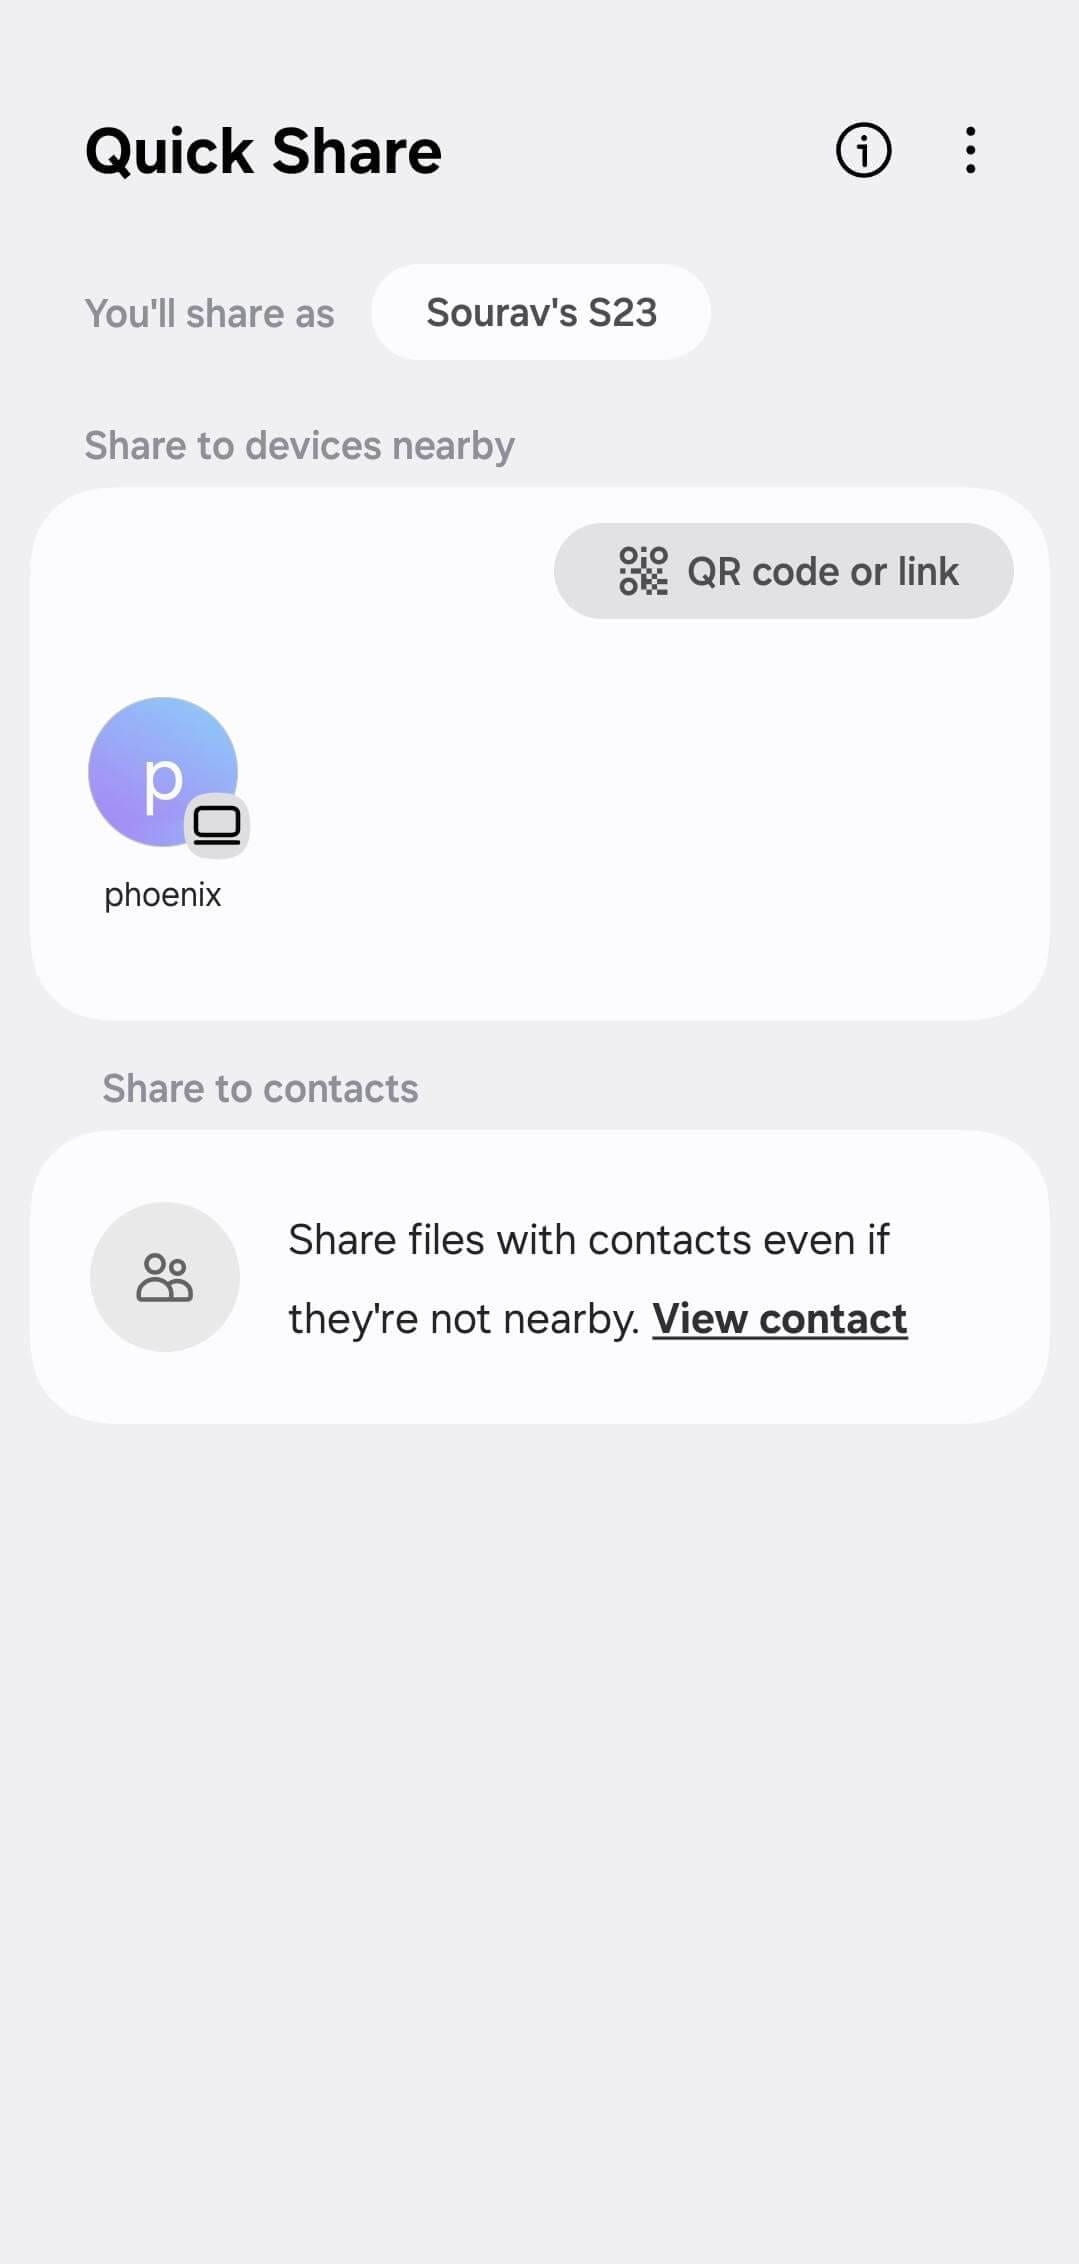
Wireless File Transfers via Quick Share
It is a lightweight, open source app for Linux that makes transferring files effortless. It leverages a partial implementation of Google's Quick Share protocol (proprietary) to enable easy wireless transfers over your local Wi-Fi network (via mDNS) without needing any cables or cloud servers.
In addition to that, Packet supports device discovery via Bluetooth, making it easy to find nearby devices without manual setup. It can also be integrated with GNOME’s Nautilus file manager (Files), allowing you to send files directly from your desktop with a simple right-click (requires additional configuration).
⭐ Key Features
Quick Share Support
Local, Private Transfers
File Transfer Notifications
Nautilus Integration for GNOME
How to Send Files Using Packet?
First things first, you have to download and install the latest release of Packet from Flathub by running this command in your terminal:
flatpak install flathub io.github.nozwock.Packet
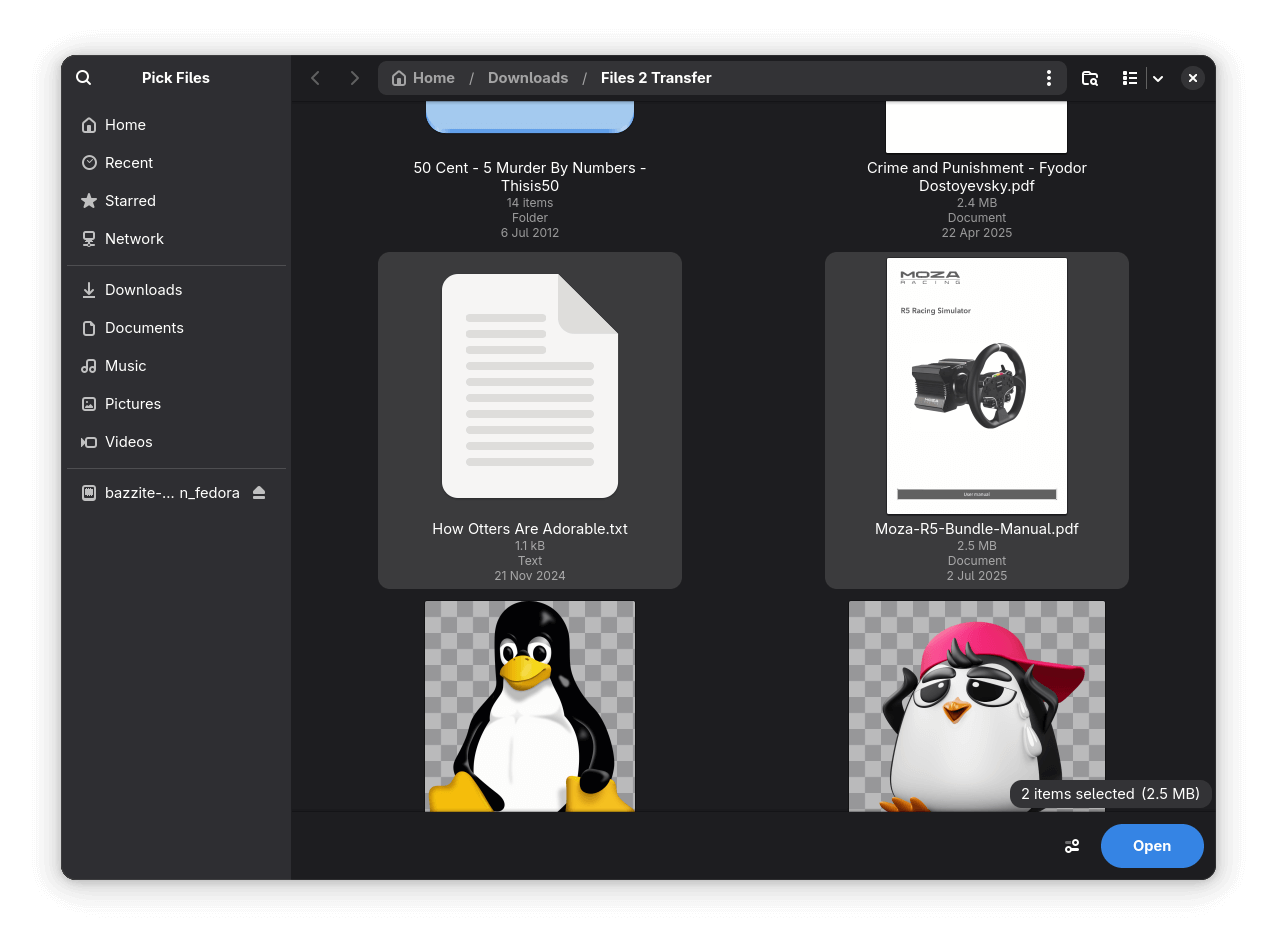
Once launched, sending files from your Linux computer to your Android smartphone is straightforward. Enable Bluetooth on your laptop/computer, then click on the big blue "Add Files" button and select the files you want to send.
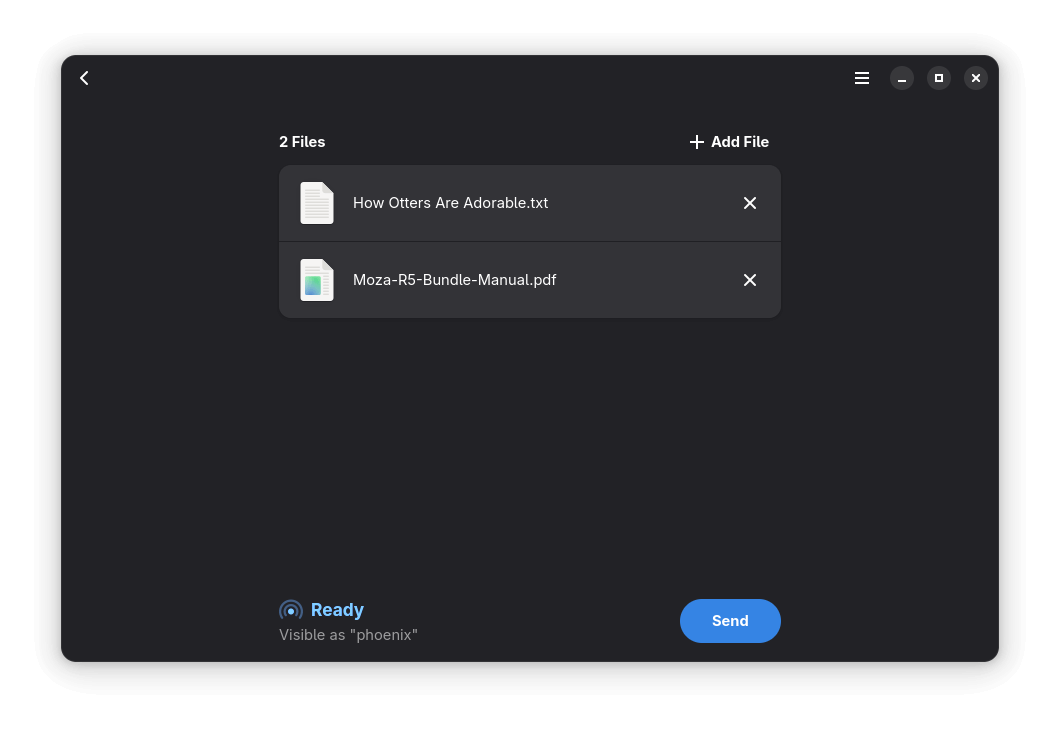
Adding new files for transfer to Packet is easy.
You can also drag and drop files directly into Packet for a quicker sharing experience. If you are looking to transfer a whole folder, it’s best to first compress it into an archive like a TAR or ZIP, then send it through Packet for transmission.
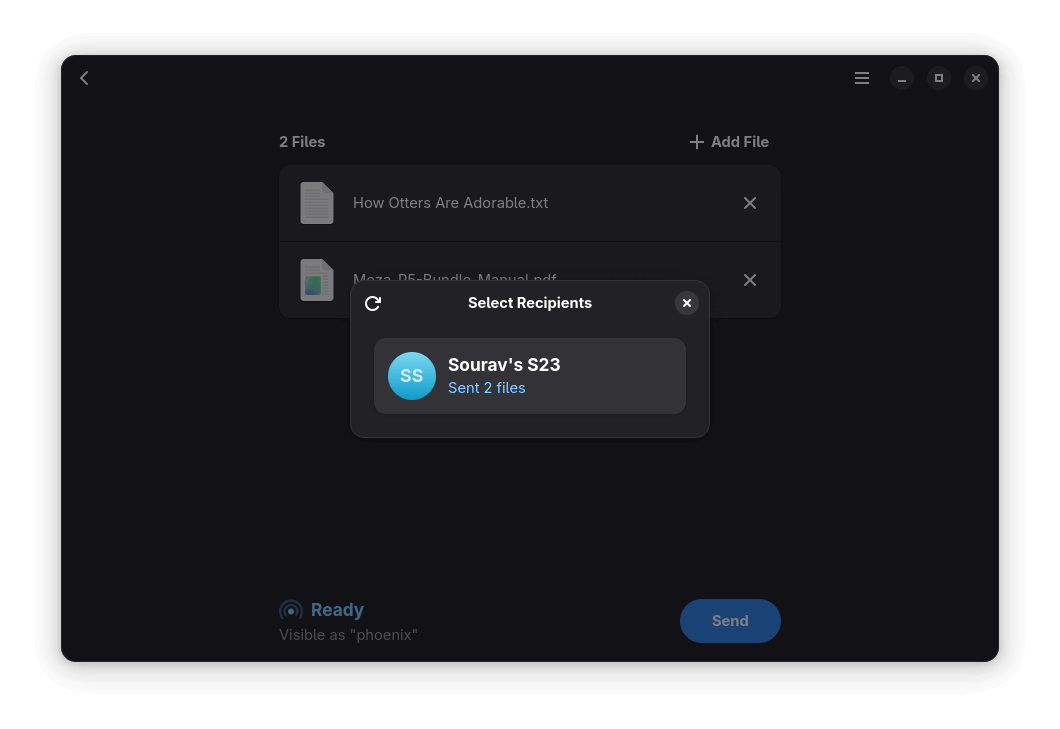
Once you are done choosing files, choose your Android phone from the recipients list and verify the code shown on screen.
File transfers from Linux to Android are lightning fast!
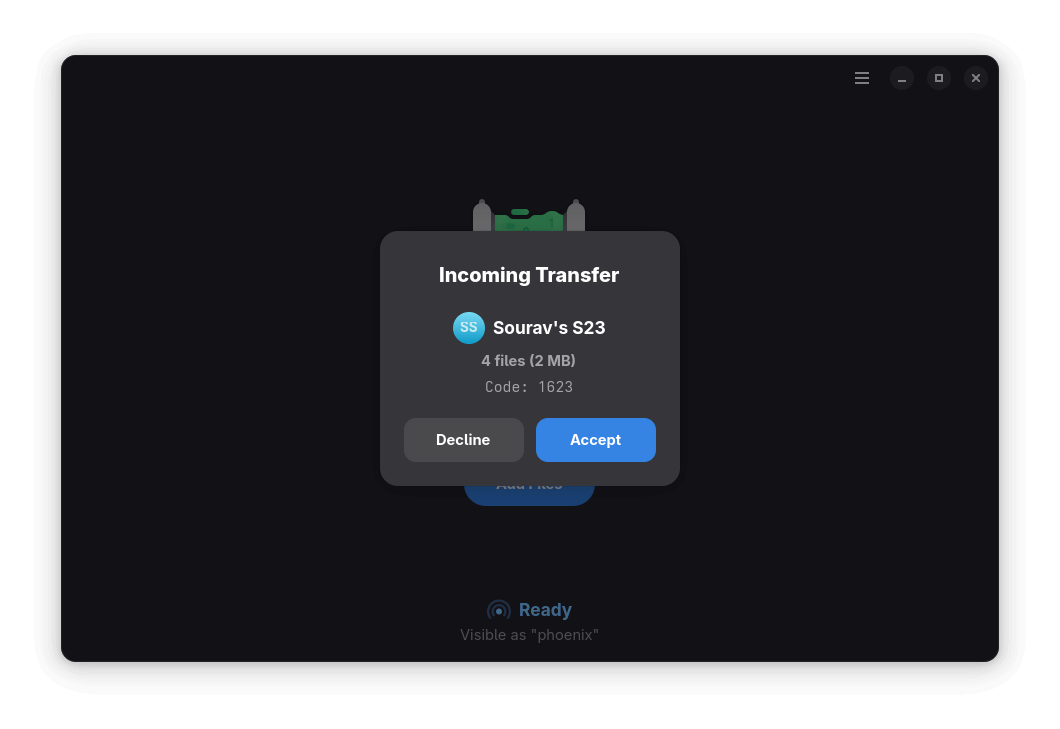
Though, before you do all that, ensure that Quick Share is set up on your smartphone to allow Nearby sharing with everyone. Additionally, take note of your device’s name; this is how it will appear on your Linux machine when sending/receiving files.
When you start the transfer, your smartphone will prompt you to "Accept" or "Decline" the Quick Share request. Only proceed if the PIN or code shown on both devices matches to ensure a secure transfer.
Transferring files the other way around, from Android to Linux, is just as simple. On your Android device, select the files you want to share, tap the "Share" button, and choose "Quick Share". Your Linux computer should appear in the list if Packet is running and your device is discoverable.
File transfers from Android to Linux are the same!
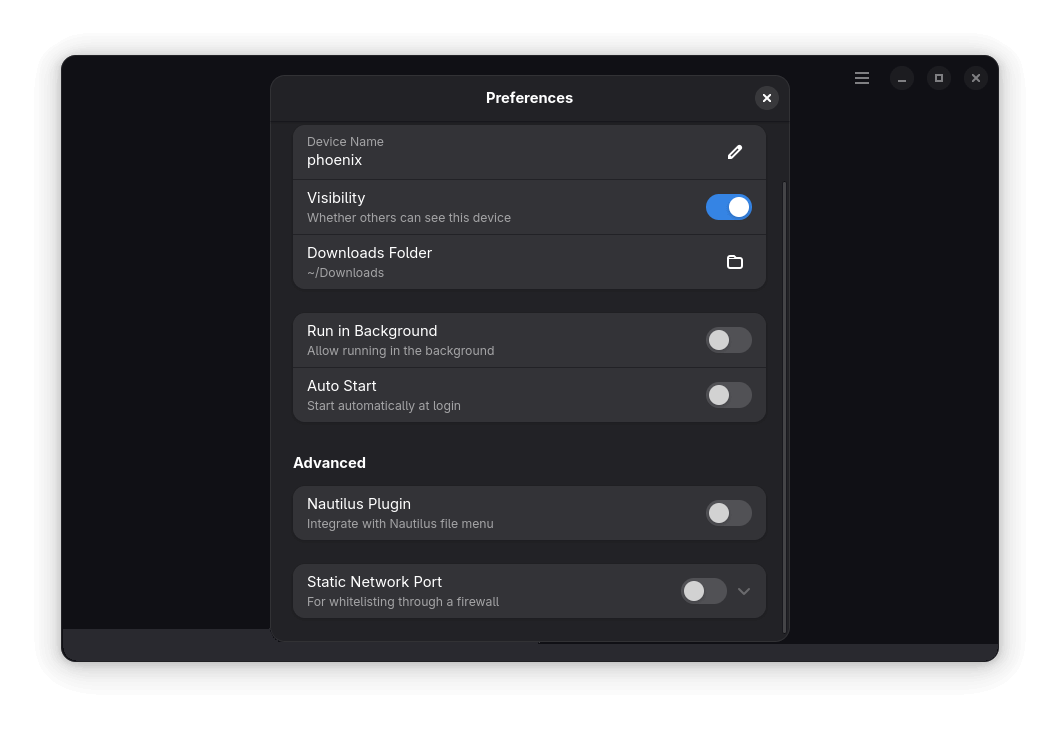
You can change your Linux device’s name from the "Preferences" menu in Packet (accessible via the hamburger menu). This is the name that will show up on your Android device when sharing files.
Packet also shows handy system notifications for file transfers, so you don’t miss a thing.
Packet shows helpful notifications and lets you change a few basic settings.
If you use the GNOME Files app (Nautilus), then there’s an optional plugin that adds a "Send with Packet" option to the right-click menu, making it even easier to share files without opening the app manually.
Overall, Packet feels like a practical tool for local file sharing between devices. It works well across Android and Linux devices, and can do the same for two Linux devices on the same network.
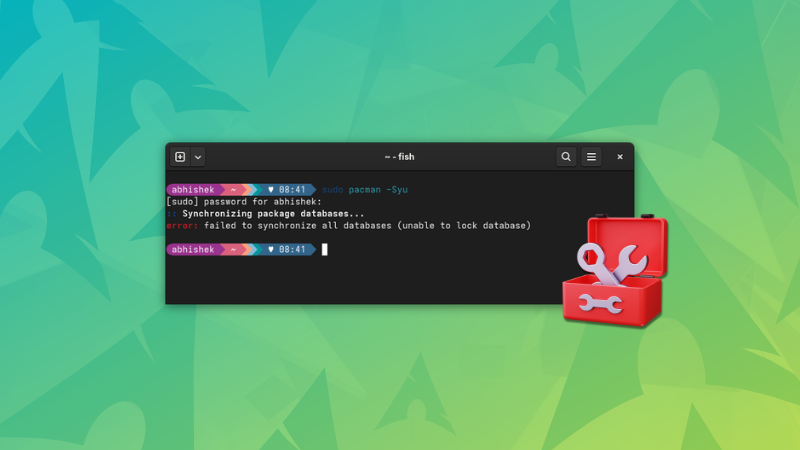
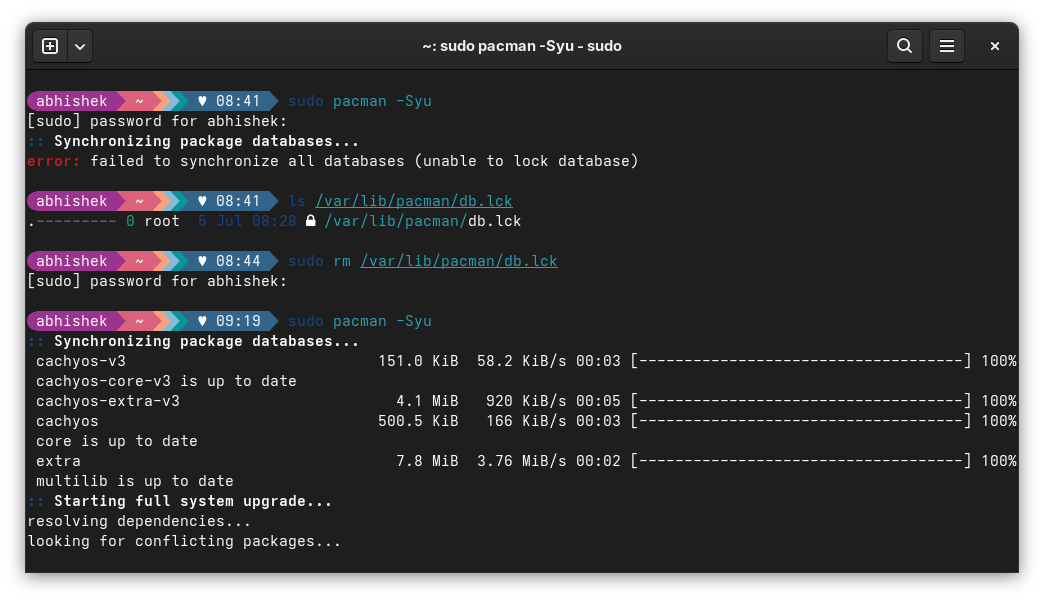
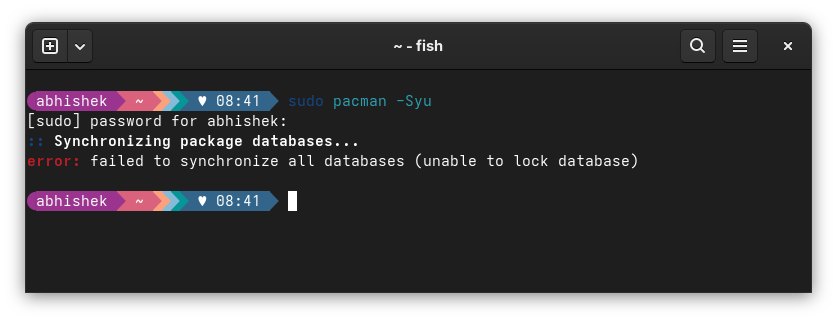
I was trying to update my CachyOS system with in the usual Arch way when I encountered this 'failed to synchronize all databases' error.
sudo pacman -Syu
[sudo] password for abhishek:
:: Synchronizing package databases...
error: failed to synchronize all databases (unable to lock database)
The fix was rather simple. It worked effortlessly for me and I hope it does for you, too.
Handling failed to synchronize all databases error
Check that no other program is using the pacman command:
ps -aux | grep -i pacman
If you see a single line output with grep --color=auto -i pacman at the end, it means that no program other than the grep command you just ran is using pacman.
If you see some other programs, use their process ID to kill them first and then use this command to remove the lock from the database:
sudo rm /var/lib/pacman/db.lck
Once done, you can run the pacman update again to see if things are working smooth or not.
Here's a screenshot of the entire scenario on my CachyOS linux:
That didn't work? Try this
In some rare cases, just removing the database lock might not fix the issue. What you could try is to delete the entire database of the local cache. The next pacman update will take longer as it will download plenty, but it may fix your issue.
sudo rm /var/lib/pacman/sync/*.*
Reason why you see this 'unable to lock databases' error
For the curious few who would like to know why they encountered this failed to synchronize all databases (unable to lock database) error, let me explain.
Pacman commands are just one way to install or update packages on an Arch-based system. There could be Pamac or some other tool like KDE Discover with their respective PackageKit plugins or some other instances of pacman running in another terminal.
Two processes trying to modify the system package database at the same time could be problematic. This is why the built-in security mechanism in Arch locks the database by creating the /var/lib/pacman/db.lck.
This is an indication to let pacman know that some program is using the package database. Once the program finishes up successfully, this lock file is deleted automatically.
In some cases, this lock file might not be deleted. For instance, when you turn off your system when pacman command was already running in a terminal. This is what happened in my case. I ran the pacman -Syu command and it was waiting for my Y to start installing the updates. I got distracted and forced turn the system off. On the next boot, I encountered this error when I tried updating the system.
This is also the reason why you should check if some other program might be using pacman underneath. Force removing the lock file when there is an active program using the database is not a good idea.
In some rare cases, the lock file removal alone won't fix the issue. You may have to delete the local database cache. This happens when the local database of package is corrupted. This is what I mentioned in the earlier section.
Did it fix the issue for you?
Now that you know the root cause of the issue and the ways of fixing it, let me know if the fix I shared with you here worked for you or not.
If it did, drop a quick “Thank You”. That is a motivation booster.
And if it didn't, I might try helping you further.
And we achieved the goal of 75 new lifetime members. Thank you for that 🙏🙏
I think I have activated it for everyone, even for members who didn't explicitly notify me after the payment. But if anyone is still left out, just send me an email.
Desktop Linux is mostly neglected by the industry but loved by the community. For the past 13 years, It's FOSS has been helping people use Linux on their personal computers. And we are now facing the existential threat from AI models stealing our content.
If you like what we do and would love to support our work, please become It's FOSS Plus member. It costs $24 a year (less than the cost of a burger meal each month) and you get an ad-free reading experience with the satisfaction of helping the desktop Linux community.
I have received the Pironman Max case for review and have assembled it too. I am looking forward to having a RAID setup for fun on it. I'll keep you posted if I made it or not 😄
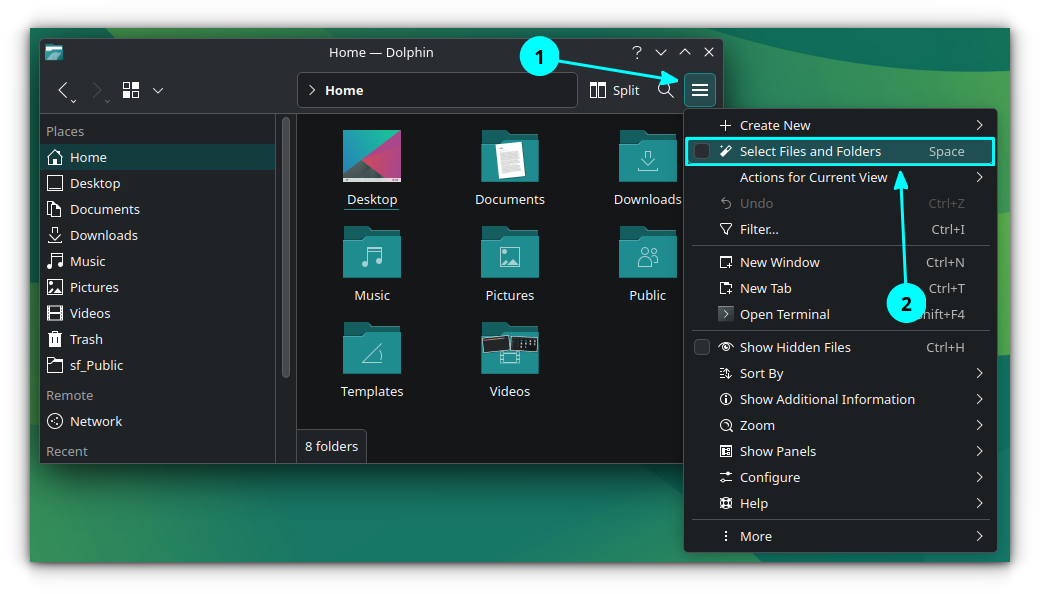
The Dolphin file manager offers you a selection mode. To activate it, press the Space bar.
In this view, you can single click on a file/folder to select them. Here, you will notice that a quick access bar appears at the bottom when you select items, offering actions like Copy, Cut, Rename, Move to Trash, etc.
🤣 Meme of the Week
🗓️ Tech Trivia
The IBM 650, introduced on July 2, 1953, was one of the first widely used computers, featuring a magnetic drum for storage and using punch cards for programming. With a memory capacity of 20,000 decimal digits, it became a workhorse for businesses and universities throughout the 1950s.
Retro techs are no longer stranger things. Just like vinyl records and vintage fashion, retro computing has captured our collective imagination, irrespective of the age group.
I mean, there's something deeply satisfying about amber-on-black terminals and chunky pixel fonts that modern UIs can't replicate.
The good thing here is that us Linux users are perfectly positioned to embrace this nostalgia wave.
No, I am not talking about those ultra-lightweight distros that involuntarily give retro vibes of late 90s and early 2000s. I am going to share a few interesting software that will help you get the retro feel on your modern Linux system.
1. Cool Retro Term
I'll start with my favorite, that is also a functional tool.
cool-retro-term is a terminal emulator which mimics the look and feel of the old cathode tube screens. That's just about it. You do not get any special abilities, just the good-old look.
But here's the thing. You can use it like your regular terminal, it have vintage looks but the modern features still work the same.
There are more than one presets of colors and style available.
Cool Retro Term
Installing Cool Retro Term
You can install it on Ubuntu, Fedora, and Arch Linux using the commands respectively:
RSC8 is a CHIP-8 virtual machine/emulator written in Rust with no_std core. It is yet another makeover for your terminal. So, if you like to use a retro terminal but built with Rust, give this a try.
RetroPie transforms your Raspberry Pi, ODroid C1/C2, or PC into a nostalgic gaming powerhouse.
It leverages platforms like Raspbian, EmulationStation, RetroArch, and other innovative projects, allowing you to enjoy classic Arcade, home-console, and vintage PC games with minimal hassle.
RetroPie Walkthrough
Since there were multiple kinds of platforms/consoles in the past, there are different emulators for them.
But that's only half of the story. You also need to download ROMs that consist of games of that platform.
For example, if you want to play games that were available Nintendo's NES console, you download the ROM with NES games and then use the NES emulator in RetroPi to load this ROM. It's like inserting a virtual disk.
The problem here is that these ROMs are often deemed illegal to distribute, and hence the websites that host them are often removed.
Playing Super Mario World in RetroPie
Installing RetroPi
Please ensure that you have git installed on your system as you'll have to clone the Git repo here.
cd
git clone --depth=1 https://github.com/RetroPie/RetroPie-Setup.git
Run the setup script:
cd RetroPie-Setup
sudo ./retropie_setup.sh
Follow the onscreen instructions for a basic installation.
Linux enables users to have a godly amount of customization options. Whether you want your desktop to look clean, and contemporary, or you want to give it a retro look, there are certainly a few tools for that.
Come to think of, I should do a tutorial on how to give a retro makeover to your Linux distro, somewhat like the modern makeover video of Linux Mint.
Linux makes it easy to bring the retro vibe back to life. Whether it’s an old-school terminal, a full-blown vintage desktop, or classic games from the 90s, there’s a tool for every kind of nostalgia.
What is your favorite tool that we missed listing here? Let me know in the comments below.
In an interesting turn of events, Linus Torvalds and Bill Gates meet each other for the first time at a dinner invite. What would have they talked about? Any guesses?
This photo also made me realize how quickly Torvalds has aged in the past few years 😔
We have 71 new lifetime members, just 4 short of our original target of 75. Would you help us achieve this? To recall, you get the lifetime Plus membership option with a reduced pricing of $76 instead of the usual $99 along with a free Linux command line eBook. If you ever wanted to support us with Plus membership but didn't like the recurring subscription, this is the best time for that 😃
Desktop Linux is mostly neglected by the industry but loved by the community. For the past 13 years, It's FOSS has been helping people use Linux on their personal computers. And we are now facing the existential threat from AI models stealing our content.
If you like what we do and would love to support our work, please become It's FOSS Plus member. It costs $24 a year (less than the cost of a burger meal each month) and you get an ad-free reading experience with the satisfaction of helping the desktop Linux community.
Spotted this 'glow bot' smart AI assistant on Kickstarter. A cool desk companion with a futuristic vibe, only if you have money to spare. It is not open source. I hope someone starts a similar open source project soon, as this is an interesting concept to have customized pixel animation that reacts according to interaction.
✨ Project Highlight
Don't like Cursor's proprietary nature? You can try Void instead.
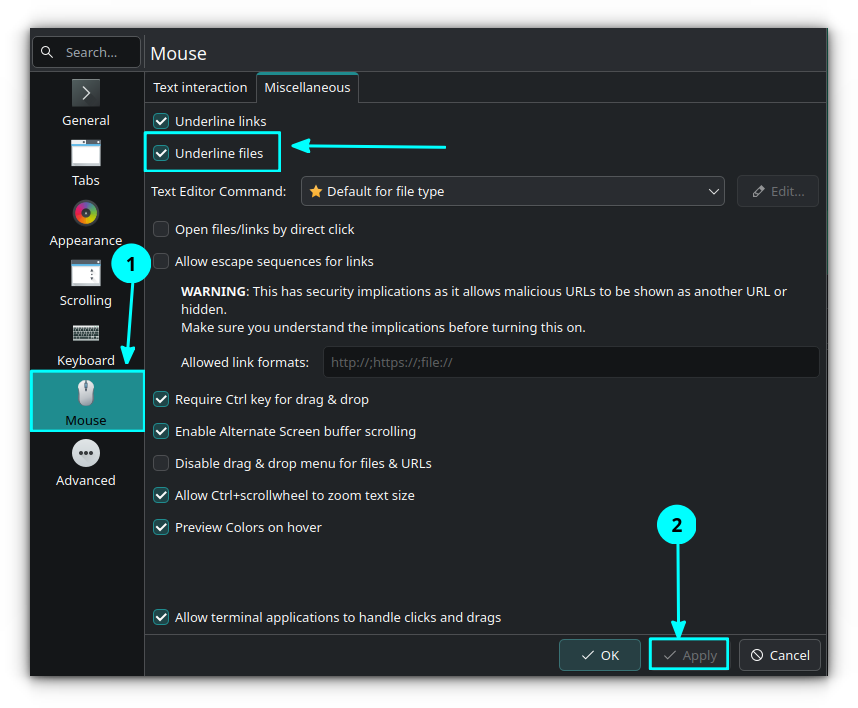
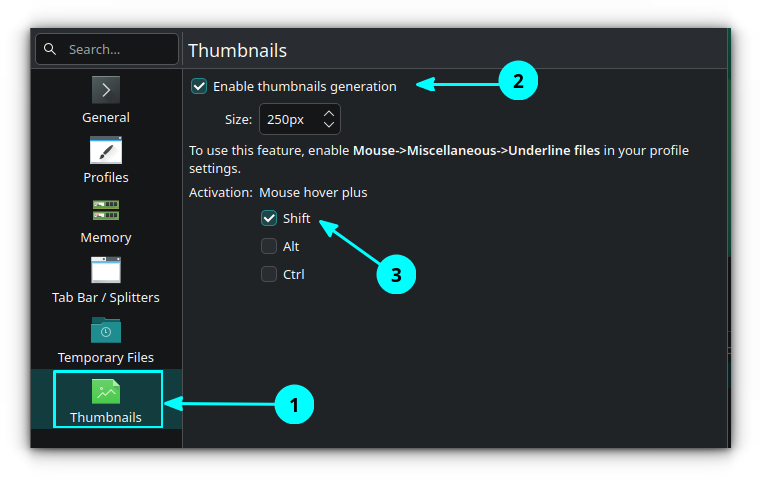
In the Konsole, you can view file thumbnails. To accomplish this, first enable "Underline files" in a profile you use in Konsole via Menu → Settings → Configure Konsole → Profiles → Your Profile → Edit → Mouse → Miscellaneous → Underline files.
Now, perform Menu → Settings → Configure Konsole → Thumbnails → Enable thumbnails generation. Also, set an activation key to hold while hovering your cursor, I used the Shift key to demonstrate below.
That's it. Now, when you press Shift and hover your mouse over a file, a thumbnail will appear!
🤣 Meme of the Week
I feel like a mentor 👨🏫
🗓️ Tech Trivia
Microsoft was incorporated on June 25, 1981, in the state of Washington, following its founding by Bill Gates and Paul Allen in 1975.
If you’re a Linux user, you might have found yourself tangled in boot issues while installing your favorite distro especially if "Secure Boot is" in the picture.
Secure Boot is meant to add an extra layer of protection to our systems, preventing unverified software from running at boot. Sounds like a win, right?
Well, not always. For Linux users, Secure Boot can often feel like more of a hassle than a help, leading to issues, failed installations, and troubleshooting headaches.
Take, for instance, the Ubuntu 21.04 release fiasco, where the latest shim files (used to enable Secure Boot on Linux) had compatibility issues with early EFI firmware, causing some users’ systems to become unbootable after an upgrade.
Ubuntu eventually released a fix, but not before many users found themselves troubleshooting or even downgrading to older shims just to get their systems to boot.
But what exactly is Secure Boot, how do shim files play a role, and when should you consider disabling it?
In this guide, I’ll break down Secure Boot in simple terms and explain how it affects Linux installations, including what you can do if it gets in the way.
What is Secure Boot?
Imagine your computer as a castle with a strong gatekeeper who checks the ID of anyone trying to enter.
Secure Boot is like that gatekeeper, making sure only trusted, safe programs get to run during the initial phase of starting up your computer, also known as the What are Secure Boot & Shim Files?boot process.
Secure Boot is a security standard developed to keep your computer safe from malware that could sneak in and start doing harmful things even before the operating system (OS) fully loads.
It is part of what's called the Unified Extensible Firmware Interface (UEFI), which replaced the older BIOS system. UEFI is a modern way for your computer to boot up and check everything is working as expected.
When Secure Boot is turned on, your computer will only load software/operating system with a special signature or “stamp” of approval.
If something without this signature tries to load, Secure Boot stops it, protecting your computer from potential harm.
How does Secure Boot work?
Secure Boot uses a chain of trust with different types of cryptographic keys (think of them as digital ID cards) to verify each step of the boot process. Here’s a simple breakdown:
Platform Key (PK): This is like the master key, usually held by the device maker (like Dell, HP, etc.). It’s the root of the verification process.
Key Exchange Key (KEK): This key confirms whether other keys can be trusted, acting as a bridge between the platform key and bootloaders.
Allowed Database (DB): Contains a list of approved signatures for software that’s allowed to load.
Forbidden Database (DBX): Stores signatures of known, unsafe programs. If something tries to load from this list, Secure Boot blocks it.
During startup, Secure Boot checks each program that tries to load against these keys and databases. Only programs that have valid, signed keys will run, making sure your system stays secure.
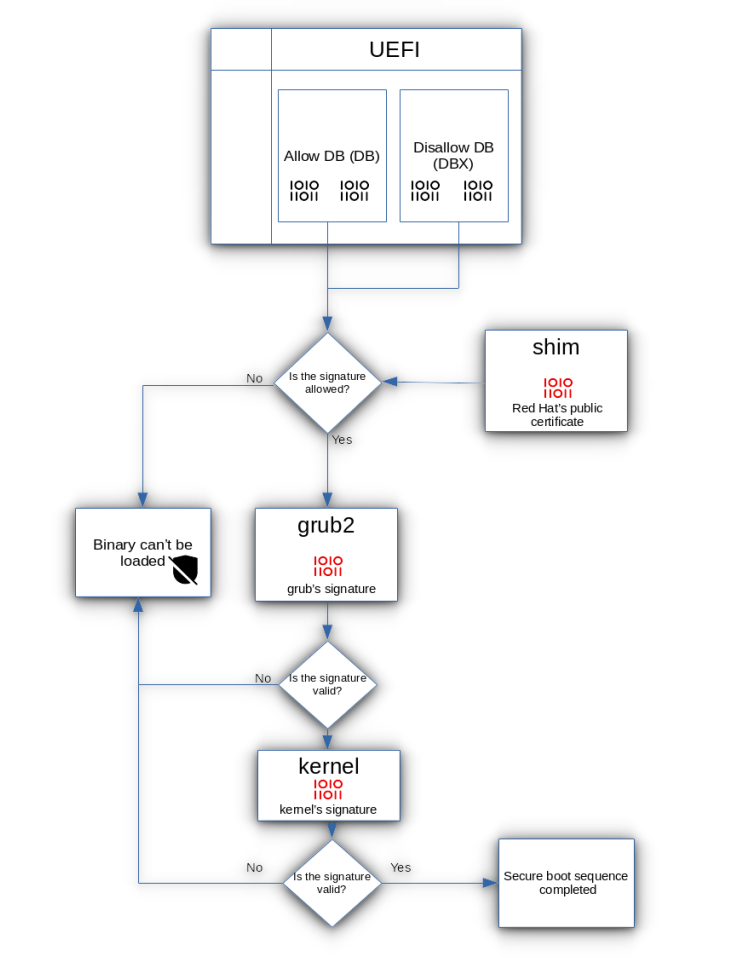
Now, let’s say you’re trying to run Linux on a Secure Boot-enabled computer. Linux doesn’t always have the same pre-approved signatures as Windows, so that’s where Shim files come in.
A Shim is a small program that acts like a translator between Secure Boot and the Linux OS. The Shim file is signed with a key that Secure Boot recognizes (often by Microsoft), so it’s allowed to load.
The Shim then verifies the signature of the Linux bootloader (like GRUB) and passes control to it if everything checks out.
This process creates a “chain of trust” from Secure Boot to Linux, so the OS can load securely even on a Secure Boot-enabled system.
Why Secure Boot is important?
Secure Boot is crucial because it provides a defense against one of the most dangerous kinds of malware: bootkits and rootkits.
These are malicious programs that try to hide themselves in the boot process, allowing them to run before the OS is fully up and running. They can be hard to detect and even harder to remove.
With Secure Boot:
Bootkits and rootkits are blocked from loading by the signature check.
Tampered or unauthorized programs are prevented from affecting the boot process.
Users are alerted if something is wrong, so they can address potential issues before they become serious problems.
When you might need to disable Secure Boot
Secure Boot is great for security, but there are times when it can cause issues:
Installing unsigned operating systems: Some operating systems, especially certain Linux distributions, may not have the required signatures to pass Secure Boot verification. If your OS isn’t recognized, Secure Boot will prevent it from loading.
Using custom drivers or bootloaders: Certain drivers or bootloaders might not be signed, which can cause compatibility issues.
Advanced Configurations: For power users who want to customize their systems, Secure Boot’s restrictions can feel limiting. Disabling it allows for greater flexibility, especially in homelab or development environments.
However, turning off Secure Boot also removes that extra layer of security, so it’s essential to proceed carefully.
Which distros support Secure Boot?
While Secure Boot has posed compatibility challenges for Linux, many popular distributions have adapted to work smoothly with it.
These distros include signed bootloaders and shim binaries that allow them to run without issues on systems with Secure Boot enabled.
Most major Linux distributions now support Secure Boot. I can think of these at least:
Ubuntu
Fedora
openSUSE/SUSE
Zorin
Linux Mint
Debian
Red Hat
🚧
This is not an extensive list of all distros with secure boot support. There are many more distros out there that support secure boot. Please check their official websites for information.
Not all distributions offer Secure Boot support, so it’s worth verifying before installation if you plan to keep Secure Boot enabled.
For distros that don’t support Secure Boot directly, you can still disable it in the BIOS settings or manually add a trusted bootloader, though it requires some technical knowledge.
How to disable Secure Boot (and why you should be careful)
Disabling Secure Boot makes your system more vulnerable to boot-level attacks. Ensure that you have other security measures in place, like keeping your OS up-to-date and using antivirus software.
Restart your computer and enter the UEFI/BIOS settings (this usually involves pressing a key like F2, F10, or DEL during startup).
Find the Secure Boot option: In the settings, look for “Secure Boot” under Security or Boot options.
Disable Secure Boot: Set it to “Disabled.” Be sure to save changes and exit.
The discourse around Secure Boot is polarizing, and for good reason.
While it’s designed to enhance system security, it often imposes limitations on Linux users, especially those who rely on proprietary drivers or use less mainstream distributions.
The need for Microsoft-signed shims raises valid concerns about vendor lock-in and compatibility.
In my experience, especially with a dedicated graphics card on my gaming laptop, keeping Secure Boot off is almost a necessity.
With Secure Boot enabled, proprietary drivers tend to fail during installation, as I’ve seen firsthand on Pop!_OS. It’s a compromise I choose for compatibility, though it shouldn’t have to be this way.
This article is for those interested in understanding Secure Boot’s quirks and why your favorite distro might not boot up smoothly.
The debate is nuanced: is it a crucial security layer or an unnecessary barrier for Linux users? I’d love to hear where you stand on this discourse, let me know in the comments!
The omnipresent top command is often the first tool that comes to mind for system resource monitoring in the Linux command line.
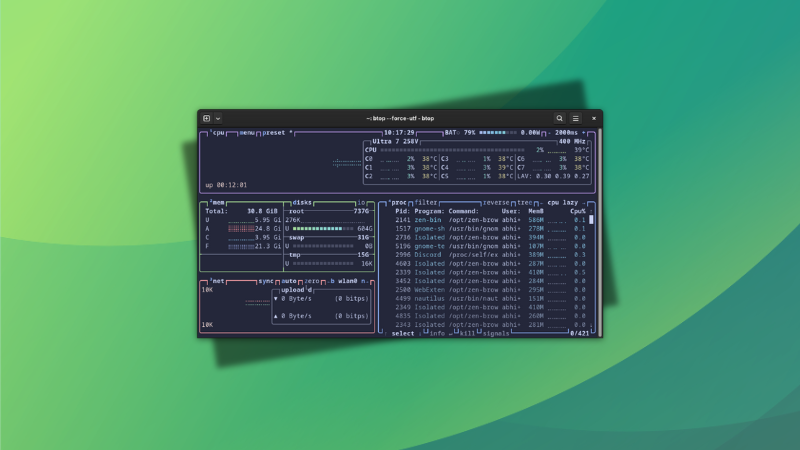
Btop++ is a similar Linux system monitoring tool that shows usage statistics for processor, memory, disk, network, and processes.
It is a C++ variant of the popular bashtop from the same developer. In fact, the developer states that Btop++ is a continuation of bashtop and bpytop.
What makes Btop++ interesting
0:00
/0:10
Btop++ default
Here are a few things that make btop++ a better choice than the top command:
Full mouse support, with clicks and scrolling
Function for showing detailed stats for selected process.
Fast, easy to use user interface.
Ability to filter processes.
Shows IO activity and speeds for disks.
Installation
Btop++ is available in the official repositories of most Linux distributions.
In Ubuntu 22.04 and above, you can use the following command to install it:
sudo apt install btop
If you are using Fedora, here is the command for you:
sudo dnf install btop
And, for Arch Linux users, you can use this:
sudo pacman -Syu btop
🪛 Troubleshooting tip: No UTF-8 locale detected
When I first ran btop++ on an Arch Linux system, I encountered a "No UTF-8 locale detected" error.
ERROR: No UTF-8 locale detected!
Use --force-utf argument to force start if you're sure your terminal can handle it.
To solve this, either run:
btop --force-utf
Or, edit your ~/.bashrc file to add the following line and fix it permanently:
export LANG=en_US.UTF-8
Running btop++
To run btop++, open a terminal and run the command:
btop
In desktops like GNOME, there will be a menu entry for btop++ as well.
Explore btop++ interface
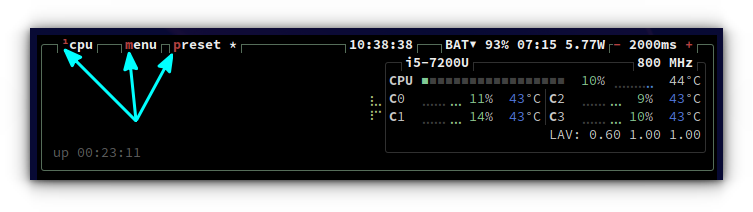
While running it, you can see that several letters appearing in the title portions of the interface appear in a different color.
Special Colours for Characters
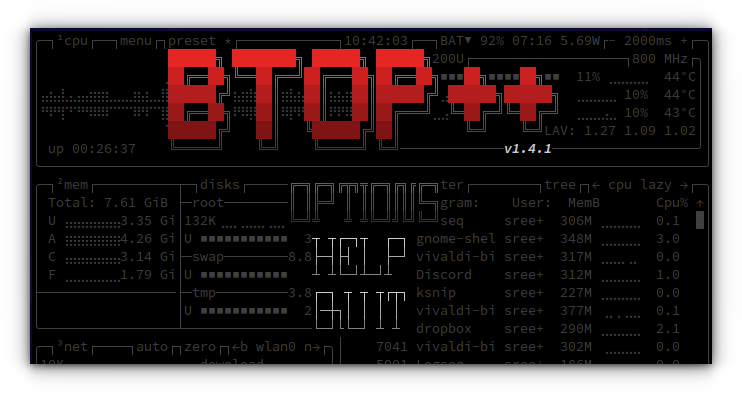
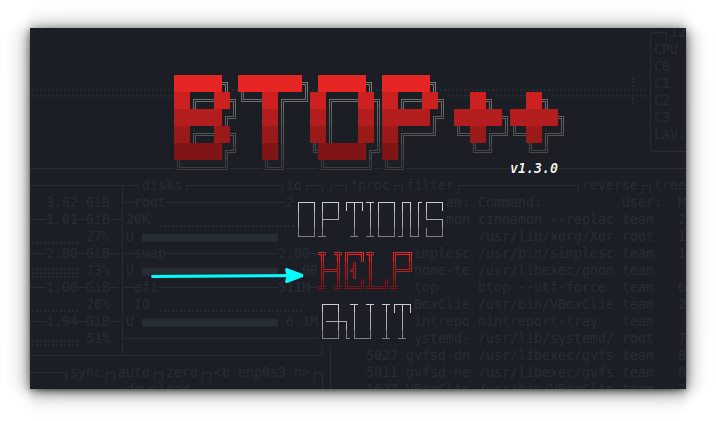
You can press these keys on the keyboard to access the related settings. For example, pressing the m key in the above screenshot will bring a menu screen.
Btop++ Menu
Here, hover over Options and press enter. This will bring up the GUI Settings dialog for btop++.
Btop++ settings
Navigate through the settings using the arrow keys and highlighted characters. The above video shows some settings changes using this btop++ menu.
📋
To keep things simpler, Btop++ is also referred to as Btop at times.
Some essential Btop functions
In this section, we will take a look at a couple of important usage of Btop as a system monitor and process manager.
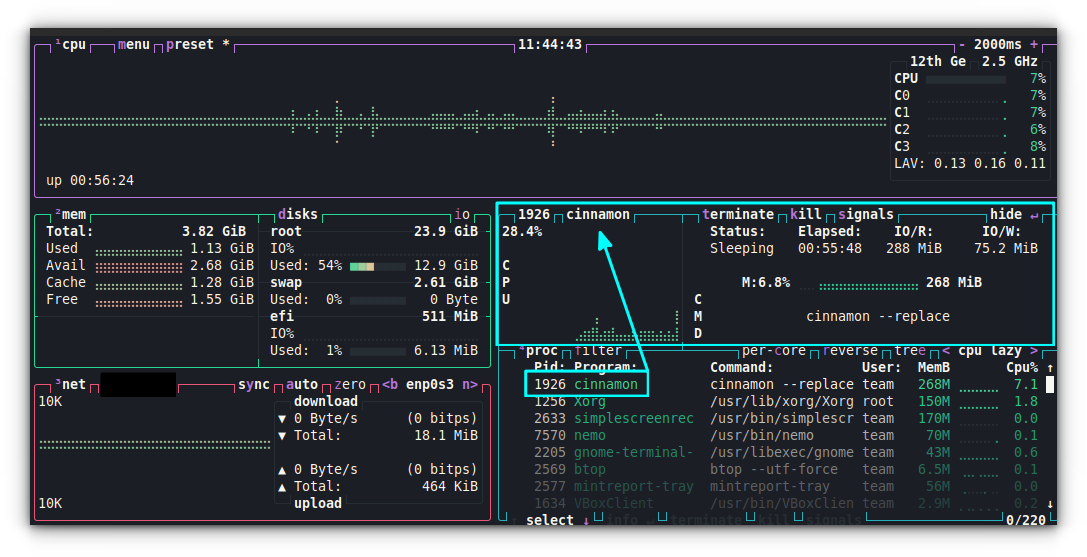
Terminate a process
While you are in Btop, press the down or up arrow key to move through the list of processes. When you are above a process you want to terminate, press the t key on your keyboard.
Terminate a process
Get more details for a process
You can press the enter key on top of a process to open it in a separate section. This will then give more insight about that process like status, CPU, elapsed time, etc.
Process details
Send more signals
If you want to send a different signal to a process, Btop can do that as well. Hover over a process and press the s key on your keyboard.
From the list of signal, enter a number. That's it!
Send more signals
Configuring Btop++
All options in btop++ are configurable via the TUI menu. Still, btop++ provides a text-based configuration file as well.
You can find this autogenerated config file at ~/.config/btop/btop.conf.
You'll may come across some themes that are specifically created for btop++. For example, I am a fan of Catppuccin theme these days and I was glad to see a btop theme in this color palette.
Here's what you should do for changing the theme. Get the .theme files. For Catppuccin, go to their release page and grab the latest themes.tar.gz file.
Extract it and you'll see four variants of the theme. Either copy all of them or the one of your choice (you can see what it looks like on the GitHub repo) to ~/.config/btop/themes folder.
Next, edit the file ~/.config/btop/btop.conf and change the color_theme = "Default" line to:
color_theme = "catppuccin_macchiato"
The above will change the theme to Catppuccin Macchiato.
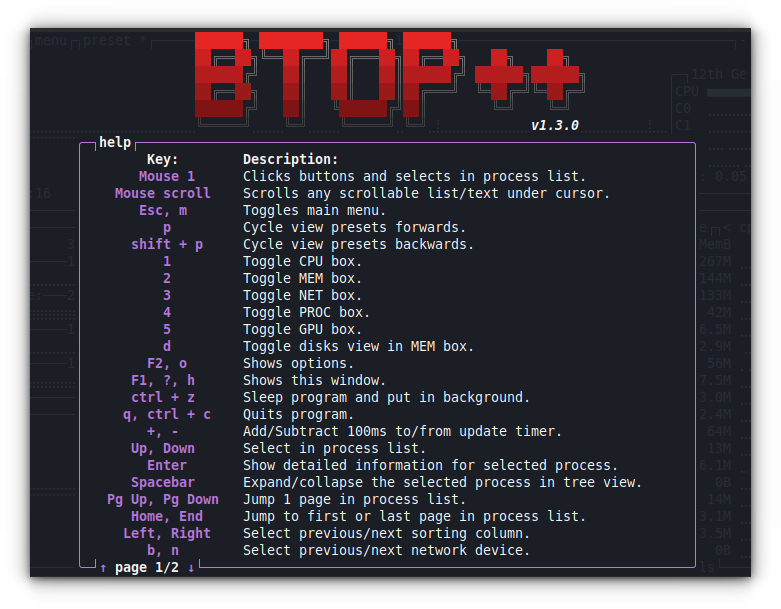
Getting help
The best way to get help in btop is by using its TUI menu. While running btop, press the ESC key.
Now, from the list, select HELP.
Select HELP
This will print the help window with necessary keys and their functions.
Help screen
Wrapping Up
For many Linux users, htop is the better top. However, Btop++ is a pretty nice system monitor too. If you do not like to use GUI resource monitors, and want something fast, this is a nice option to have. Alternatively, you may also explore glances.
You probably have noticed a lack of new articles this week. And there is a 'good' reason for that. I have been busy with the arrival of my second child 🚼
That is also the reason why there was a slight delay in lifetime membership activation. But it's done for all the 43 new members so far (of the set goal of 75 new lifetime members).
Things are getting back on the track as the mother and baby duo have been discharged from the hospital. You should start seeing more tutorials, I promise 😸
The 13th anniversary offer is still going on. You get the lifetime membership option with reduced pricing of $76 instead of the usual $99 along with a Linux command line eBook. If you ever wanted to support us with Plus membership but didn't like the recurring subscription, this is the best time for that 😃
Desktop Linux is mostly neglected by the industry but loved by the community. For the past 13 years, It's FOSS has been helping people use Linux on their personal computers. And we are now facing the existential threat from AI models stealing our content.
If you like what we do and would love to support our work, please become It's FOSS Plus member. It costs $24 a year (less than the cost of a burger meal each month) and you get an ad-free reading experience with the satisfaction of helping the desktop Linux community.
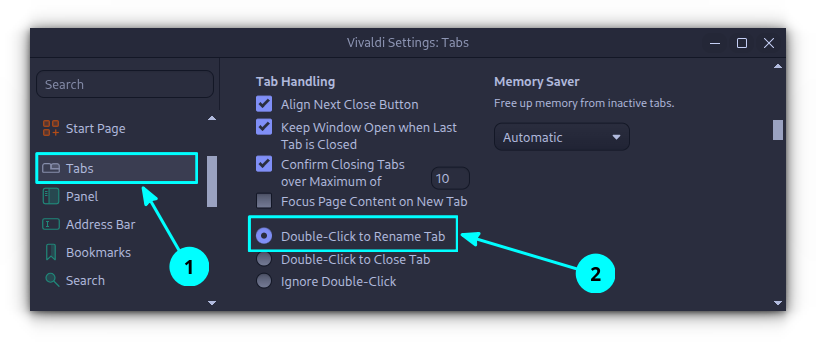
If you are using Vivaldi, you can rename tabs by simply double-clicking on the tab title and entering a name. Before doing that, ensure that double-click tab rename is enabled in the settings.
Open Settings and go to the Tabs section. Here, check whether the double-click action is set to "Rename tab".
This is useful when the tab names are taking up too much space, this way, you can give a nickname to easily identify the tab.
It was created on 14th June, 2012 as a personal notebook where I shared my Linux discoveries. I didn't know that it will become a force to reckon with, a place to look up to for suggestions and advice on using Linux.
In the 13 years, it's been viewed over 200 million times and formed a community of hundreds of thousands of Linux lovers from all parts of the world, with the US, Germany, Russia, UK and India taking the top 5 spots.
I would like this opportunity to express my gratitude to all of you for your continued support 🙏 We shall continue to grow together and help the growth of the Linux community and open source software movement 💪
As a token of appreciation, I would like to unveil the new It's FOSS Plus website. This portal organizes the existing resources from the main website into course format which can be enjoyed by our paid members. Thank you for supporting us.
To celebrate 13 years of It's FOSS, I have brought back the lifetime membership option with reduced pricing of $76 instead of the usual $99. If you ever wanted to support us with Plus membership but didn't like the recurring subscription, this is your chance 😃
Desktop Linux is mostly neglected by the industry but loved by the community. For the past 12 years, It's FOSS has been helping people use Linux on their personal computers. And we are now facing the existential threat from AI models stealing our content.
If you like what we do and would love to support our work, please become It's FOSS Plus member. It costs $24 a year (less than the cost of a burger meal each month) and you get an ad-free reading experience with the satisfaction of helping the desktop Linux community.
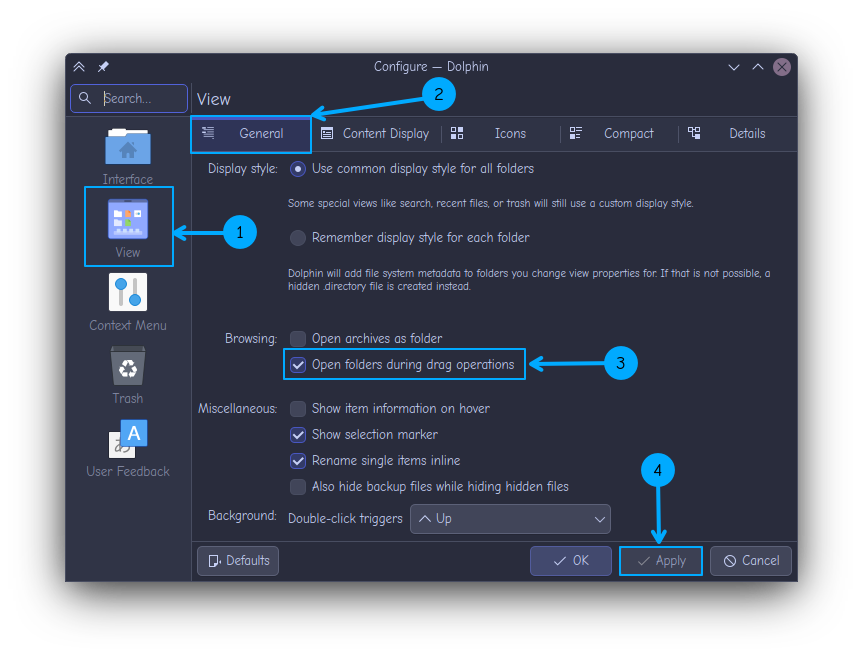
In the Dolphin file manager, you can open a folder while dragging a file to it. This is helpful if you want to drag and drop a file into a nested folder arrangement. To enable this, click on the Top-right Hamburger menu ⇾ Configure ⇾ Configure Dolphin.
Here, go to the View section, select the General tab and toggle the Open folders during drag operations checkbox.
Now, you can open a folder by dragging files and hovering them over it.
🤣 Meme of the Week
An unbreakable bond! 🫂
🗓️ Tech Trivia
On June 10, 1977, Apple began shipping the Apple II, a home computer that quickly became a hit, especially in schools, thanks to its user-friendly design and color graphics.
The bare Raspberry Pi board has a different appeal but I prefer keeping my Pis under cover, in protective cases.
Now, there are tons of interesting cases available. You can also build your own with a 3D printer.
The official Raspberry Pi 5 case and other small box design cases are okay for protection and they don't cost much.
Raspberry Pi 5 official case beside Pironman 5
However, lately, I have been fascinated with the tower cases. With the semi-transparent design and RGB lightings, they look dope. Like those customized gaming rigs people spend hundreds of dollars on.
Thankfully, the Raspberry Pi is a small device so their tower cases are also not that expensive.
Let me share a few of such beautiful mini tower PC like protective cases you can get for your Raspberry Pi 5 in the buyer's guide.
Pironman 5: Full mini PC experience
Pironman 5 is the ultimate case that got me into the tower PC fetish. It's my prized Pi accessory, beautifully sitting there on my secondary work desk.
The Pironman 5 case transforms your Raspberry Pi 5 into a sleek aluminum mini-tower with advanced cooling, NVMe M.2 SSD support, customizable RGB lighting, dual standard HDMI ports, and a secure power switch.
Yes, you read that right. It upgrades your Pi 5's mini HDMI ports into full HDMI ports and also allows you to use NVMe M.2 SSD. Do check the list of supported SSDs.
Key Features:
Adds a NVMe M.2 slot for SSD
Tower cooler
Dual RGB fans with dust filters
0.96" OLED display showing real-time system metrics
Safe shutdown functionality and IR receiver
Dual full-size HDMI ports and external GPIO access
Tom's Hardware found it could handle overclocked Pi 5s at 3GHz while maintaining excellent temperatures. I didn't do such extensive testing but you can still read my full experience of Pironman 5 in the review I did earlier.
Pironman 5 Max is a slight upgrade to the previous entry. What's different here? Well, it primarily adds an additional NVMe M.2 slot so that you can use it as NAS RAID 0/1 setup or add Hailo-8L AI accelerator.
There might be a few small differences, like the OLED screen has the tap to wake feature, but the main difference is that Pironman 5 Max has an additional NVMe slot. Oh, the black design gives it a more badass look.
Key Features:
Dual expandable NVMe M.2 slots with RAID 0/1 support
AI accelerator compatibility (e.g., Hailo-8L) for advanced edge AI applications
Smart OLED display with vibration wake-up and tap-to-wake functionality
Advanced cooling with tower cooler and dual RGB fans
Sleeker black aluminum chassis with semi-transparent panels
Dual full-size HDMI ports and external GPIO access
Active support and community
Safe shutdown functionality and IR receiver
💸 Price: $94.99 (Early bird: $71.24 for first 500 units)
Clearly, it is suitable for NAS builds, AI edge computing, and Home Assistant hubs.
💡 And at the moment, the pre-order discount makes it cheaper than its predecessor. Grab it before the pricing goes back to normal.
The GeeekPi Tower kit comes into two variants: with and without N07 M.2 NVMe SSD PCIe peripheral.
The design is not a lot different from Pironman cases, at least from the outside. But here, you DO NOT get full HDMI slots. You access the usual Pi 5 ports. That makes it cheaper than Pironman cases.
You have one Ice tower cooler with RGB lights to keep the Pi cool.
Key Features:
ICE Tower Cooler with LED fan for effective temperature control
0.96" OLED screen for displaying system status information
Two acrylic panels offering clear view of internal components
Sometimes less is more. ElectroCookie's aluminum mini tower combines a large heat dissipation structure with an RGB-lit PWM fan that automatically adjusts speed based on CPU temperature.
There is scope for the NVMe SSD HAT but you have to purchase it separately. There is a separate model that comes with the HAT.
And that's it. It's just a case and doesn't add extra ports or slots to it. There is no OLED display, either.
However, the case comes in five different colors to choose from. Now that's something, right?
Key Features:
Large active cooler with RGB PWM fan
Compatible M.2 HAT NVMe SSD support (sold separately)
Easy access to GPIO pins, SD card slot, and all ports
Soft-touch power button
Available in silver, black, red, blue and pink colors0-40 (M.2 HAT sold separately)
Pick Pironman 5 if you want the complete package with professional features and don't mind paying premium pricing.
Pick Pironman 5 Max if you need extra storage slot for a NAS or AI options to an overall mini PC build and don't mind the price tag.
GeeekPi if you want a cool looking mini tower PC with focus on tower cooling and not focused on additional slots.
Pick Yahboom if you don't necessarily want extra features but agree to pay a premium price for just a beautiful RGB lit tower case.
Pick ElectroCookie if you want a tower case in your choice of color and don't need fancy features to keep the pricing in check.
All these cases transform your Pi 5 from exposed board to desktop-class computer. Well, a miniature desktop computer.
The cooling performance across all options is pretty good - you cannot function a Raspberry Pi as a desktop computer without proper thermal management.
I am a fan of the Pironman cases. They are on the expensive side when compared to the rest but they also provide more features than the rest of the lot.
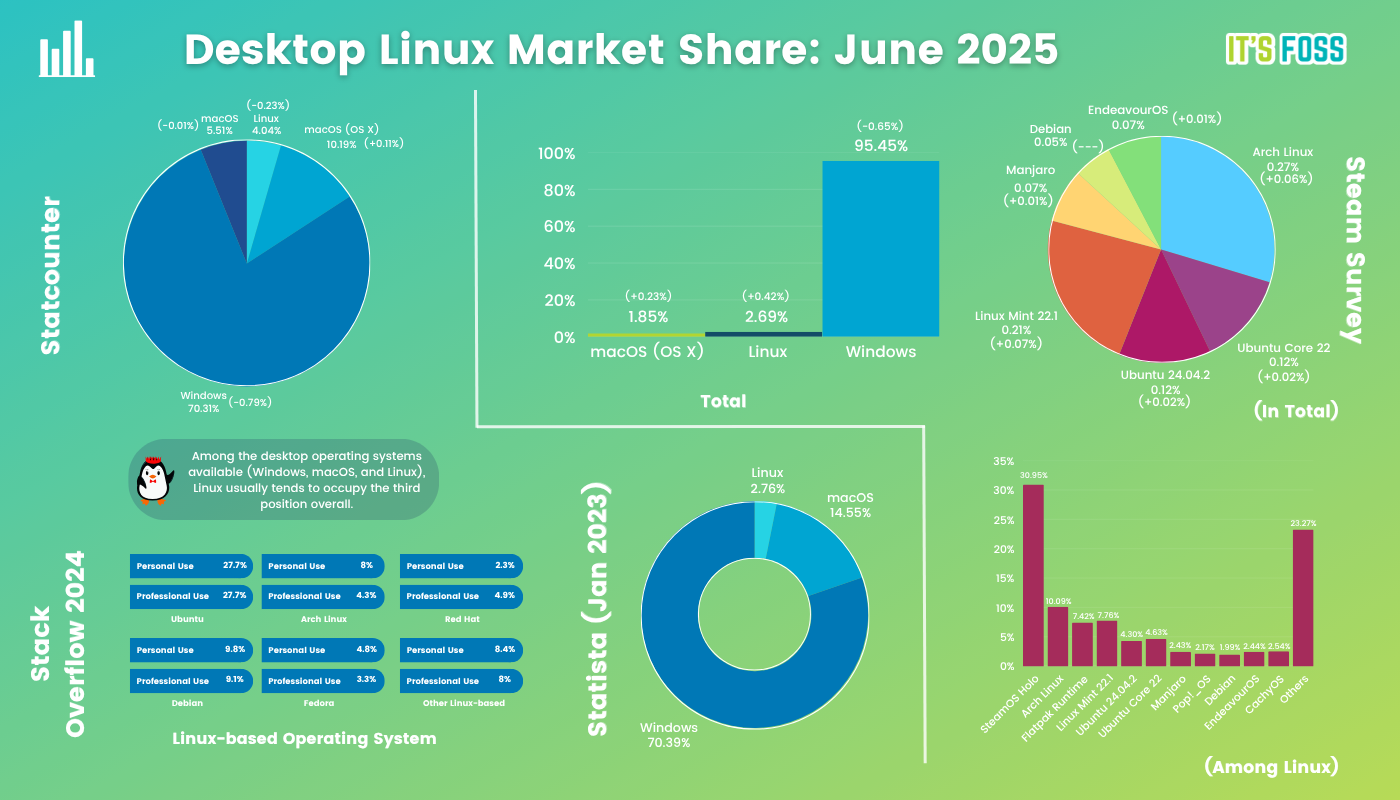
Linux has reached an all-time high market share of 2.69% in the latest Steam Survey. Also, CachyOS has found itself a spot in Linux-specific desktop market share in Steam Survey.
💬 Let's see what else you get in this edition
Ubuntu keyboard shortcuts.
The World Bank open sourcing a tool.
Swiss privacy debacle.
Obsidian plugins suggestion.
And other Linux news, tips, and, of course, memes!
This edition of FOSS Weekly is supported by ANY.RUN.
🌟 OtterCookie: New Malware from North Korea Targets Tech and Finance Professionals
Lazarus Group is currently distributing a stealer malware in fake job offer attacks. Here's how it goes:
Lure via LinkedIn: Attackers offer freelance work to fix a minor DApp bug.
Triggered Failure: An intentional app error fetches and executes malicious code from external API
Malware Execution: OtterCookie infects the system, stealing victims' browser data and crypto wallets.
Desktop Linux is mostly neglected by the industry but loved by the community. For the past 12 years, It's FOSS has been helping people use Linux on their personal computers. And we are now facing the existential threat from AI models stealing our content.
If you like what we do and would love to support our work, please become It's FOSS Plus member. It costs $24 a year (less than the cost of a burger meal each month) and you get an ad-free reading experience with the satisfaction of helping the desktop Linux community.
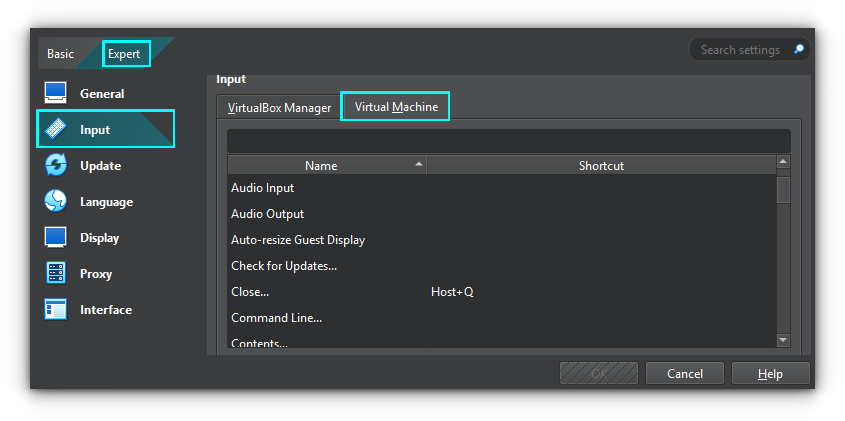
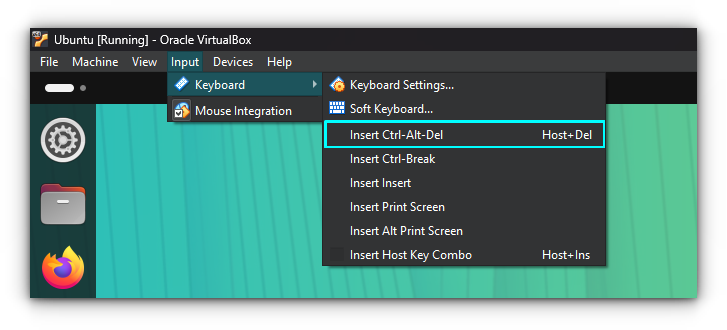
In VirtualBox, you can send keyboard shortcuts like CTRL+ALT+DEL to logout, and a bunch of other keyboard shortcuts to the guest (the virtual machine), without affecting the host (your computer).
To send CTRL+ALT+DEL, use Host+Delete. The Host key is usually the Right CTRL key on a keyboard. In the top menu, go to Input ⇾ Keyboard → Keyboard Settings to view and customize additional keyboard shortcuts for interacting with the virtual machine.
If you need more input options, you can use the Input ⇾ Keyboard → Soft Keyboard menu to open a virtual keyboard for the guest VM.
🤣 Meme of the Week
Linux users, together, strong! 🤜🤛
🗓️ Tech Trivia
Before Spotify or iTunes, there was Napster. Launched on June 1, 1999, by 18-year-old Shawn Fanning, who built it in his college dorm room, Napster quickly attracted over 20 million users (and viruses).
🧑🤝🧑 FOSSverse Corner
One of our regular FOSSers, Laura, is looking to compare notes on building Linux and open source software from source.
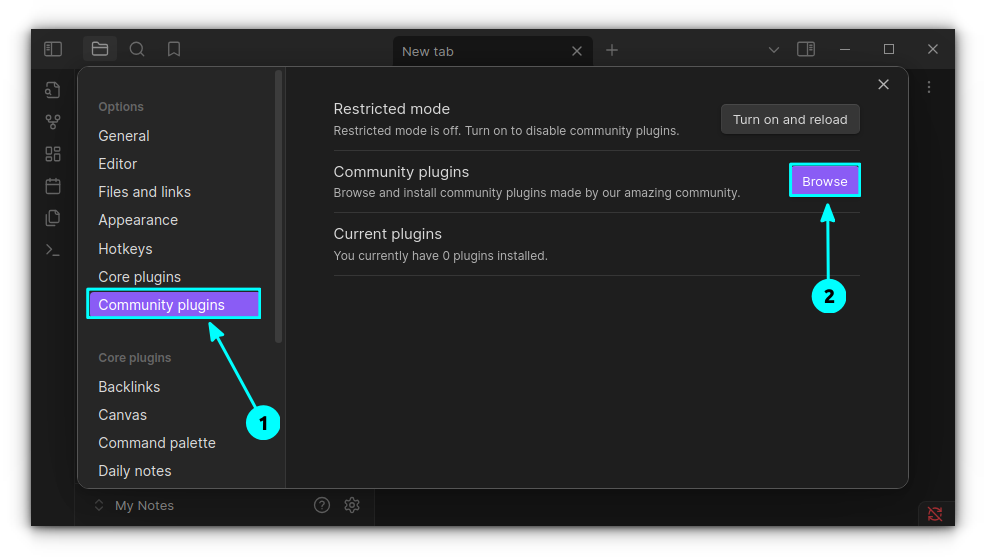
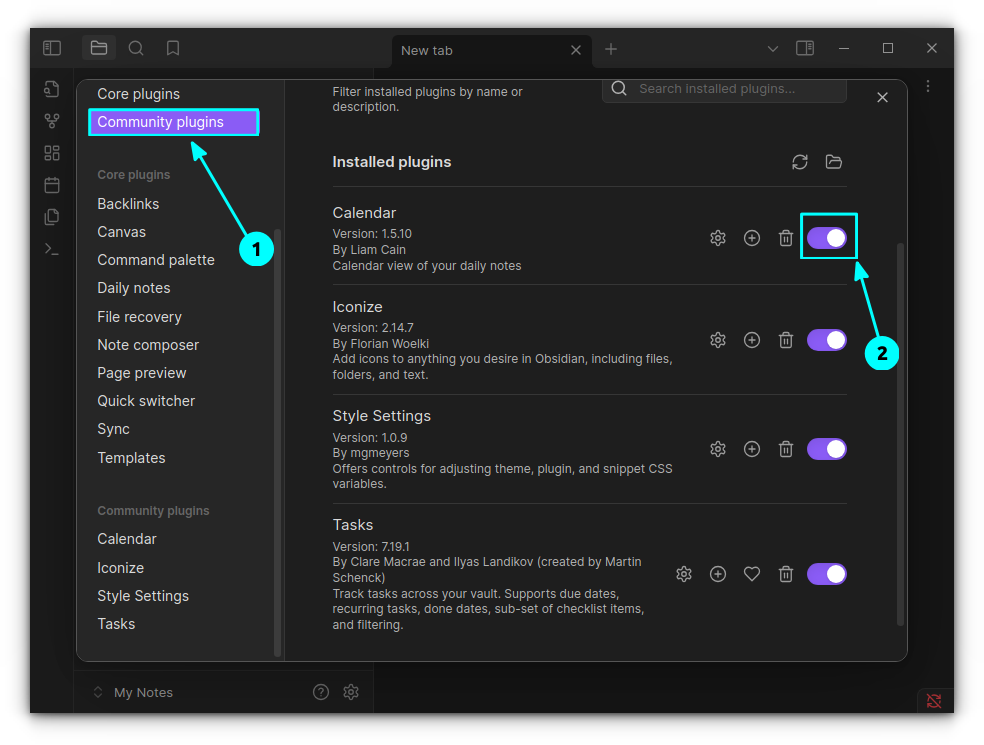
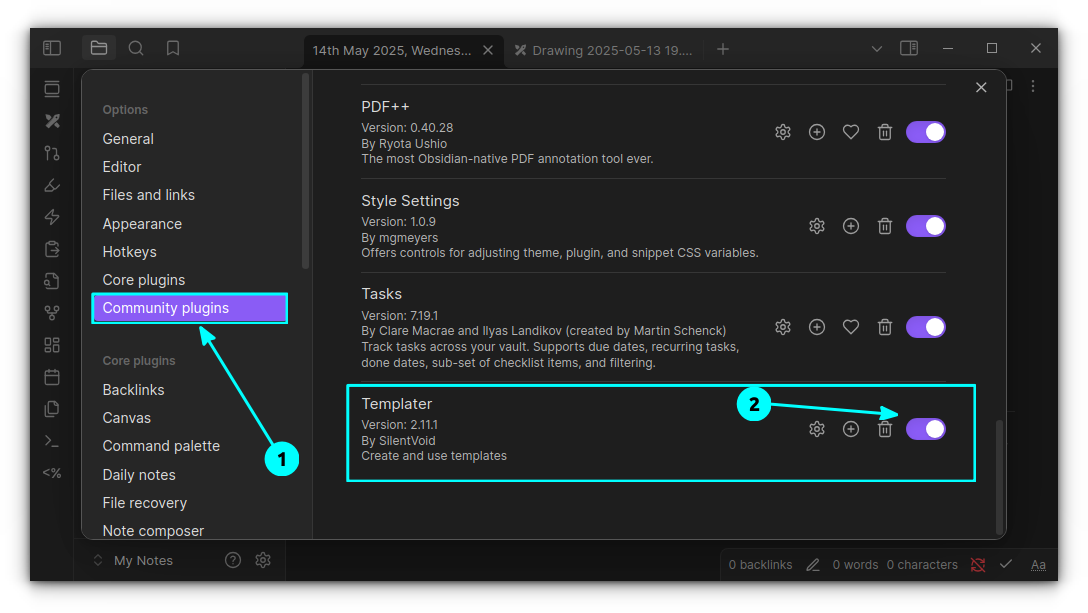
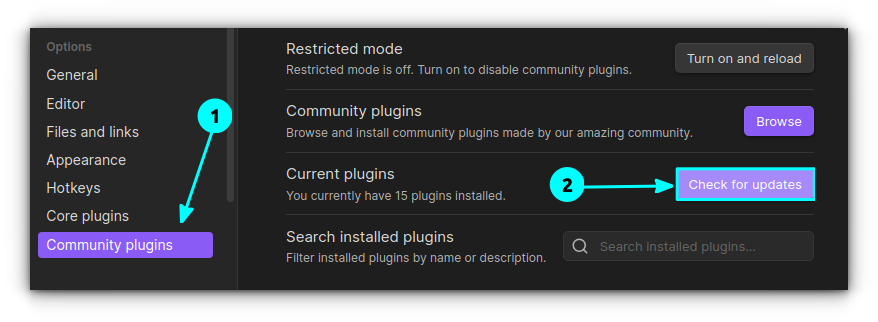
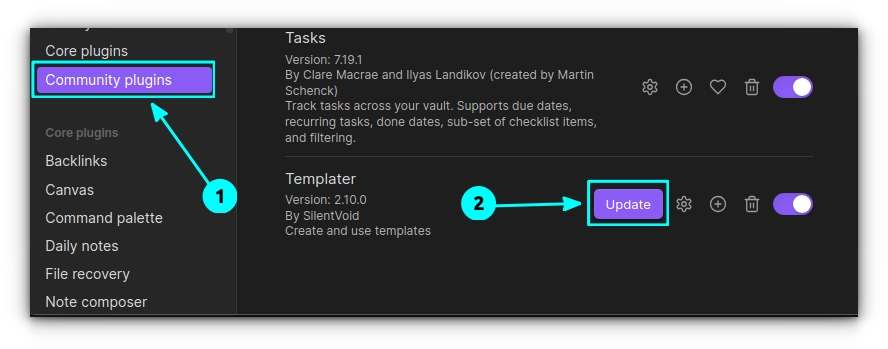
In an earlier article, I wrote about using plugins in Obsidian. In this one, let me share a few of my favorite plugins. I recommend them but only use the ones that fit your needs.
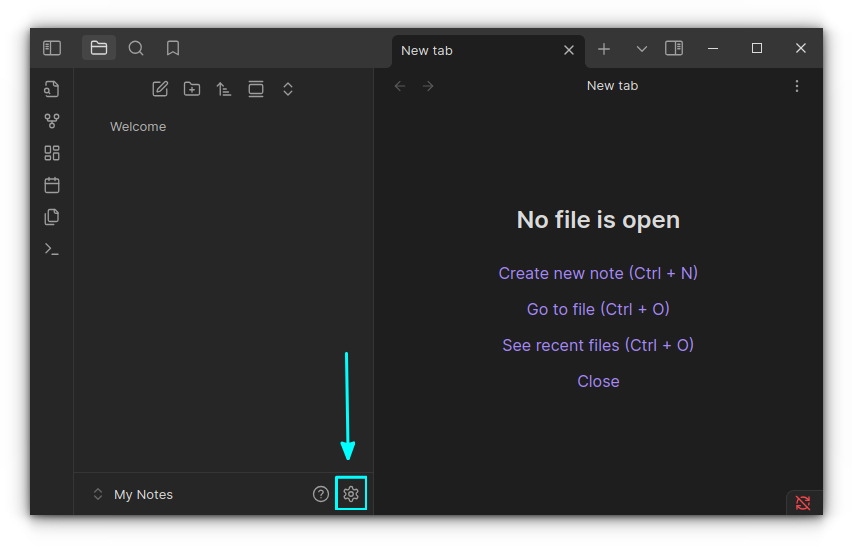
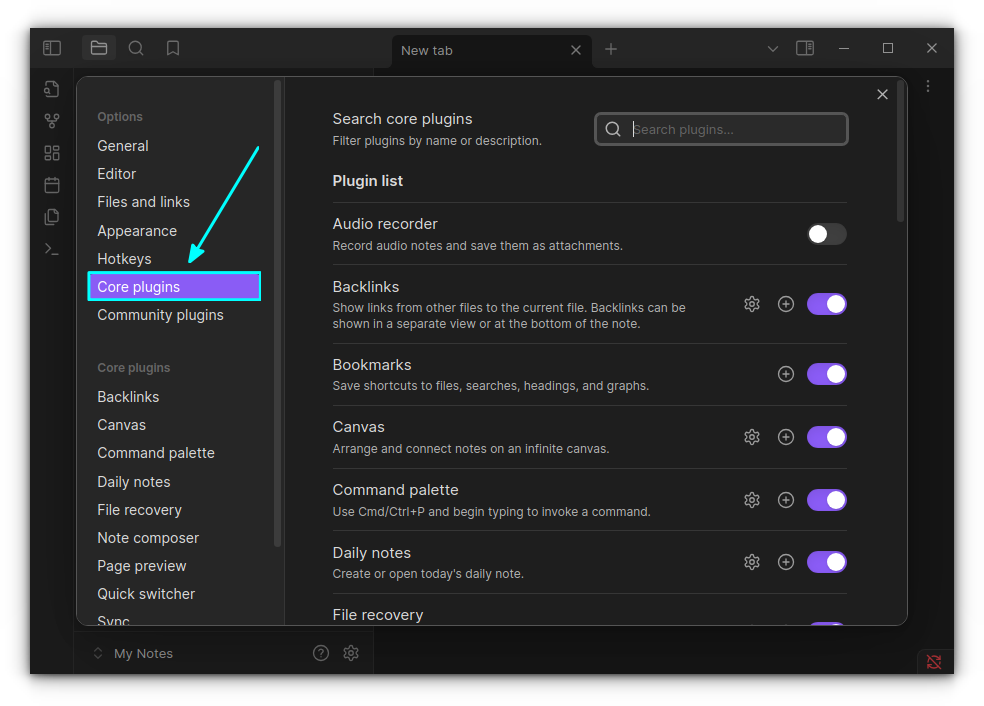
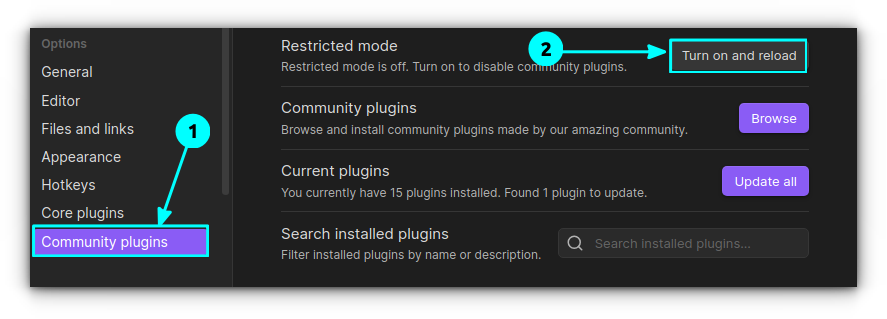
Just to recall, Obsidian has two kinds of plugins:
Core plugins: Officially developed and maintained by the Obsidian team.
Community Plugins: Created by users in the Obsidian community
🚧
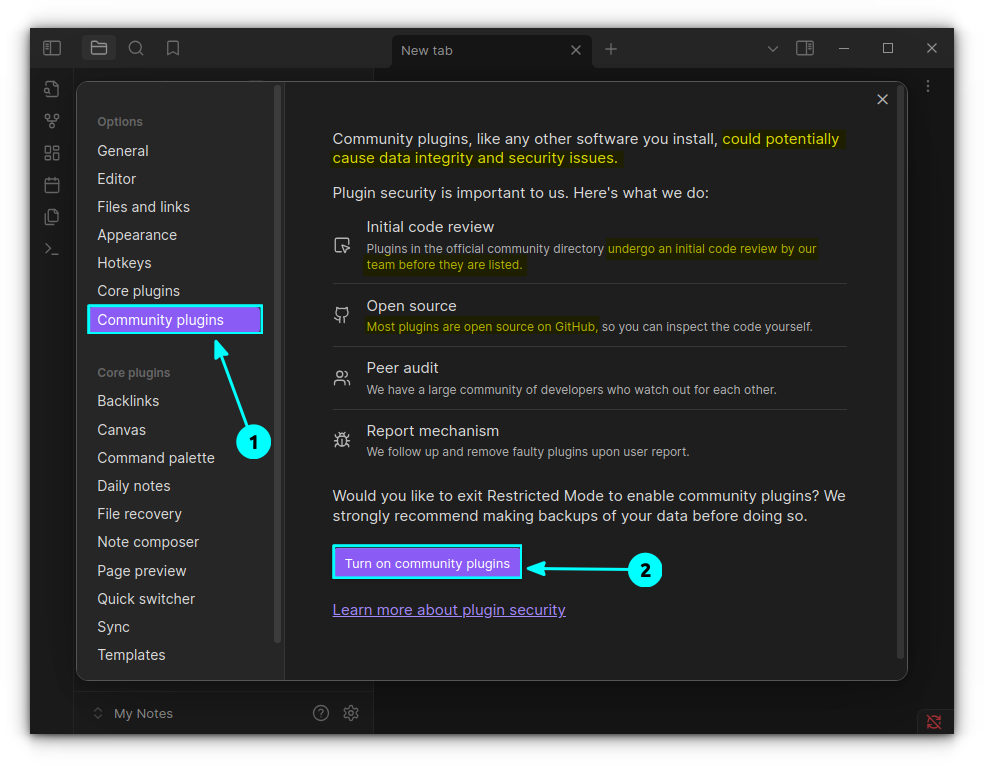
Note that some plugins may make your Markdown notes fully readable only in Obsidian as they add extra features that are not available in usual Markdown. This can be a vendor lock in. Use plugins only according to your needs.
Essential Core Plugins
At the time of writing this article, I see 28 core plugins in my Obsidian installation.
I have picked only a handful of them. It doesn't mean others are not good. All core plugins have some use case for a particular set of users!
Several of the plugins I discuss here are enabled by default. But these plugins have settings of their own and I share these settings that have enhanced my note management experience in Obsidian.
✋
Non-FOSS Warning! Obsidian is not an open source software but it is loved and used by many open source developers and Linux users.
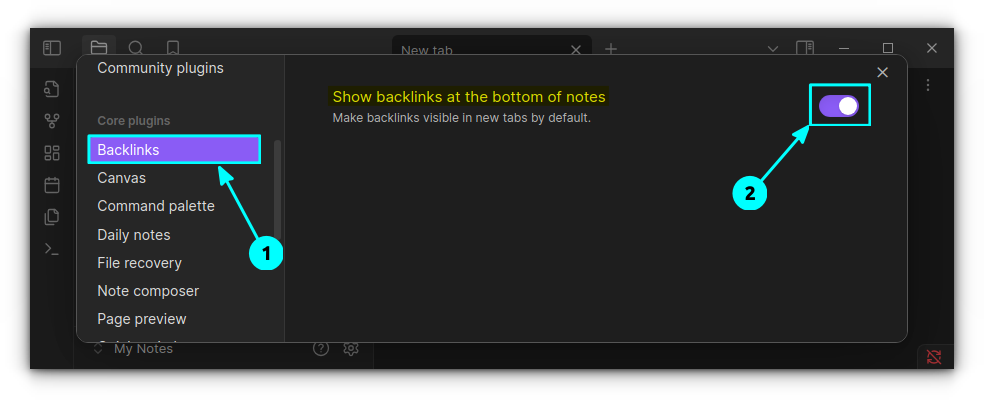
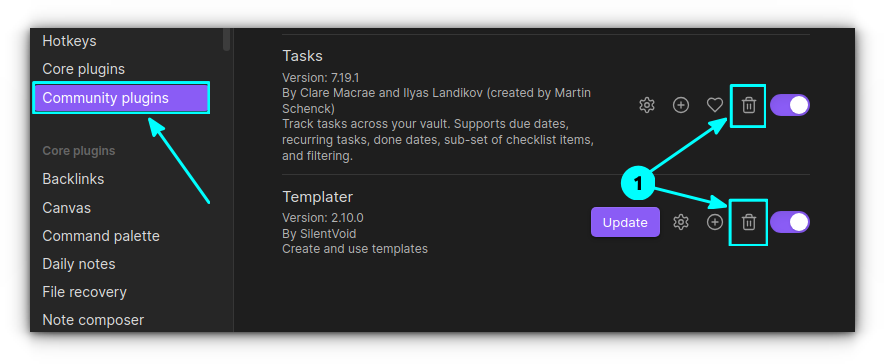
Backlinks
The backlinks are among Obsidian's greatest features. It is crucial for managing interconnected notes and data.
I know that the backlink plugin is enabled by default but there is a useful feature that you'll have to manually enable. It is “Show backlinks at the bottom of notes” option.
Enable it by going to Backlinks plugin settings.
Enable backlinks
Now, under each note, backlinks will be shown.
0:00
/0:18
Backlinks in Obsidian
It is particularly useful if you are creating new notes from a single place like Daily Notes, which is our next plugin!
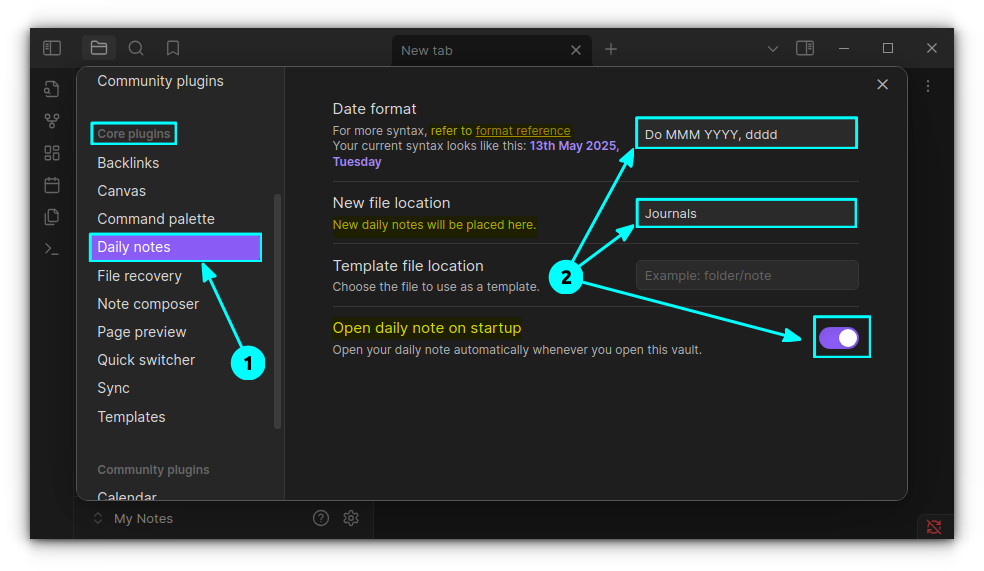
Daily Notes
Daily Notes is like diary pages. It will create a Markdown page for each day and you can write your thoughts here.
By default, you can access the daily notes from the Obsidian ribbon menu. But a more efficient way is to open daily notes whenever you open Obsidian.
Go to the Daily Notes settings. Here, enable the "Open daily note on startup" toggle button.
Daily Notes Settings
In the screenshot above, you can see some other settings have been changed.
Date Format: How the title of the daily note appear. You can get the date format options here.
New file location: I have created a separate folder called Journals in my Obsidian vault to store all the daily notes.
Page Preview
This is enabled by default for you. With this plugin, you can hover over a note while pressing the CTRL key to get a preview.
You can also quickly edit the note in the preview or go to another sub-preview, etc. Very useful tool if you are deep into note interlinking.
0:00
/0:23
Preview page in Obsidian
Slash Commands
This plugin is disabled by default. Go to the Core Plugins in Obsidian settings and enable this plugin.
Once enabled, you can press the / key when typing a note to access commands. For example, insert attachment, insert code block, etc. A simple preview is shown in the below video.
0:00
/0:24
Slash command in Obsidian
Notion, Ghost and many modern editors use this feature.|
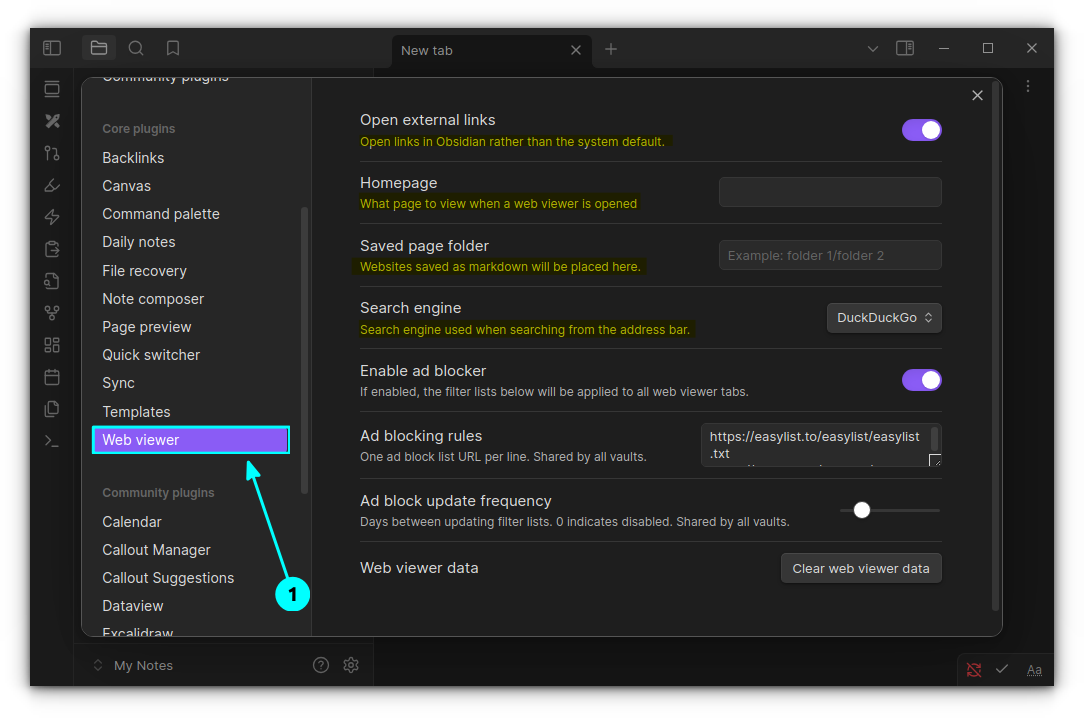
Web Viewer
This is a cool plugin that allows you to visit web links from within Obsidian. More than that, you can save a website to vault using this core plugin.
It is not enabled by default, so do that first. Once enabled, click on the settings gear adjacent to the plugin to go to the plugin settings.
Web viewer settings button
Here, you can set further options like where to save the page by default, search engine, etc.
Web Viewer Settings
You can see some examples in the video below.
Web viewer in Obsidian
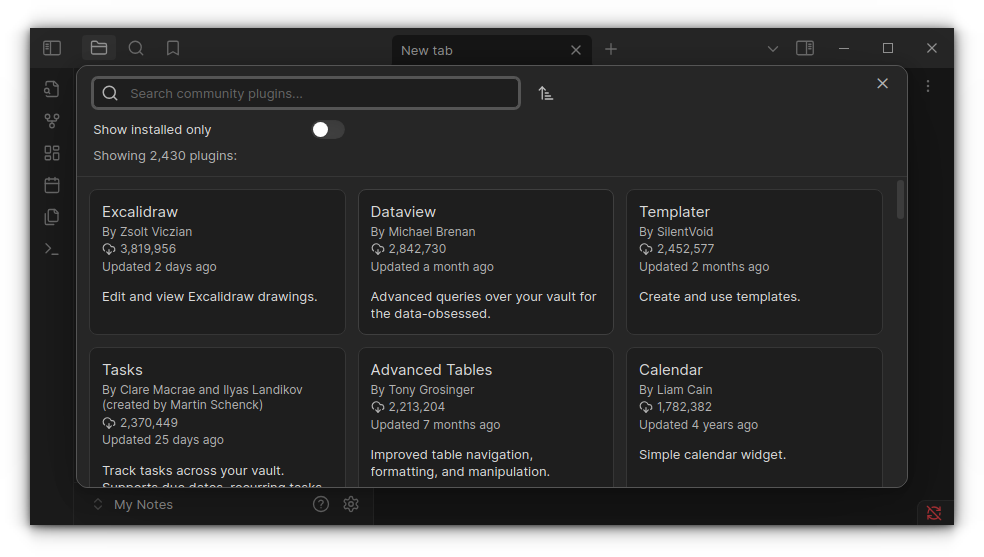
Interesting community plugins I like
Now, let's take a look at some cool community plugins that can enhance your knowledge base, as they do for me.
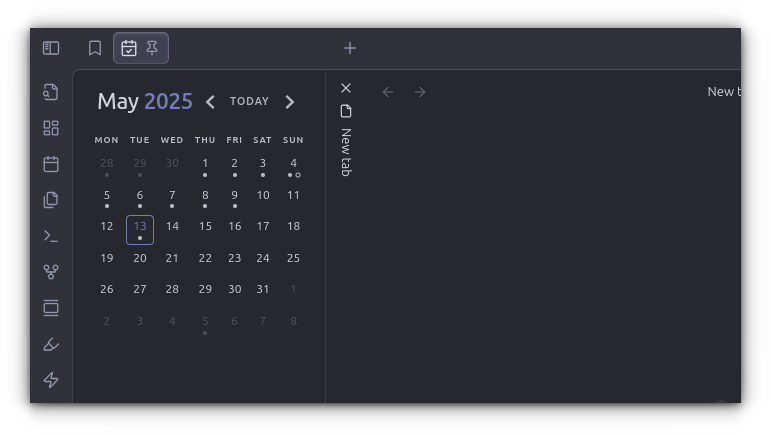
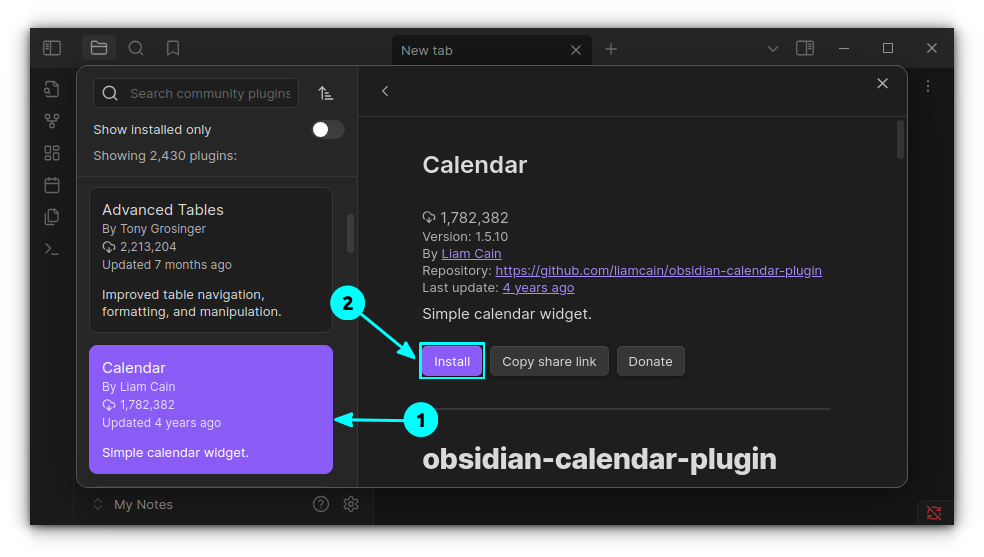
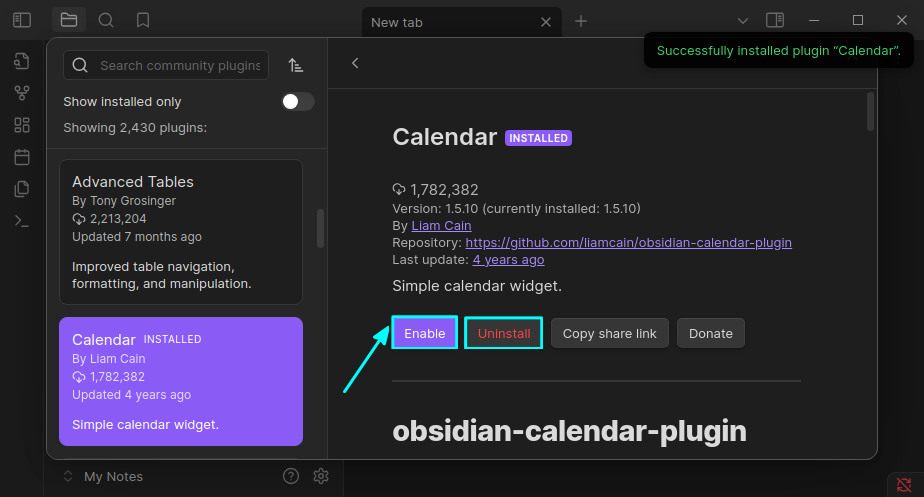
Calendar
If you are a daily notes writer, this is a must-have plugin. Even if you are not into diary writing, it is still pretty cool to have a calendar placed on Obsidian.
Calendar View
You can visit notes of any date simply by clicking on that date. If there is no note, it will prompt you to create one!
There are many more features that you can explore, like a meter to track how much you have written on a particular day.
💡
If you press CTRL key and hover over a date, those day's notes will be shown in a preview.
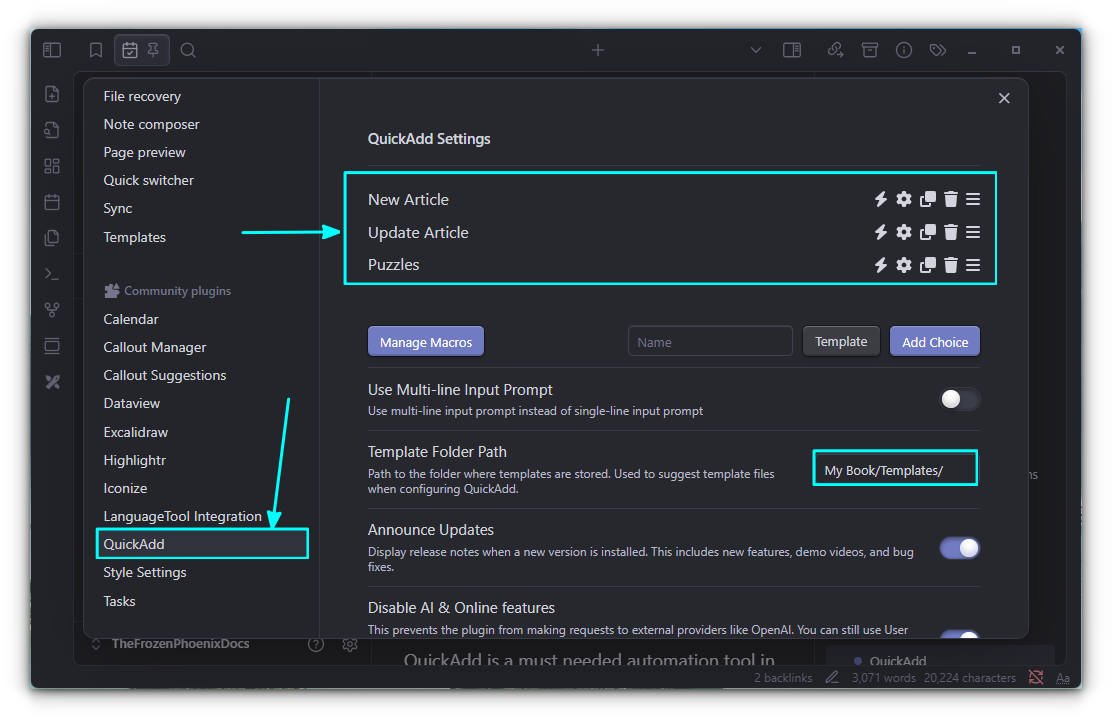
QuickAdd is a much needed automation tool in Obsidian. It offers features like templates, captures, macros, multis, etc. which essentially allow users to create notes quickly.
For example, the template feature can create a note based on a given template in a specified directory. All you have to do is invoke the command.
The screenshot below shows three templates created by me for my use cases.
Created Templates
Use the settings gear to change additional settings like where to create a note, open the note automatically, etc.
The video below shows how it quickly creates a note on a specified location.
0:00
/0:13
QuickAdd Working
With macros, you can even assign key bindings to make your workflow even faster!
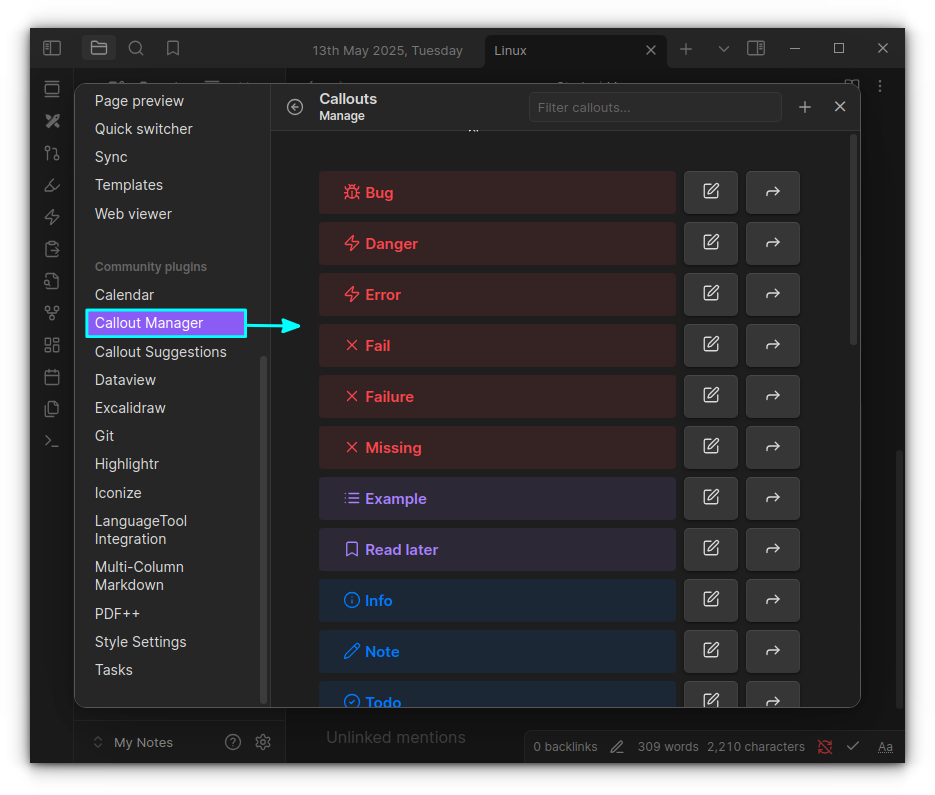
These are two different plugins which, when used together, are a great way to add callouts.
📋
If you are not aware, callout blocks can improve your notes by making specific visually separated blocks for tips, warnings, etc. Like this 'note' callout block I used for telling you about callouts.
By default, obsidian has some callouts like Note, Tips, Warnings, etc.
Callout Manager allows you to create more callout blocks. Say you want to create a new callout block called "Read Later" and assign a particular color and icon. You can do that with this plugin.
Callout blocks from Callout Manager
The Callout Suggestions plugins will help you access these defined callout blocks easily in your notes.
You can press >! and a dropdown menu will appear asking what block to use.
0:00
/0:23
Inserting Callouts in Obsidian
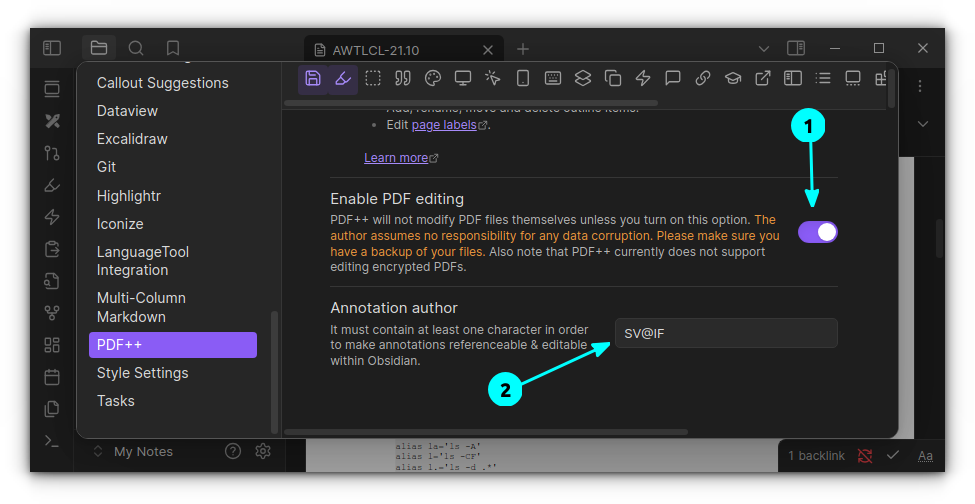
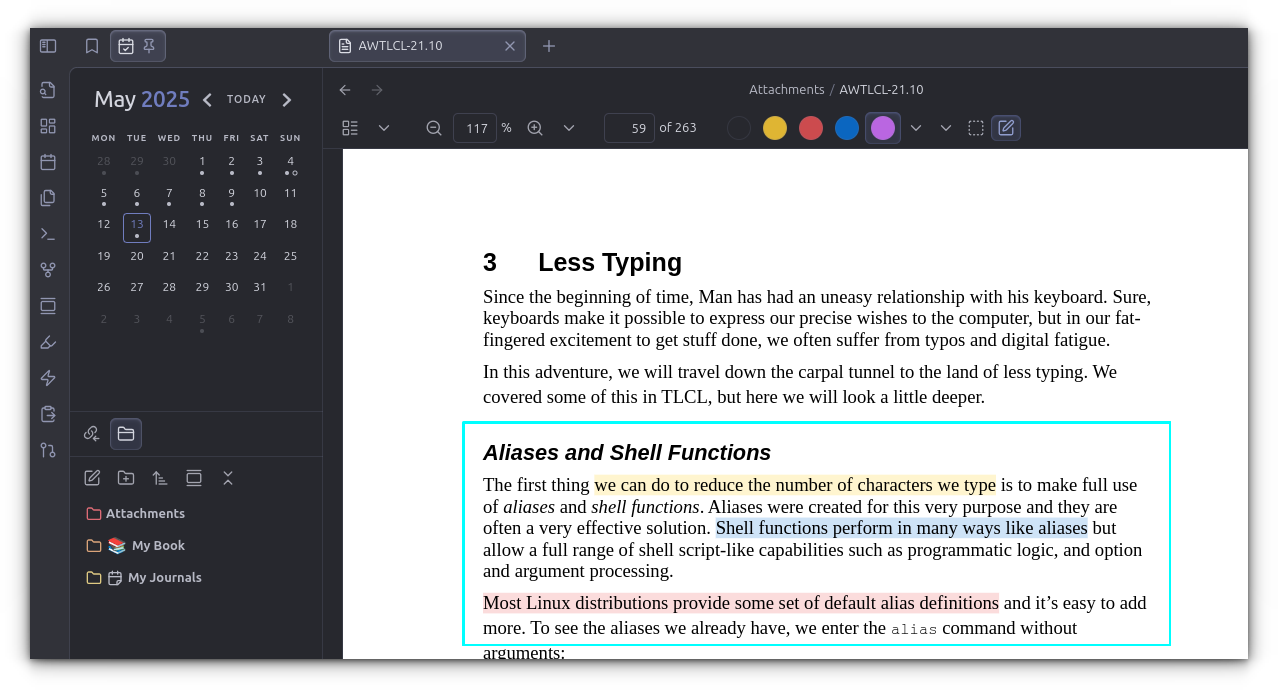
PDF++
Annotating a PDF document is a must-have feature in any PDF viewer. How about doing it in Obsidian? PDF++ is a great tool for this purpose.
You can add your PDF notes to your vault and start annotating!
Once the plugin is installed and enabled, make sure you have enabled the PDF editing feature.
PDF++ plugin settings
Now, you can select text and then right-click to get the annotation menu. Unlike other plugins, this has a slight learning curve and plenty of options to tweak. Use it carefully.
This is for those who want to create notes without grammatical errors or spelling mistakes.
LanguageTool is a proofreading software that checks the grammar, style, and spelling in over 20 languages. With this plugin, you can get error notifications for your text in Obsidian.
If you have a premium subscription for LanguageTool, you can use it here as well.
Spell check in Obsidian
🚧
You should disable the Obsidian spell check (Settings → Editor → Behavior → Spell Check) feature if you want to use this plugin.
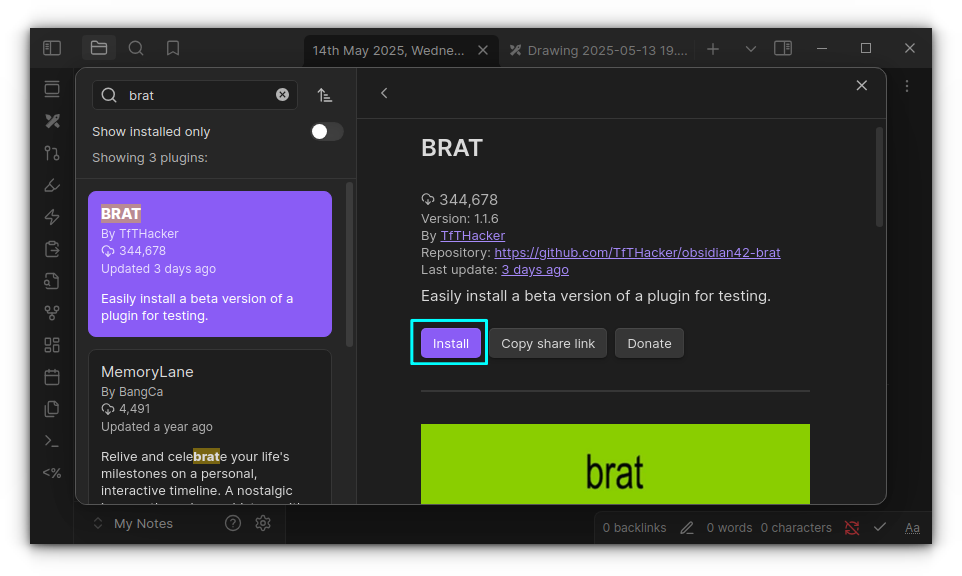
Excalidraw is a plugin to edit and view Excalidraw drawings in Obsidian. This sketching solution can make wonderful diagrams within Obsidian, embed drawings into your documents and much more.
An Excalidraw drawing in Obsidian
You can find a huge list of settings for this plugin in the Obsidian settings. If you are into creative note-taking, look no further.
Style Settings: Allows you to tweak several themes in Obsidian. One such theme that I am using and is heavily customizable is Border.
Git: Allows you to version control your notes. You can pull changes from and push changes to GitHub, GitLab, etc.
Dataview: Dataview is a live index and query engine over your personal knowledge base. You can query data from your Obsidian vault.
QuickAdd: QuickAdd is like a super-smart shortcut button in Obsidian that lets you quickly create new notes or add stuff to existing ones using pre-made templates and automated steps you set up.
Kanban: This plugins created a Markdown-based Kanban board.
There are many other plugins, enabled/disabled in a default Obsidian installation. What I mentioned above are a couple of special ones. Don't forget to read the descriptions and try others too.
Now I let you share your favorite Obsidian plugin in the comments.
Most educational programs keep students trapped behind screens, manipulating virtual objects and producing digital outputs.
This is why the Raspberry Pi and Arduino like devices provide such a great learning environment. Adding hardware components to the board gives meaning to the software.
The CrowPi takes this forward by giving an entire learning laboratory that transforms abstract programming concepts into tangible, interactive experiences.
Elecrow has been known for creating great Raspberry Pi products. They are launching their latest product, CrowPi 3. They sent me the device to test and share the experience and that's what I am going to do in this article.
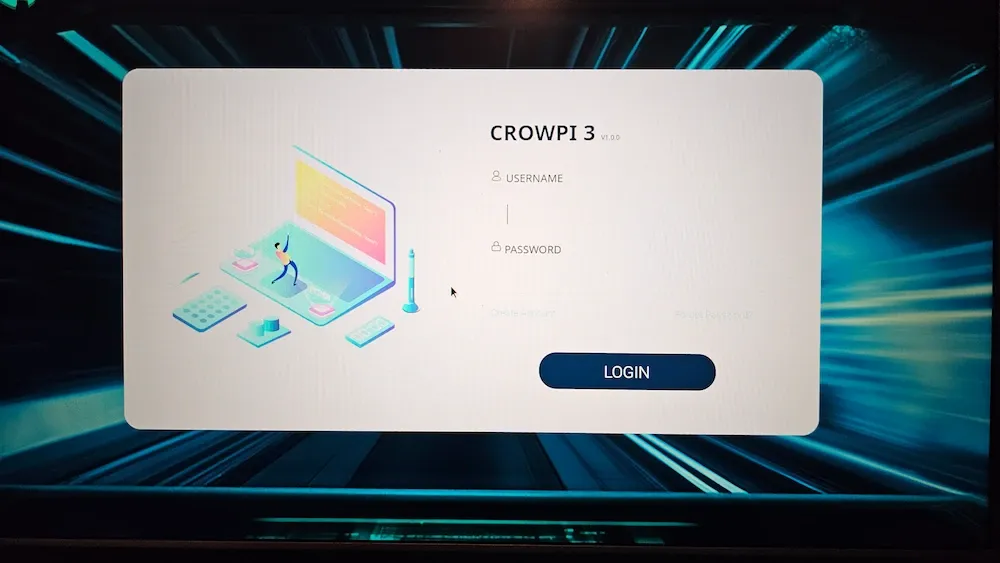
What is CrowPi 3?
Think of the CrowPi 3 as a Swiss Army knife for coding education - it packs dozens of sensors, programming environments, and learning tools into one portable, briefcase. Instead of juggling separate breadboards, sensors, and computers, everything lives in a single ecosystem.
The CrowPi 3 transforms abstract programming concepts into tangible experiences. Write Python code to detect motion → PIR sensor triggers alarm. Code an NFC reader → tap a card to spawn TNT blocks in Minecraft. It's programming with immediate, visible consequences.
The core components are:
Raspberry Pi 5 as the brain of the kit (advance kit includes the pi)
20+ sensors pre-wired and ready
4.3" touchscreen + HDMI connections for external monitors
Built-in breadboards and GPIO access
Arduino and Pi Pico can be attached on top of it
128 GB micro SD card with custom operating system
This custom operating system is a customized version of Raspbian OS and has numerous ready-to-explore projects across multiple programming environments like Python, Scratch etc.
A dedicated section of AI projects to try beginner level AI projects using the on-board camera and various sensors.
No prizes for guessing that there were at least two more such CrowPi kits in the past and considering the fact that this is the third such inastallment, I would think that the first two devices met with success.
Who is this kit for?
The primary audience for CrowPi 3 is children aged 8-16 who are learning programming and AI coding fundamentals.
Of course, it is not just limited to children. People new to Raspberry Pi/Arduino would also benefit from the guided experiences of such a kit.
I also think that it is suitable for teachers that need turnkey STEM curriculum tools.
The kit has streamlined learning of all levels with a mix of both software and hardware. Start with drag-drop Scratch blocks, graduate to Python sensor control, eventually tackle more intense AI projects.
But all this can be assembled...
Sure, you may not need or use all of the sensors provided in the kit. And yes, you can get the sensors and accessories separately and use them with tons of open source projects available online but kits like CrowPi, make it all streamlined. This is ideal for schools and for people who want to explore programming the hardware devices without struggling with the hardware assembly.
Hardware assembly could be fun, too, but it could be frustrating and time-consuming. These kits flatten the learning curve a little, letting the students enjoy dipping their toes in the vast ocean of electronic geekery.
CrowPi 3 Kit contents
📋
The kit I received for this review is the basic one. The advanced kit comes with a Raspberry Pi 5 16 GB already fixed in, batteries for extra portability, an additional SD card with retro games on it, game controllers and a few more accessories.
The basic kit has the following item in addition to the pre-wired ones on the board already:
Power Supply x1
Screwdriver x1
Stepped Motor x1
Infrared Receiver Head x1
RFID Card + Tag x1
IR Remote Control x1
User Manual x1
Motor + Fan Blade x1
USB A to Micro B Cable x1
Type-C to Type-C Cable x1
NFC Card x1
TF Card Reader x1A Swiss Army knife for coding education as this kit transforms the programming concepts into tangible experiences. Learn from more than a hundred interactive projects.
Crowtail-9G Servo x1
Components Pack (with wires, LED and more) x1
128G TF Card with Customized System x1
Accessories in CrowPi 3 Basic kit
The advanced kit has these items in addition to everything in the basic kit:
NFC Tag x10
Raspberry Pi 5 (16GB) x1
Laptop Tote x1
2.4G Wireless Keyboard + Mouse x1
32G TF Card with Customized System x1
Minecraft paper x5
Crowtail - I2C HUB x1
18650 Lithium Battery x2
Game Controller x2
Experiencing CrowPi 3
The CrowPi kit comes in a briefcase styled box which kind of gives me the cyberdeck feel. The case looks good with the frosted glass.
CrowPi 3 Kit with frosted glass cover
Let me share my experience using this open source AI education kit.
The build
This is a well-thought and well-built device. It comes in a briefcase styled box with a fold-out handle that makes it easy to carry. The frosted glass cover doesn't come off easily as it has strong magnets and all the sensors and components are firmly fixed in the kit.
I didn't do a fall test by dropping it to the ground to check if it can survive something like that. If you ever do this, accidentally or otherwise, do share the data with us 😜
There is an empty slot at the bottom that could hold a few tiny accessories. It's a small thing but
Built-in touchscreen
The small screen has touch capability and the touch response is pretty decent but I would only use it when there are no other options available. My fat fingers and eyes are not suitable for tiny screens anymore.
Okay, I could access pretty much most of the things with this tiny screen and it becomes even easier to use when I connected proper keyboard and mouse to it.
Still, it is tiny which is okay for retro gaming and a few small stuff to check the output or see debug info but you'll need a proper screen to make use of it.
This is evident as the customized learning interface is not properly displayed in the tiny screen.
CrowPi 3's small screen doesn't properly display its customized learning interface
Raspbian OS customized for interactive learning
📋
I still don't have a capture card for Raspberry Pi (a shame, I know) and hence I cannot share good quality images here. Apologies as I order a capture card.
The interface, when experienced on a proper monitor, shows the IDE tools and interactive project to choose from. I used their CrowView Notebook for this purpose, although it can be connected to any external monitor.
Select interactive project from left or use IDE from the right to code on your own
To use the interactive projects, you'll have to create an account. I think it's a local user account that stays on your system. This way, more than one people can save their progress.
A local user account saves your progress on the device
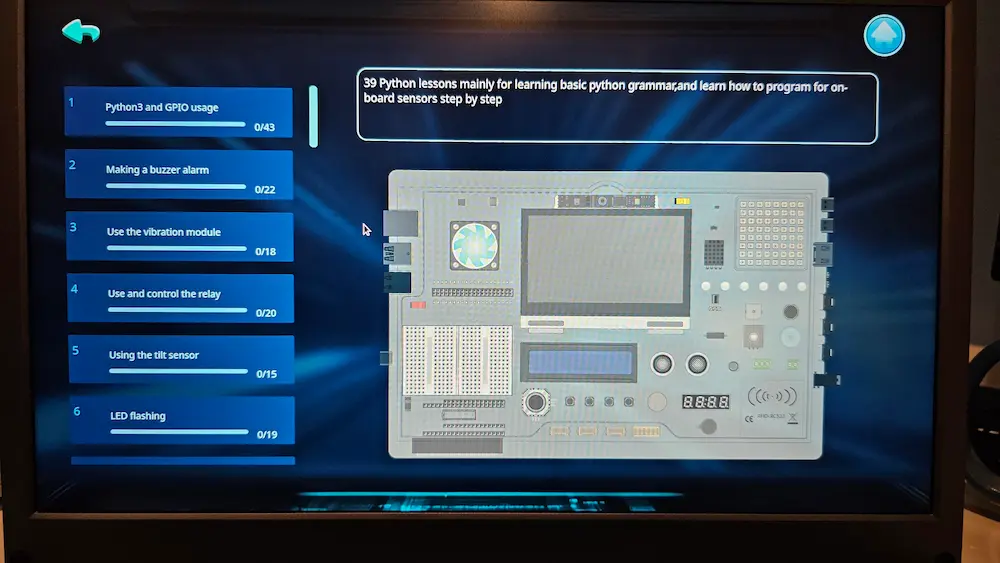
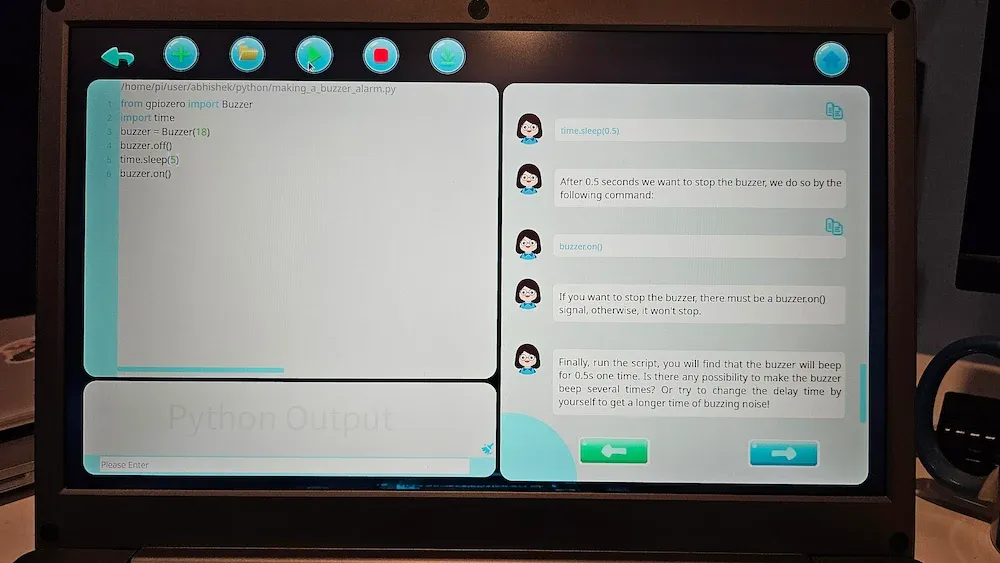
In the image below, you can see that it provides 39 Python projects that teach you the basic Python programming that also interact with various sensors and components on the kit.
Interactive Python project interface
When you select a project, you have instructions on half the screen and the code editor or tool in the other half. And the programs you run can also impact the hardware (most of the time) and you can see it on CrowPi 3 kit.
For example, in the screenshot above (if it is visible), it creates a simple program that sounds the buzzer on the board for the specified time.
See, this allows an easier way of learning with both software and hardware in the mix as you have pre-built scenario with instructions and their impact is visible on the hardware.
You are not restricted to this customized interface. You can also use the classic Raspbian interface and access the editors and projects from there as well.
The sensory board experience
The kit features two breadboards positioned strategically on the main board, eliminating the frustrating "where do I connect this?" moments.
While breadboards are available for custom circuits, most sensors come pre-connected and ready to use. There are easy sample projects to test the functionality of these sensors and they are fun to experiment even for adults.
The cooling fan
The cooling fan is loud and runs continuously
There is a visible cooling fan with RGB lighting. While it seemed cool at the beginning, it started to annoy me later. Don't get me wrong. I know that Raspberry Pi like devices must have some sort of cooling system.
But this fan is much too loud for its size. And it runs continuously, unnecessarily. There is no on/off button for that and I don't expect such a feature. Now, this could be a good programming challenge to write a script that turns the fan off when the CPU reaches a certain temperature threshold.
Bottom line
The CrowPi 3 solves the "hello world" problem in programming education. Instead of printing text to screens, students control real-world devices and see immediate physical results.
I mean, those variables are more meaningful when they represent real sensor readings. The conditional logic makes more sense when you can control lights and motors with it.
The ready-to-use kit eliminates the setup frustration that could arise from manually connecting all those sensors, fans and lights.
This is suitable for classrooms, as well as motivated self-learning at home. It is also a good Christmas gift candidate if you have children in your family that might be interested in learning AI, coding and electronics.
I don't have the pricing at the time of writing this review. Elecrow is planning to run a pre-order campaign through Kickstarter very soon. Please check it for pricing and release dates.
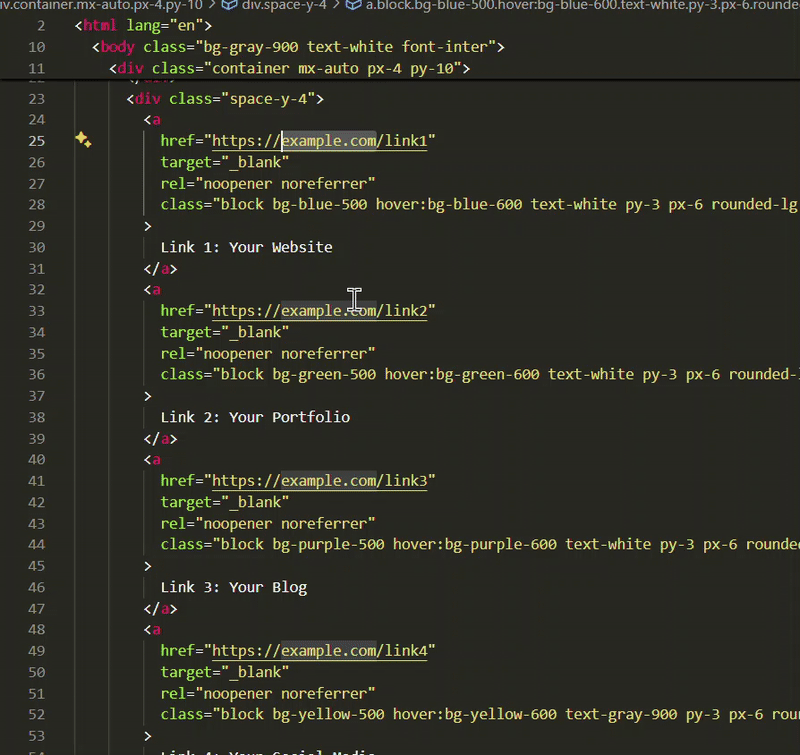
In one of my earlier articles, I showed how you can preview HTML files inside Visual Studio Code. That setup worked well for testing static pages, but what if you want to go beyond markup and bring interactivity into the mix?
With JavaScript being the backbone of the modern web and countless developers now diving into frameworks like React, Vue, and Svelte, being able to run JavaScript code directly inside VS Code becomes almost essential.
Running JavaScript in the editor helps you avoid constant context-switching, reduces distractions, and gives you immediate feedback when debugging.
There are two approaches here:
Running JavaScript inside VS Code using Node.js: most efficient and editor-native approach.
Run it in a browser or using extensions: handy for quick tests or visual feedback.
Let's see about using them.
Understanding the role of Node.js
JavaScript was originally designed to run inside browsers, which come with their own JavaScript engines (like V8 in Chrome).
Node.js takes that same V8 engine and brings it to your local machine. This lets you run JavaScript outside the browser, directly from the command line or terminal.
It’s particularly useful for backend work, automation scripts, or just quick testing without the overhead of an HTML shell.
If you're unsure whether Node.js is already installed on your system, open a terminal and type:
node -v
If you see a version number, you’re all set. If not, you’ll need to download Node.js and follow the installation instructions for your operating system.
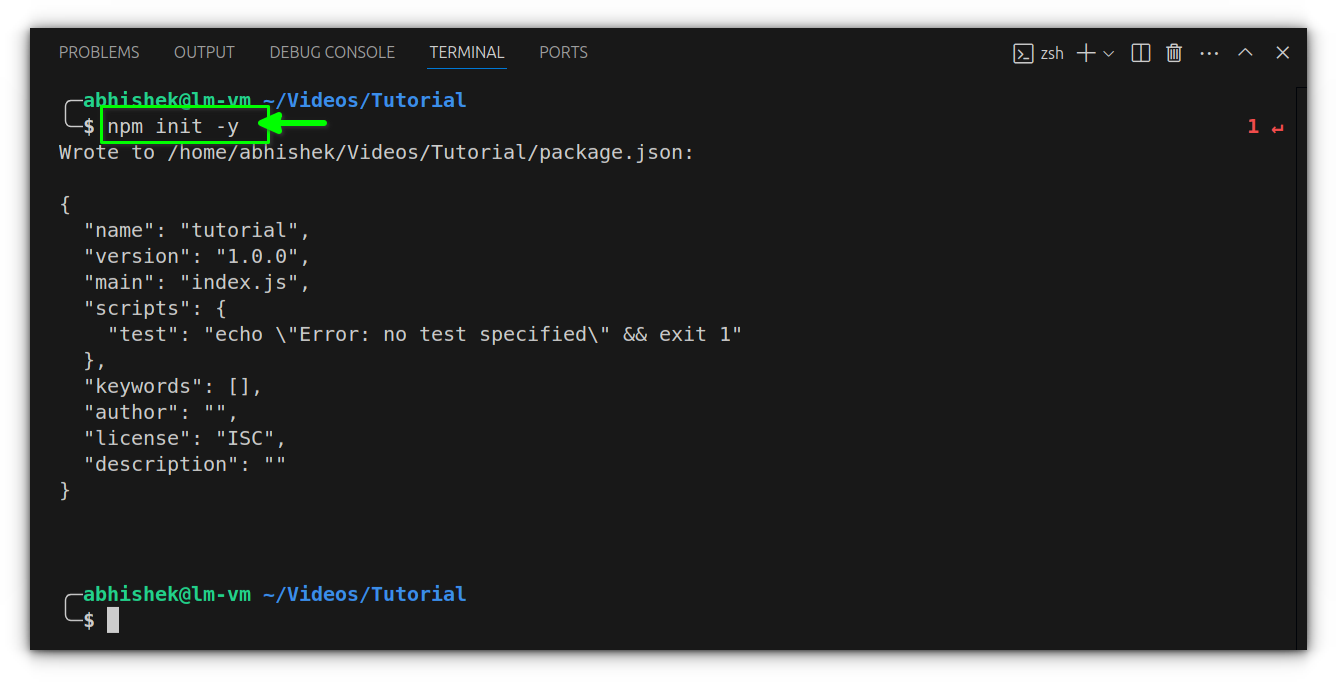
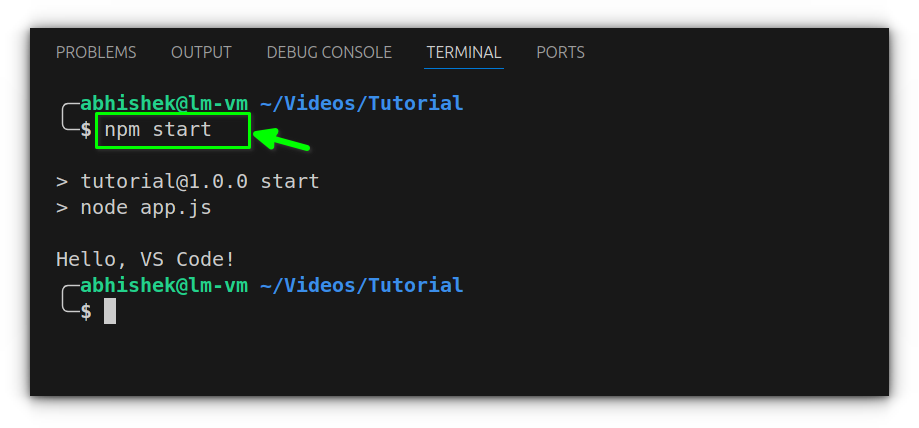
Once everything’s installed, open VS Code and create a new folder for your project. Inside it, launch the terminal (Ctrl + ~ or Terminal > New Terminal) and run npm init -y.
This initializes a basic project and creates a package.json file, which will be useful for managing your scripts and dependencies later.
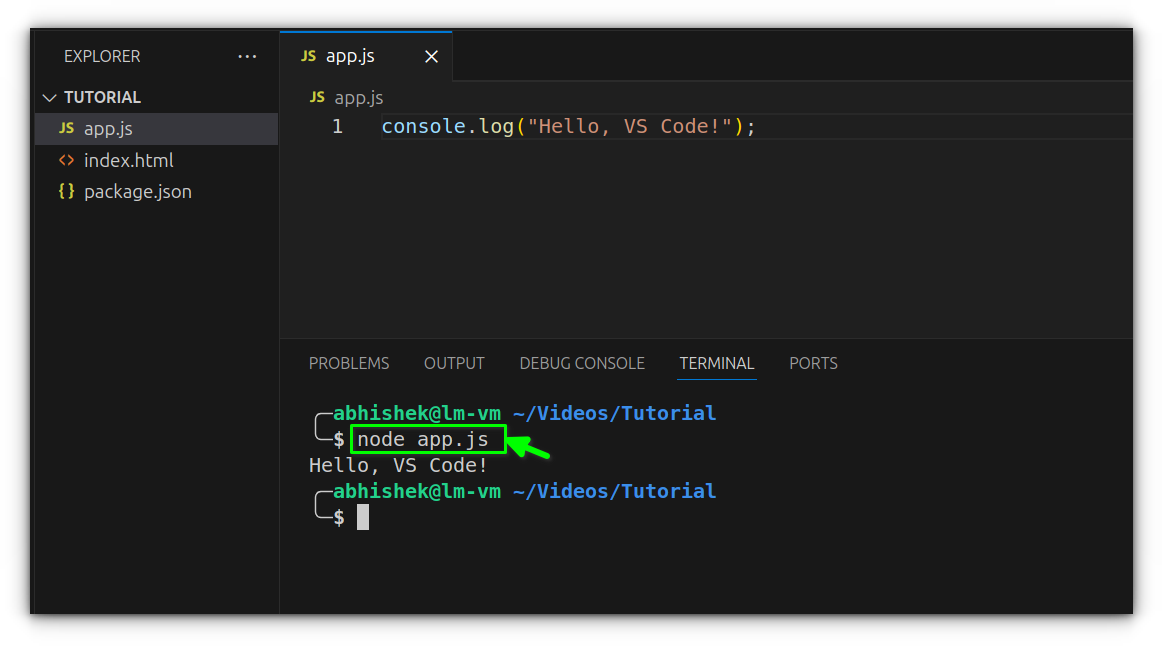
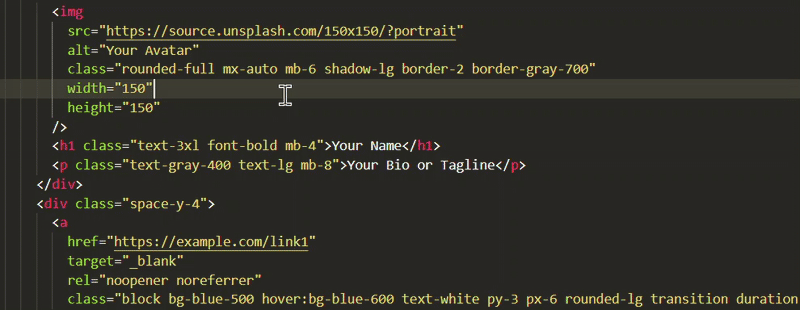
With the environment ready, create a new file named app.js and add a bit of JavaScript, for example:
console.log("Hello, VS Code!");
To run it, simply type node app.js in the terminal.
The output will appear immediately in the console, confirming that Node is executing your file properly.
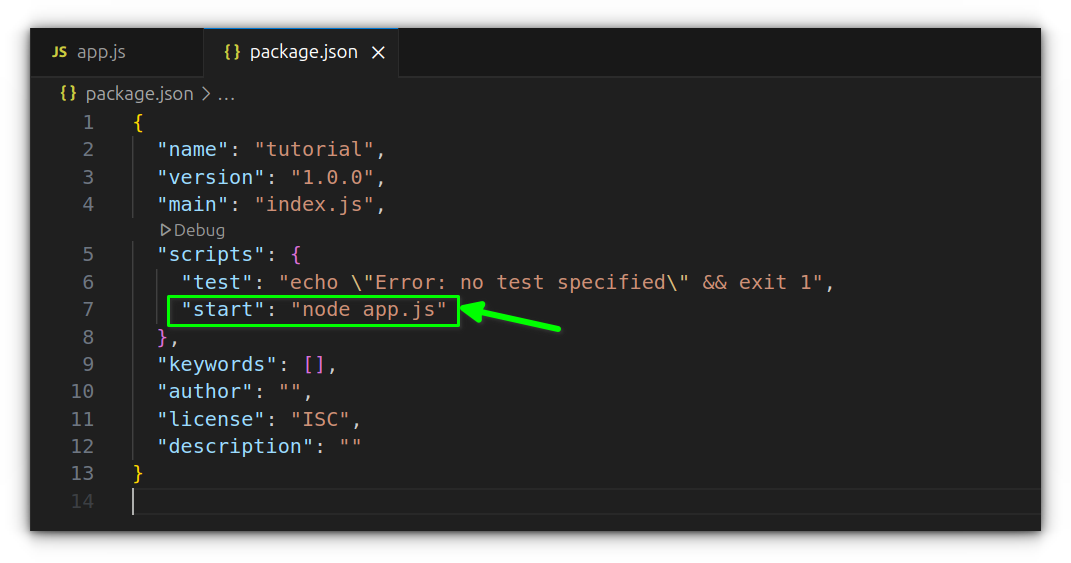
Add a custom script for simpler runs
To make things smoother, especially as your project grows, it’s a good idea to define a custom script in your package.json file. Open that file and find the "scripts" section, then add:
"start": "node app.js"
This allows you to run your script just by typing npm start, instead of repeating the filename every time.
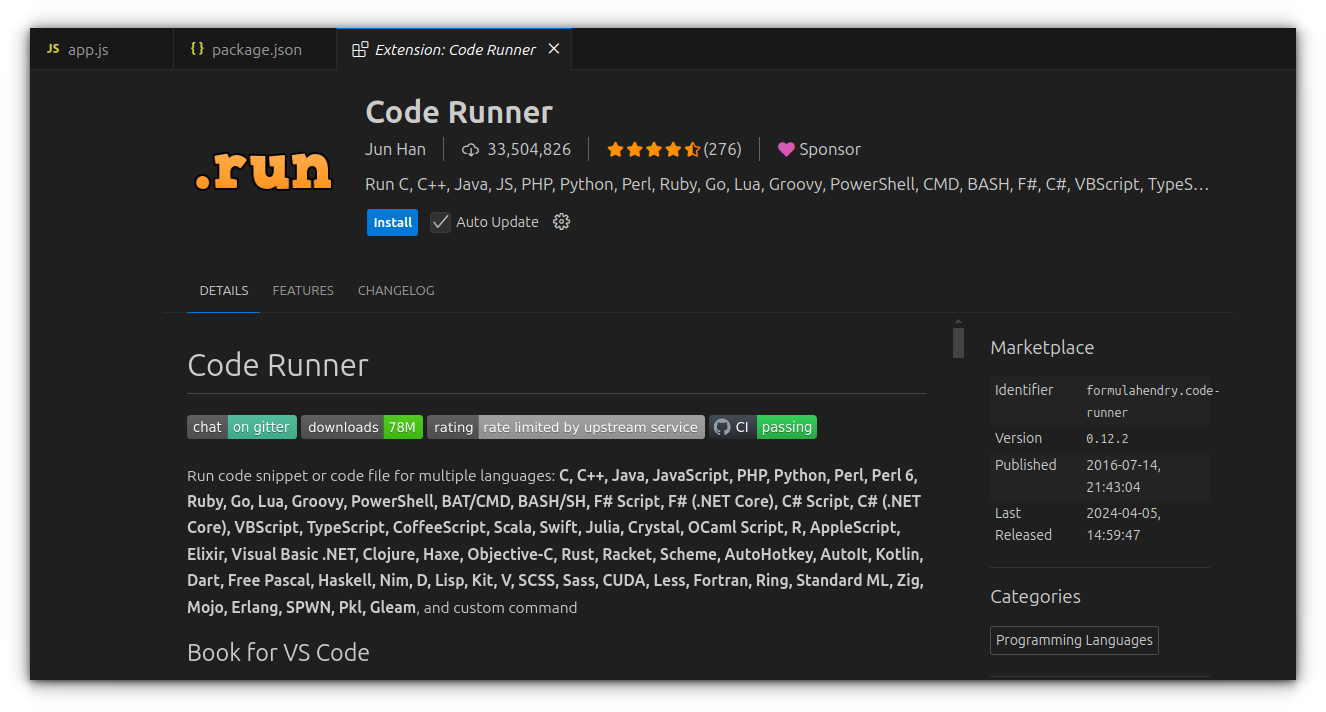
Optional: Using the Code Runner extension
If you prefer a quick way to execute small snippets without setting up a project, Code Runner can help. It’s a lightweight VS Code extension that runs code in a sandboxed output window.
To get started:
Open the Extensions tab in VS Code.
Search for “Code Runner” and install it.
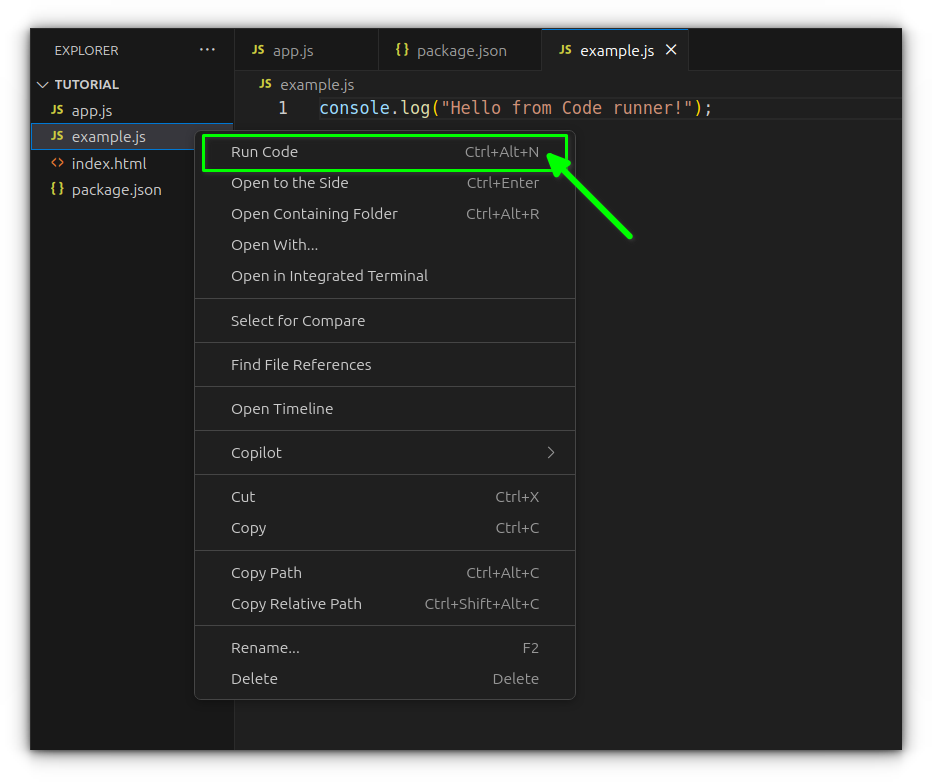
Open a .js file, write some code, right-click, and select “Run Code.”
For example, a file like example.js with:
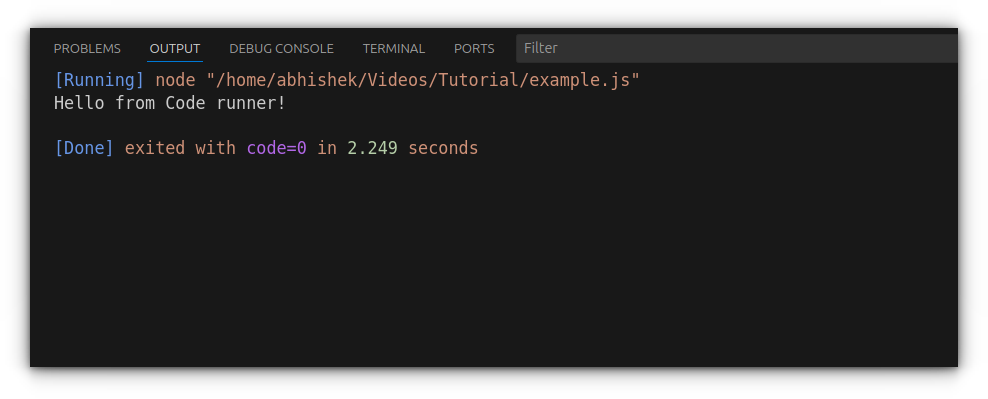
console.log("Hello from Code Runner!");
It will output directly to VS Code’s "Output" tab.
The main limitation here is that it doesn’t use the integrated terminal like we used above, which can restrict input/output behavior for more complex scripts.
Wrapping up
With Node.js set up inside VS Code, running JavaScript becomes a seamless part of your workflow, no browser tabs or external tools required.
Whether you're testing a quick function or building out a larger project, using the terminal and custom npm scripts keeps things fast and distraction-free.
Extensions like Code Runner can help for quick one-off tests, but for anything serious, sticking to the Node-powered method inside VS Code gives you more control, better error output, and a real development feel.
Once this setup becomes second nature, jumping into frameworks like React or Express will feel a lot more natural too.
Now that you’ve got the tools, go ahead, experiment, break stuff, debug, and build.
GNU Taler payment system being approved for Swiss use.
And other Linux news, tips, and, of course, memes!
This edition of FOSS Weekly is supported by PikaPods.
❇️ PikaPods: Enjoy Self-hosting Hassle-free
PikaPods allows you to quickly deploy your favorite open source software. All future updates are handled automatically by PikaPods while you enjoy using the software. PikaPods also share revenue with the original developers of the software.
Carmen from Mission Libre has started a petition to get Qualcomm to release fully-free drivers for their in-production chipsets. If the petition is signed by 5,000 people, a hardcopy of the petition and signatures will be mailed to Qualcomm's head office. We can get 5,000 signatures, can't we?
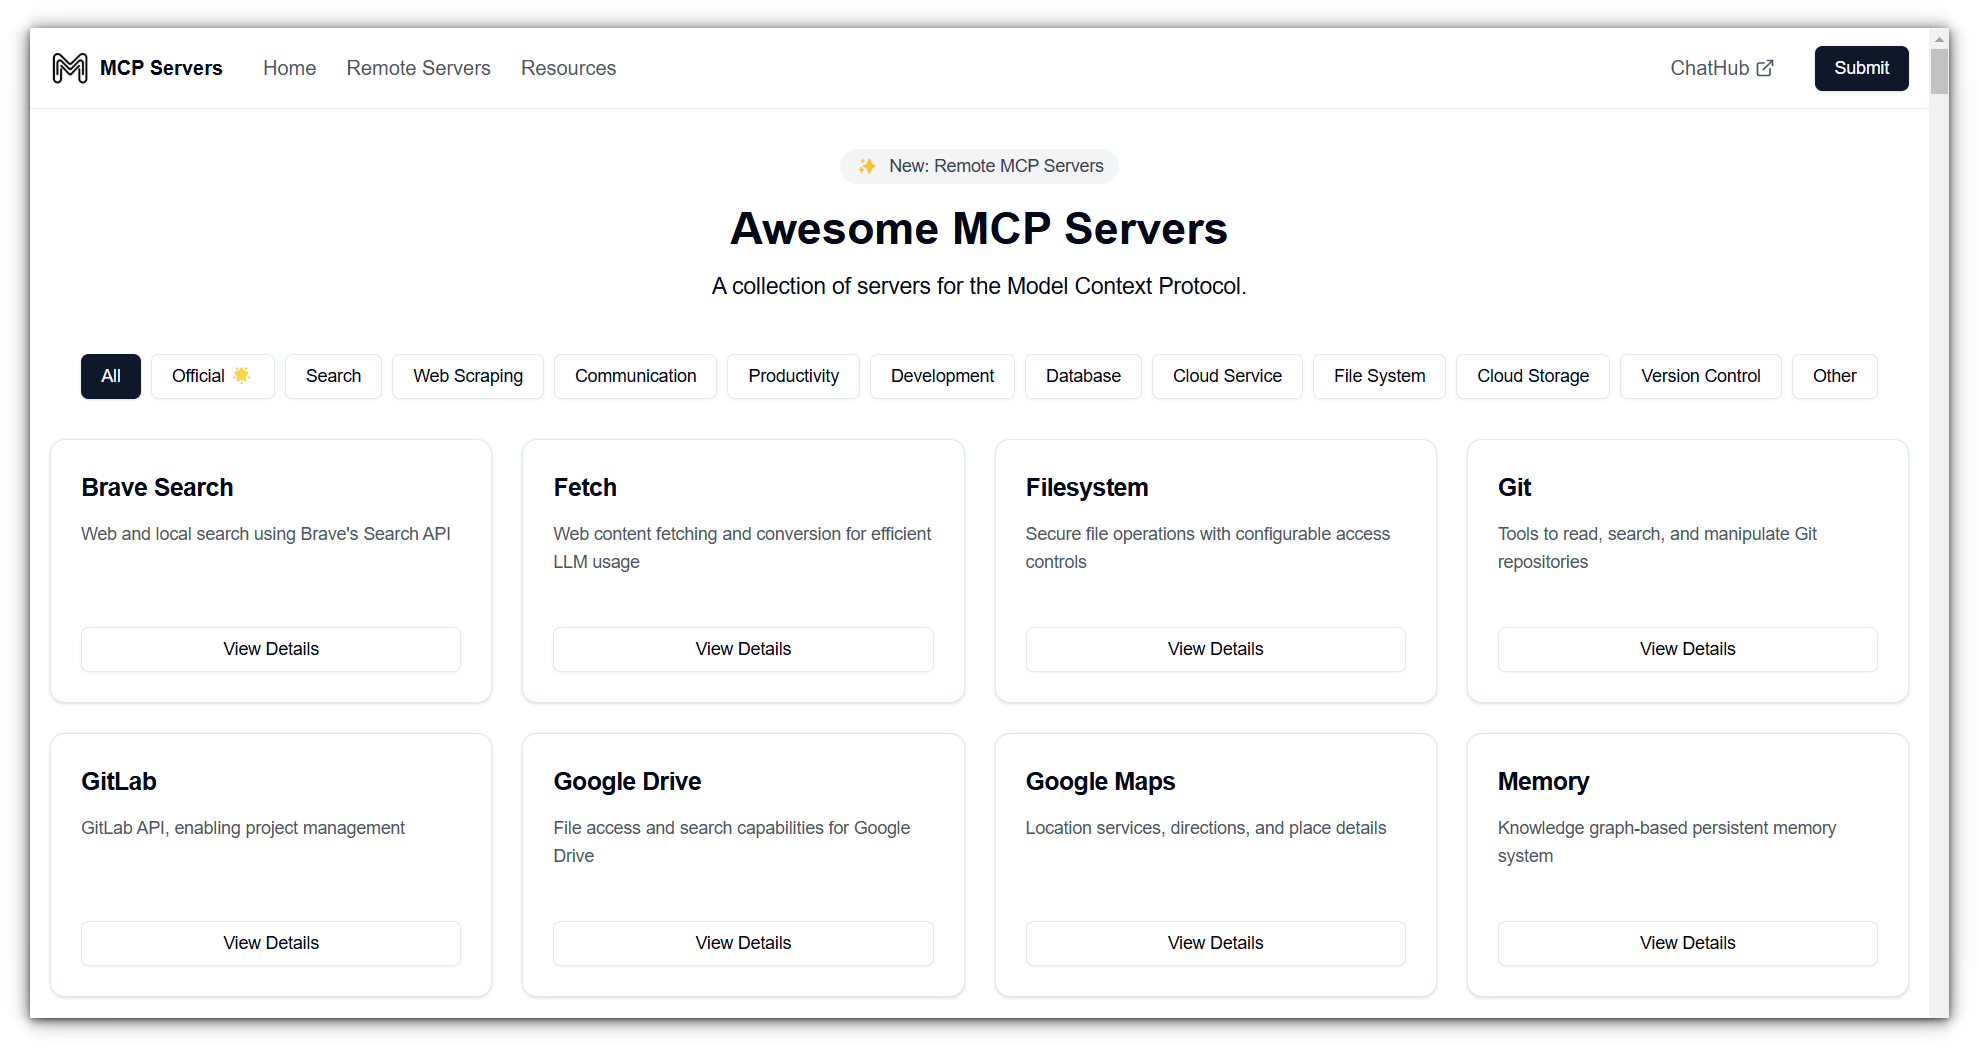
Also, learn a thing or two about MCP servers, the latest buzzword in the (AI) tech world.
✨ Apps Highlight
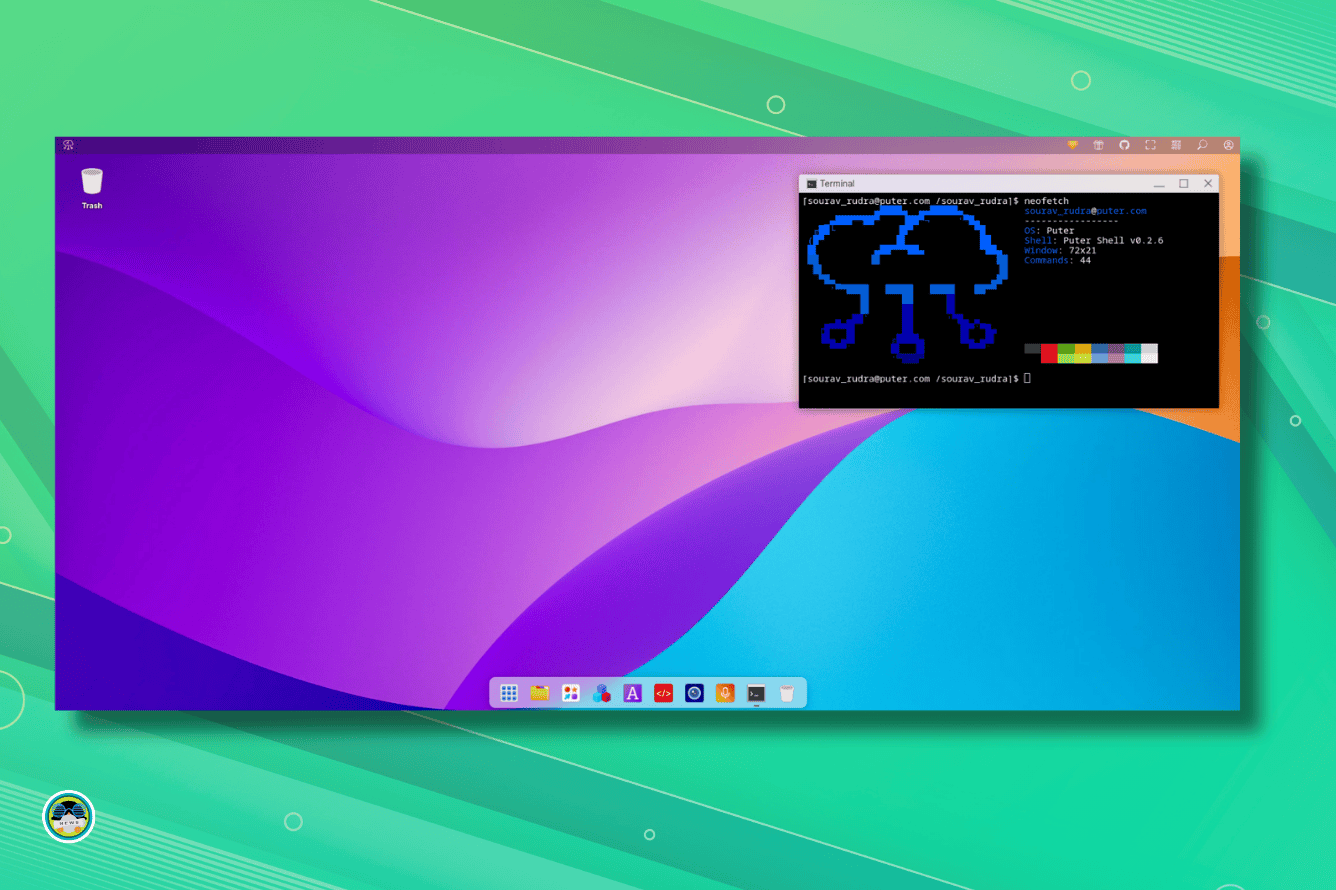
If you ever wanted to run an operating system inside your browser, then Puter is the solution for you. It is open source and can be self-hosted as well.
An It's FOSS reader created an FFmpeg AAC Audio Encoder Plugin for DaVinci Resolve. This will help you get effortless AAC audio encoding on Linux if you use DaVinci Resolve video editor.
📽️ Videos I am Creating for You
I tried Microsoft's new terminal editor on Linux! I hate to admit it but I liked what I saw here. This is an excellent approach. I wonder why Linux didn't have something like this before. See it in action 👇
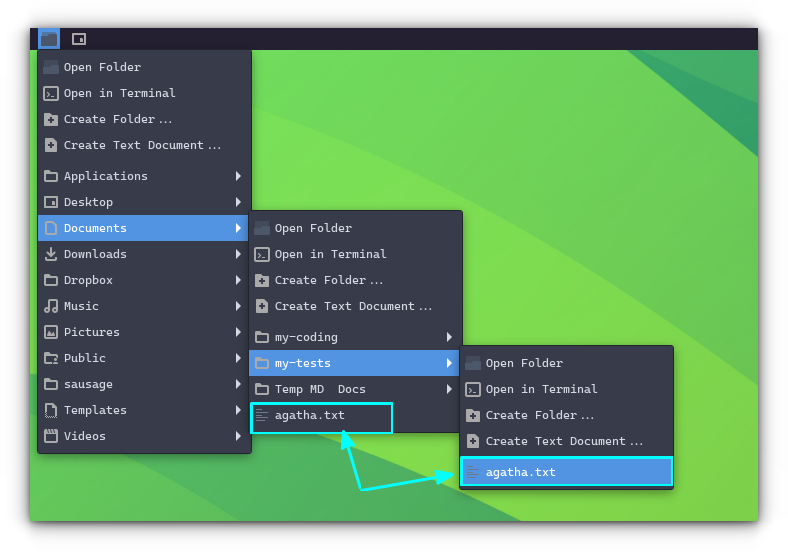
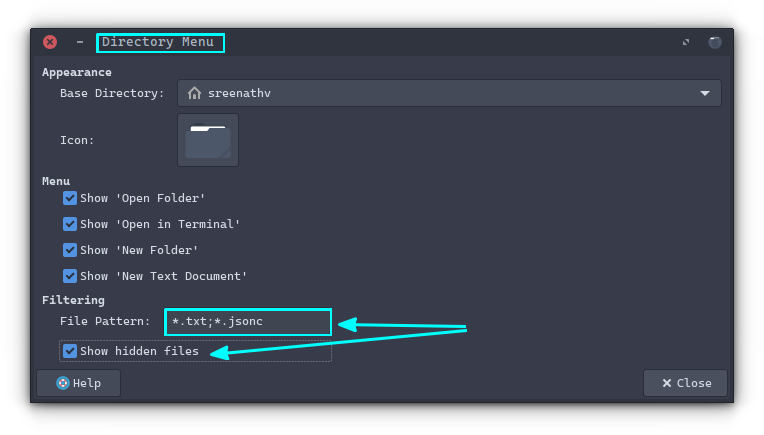
In Xfce, you can use the panel item "Directory Menu" to get quick access to files from anywhere. This is like the Places extension in GNOME, but better.
In the configuration menu for it, provide the file extension in the following format *.txt;*.jsonc as shown in the screenshot above to access the files quickly. Clicking on those files opens it in the default app.
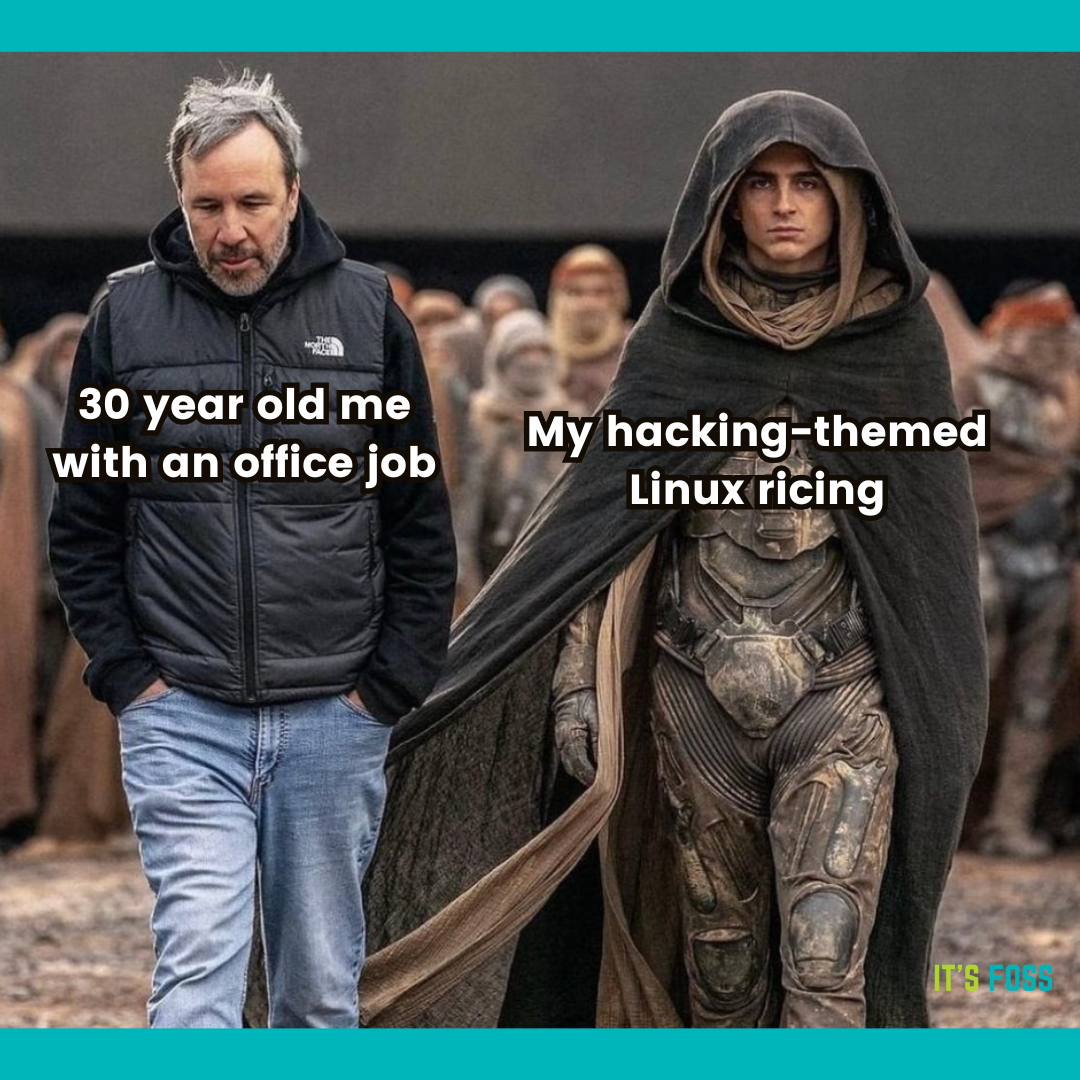
🤣 Meme of the Week
The ricing never stops! 👨💻
🗓️ Tech Trivia
On May 27, 1959, MIT retired the Whirlwind computer, a groundbreaking machine famous for pioneering real-time computing and magnetic core memory.
There are two main choices for getting VS Code on Arch Linux:
Install Code - OSS from Arch repositories
Install Microsoft's VS Code from AUR
I know. It's confusing. Let me clear the air for you.
VS Code is an open source project but the binaries Microsoft distributes are not open source. They have telemetry enabled in it.
Code - OSS is the actual open source version of VS Code.
Think of Code - OSS as Chromium browser and VS Code as Google Chrome (which is based on Chromium browser).
Another thing here is that some extensions will only work in VS Code, not in the de-Micorsoft Code - OSS.
This is why you should think it through if you want to use Microsoft's VS Code or its 100% open sourced version.
Let me show you the steps for both installation.
Method 1: Install Code - OSS
✅ Open source version of Microsoft VS Code ✅ Easy to install with a quick pacman command ❌ Some extensions may not work
This is simple. All you have to do is to ensure that your Arch system is updated:
pacman -Syu
And then install Code - OSS with:
pacman -S code
It cannot be simpler than this, can it?
As I mentioned earlier, you may find some extensions that do not work in the open source version of Code.
Also, I had noticed earlier that Ctrl+C - Ctrl+V was not working for copy paste. Instead, it was defaulted to Ctrl+Shift+C and Ctrl+Shift+V for reasons not known to me. I had not made any changes to key bindings or had opted for a Vim plugin.
Removing Code OSS
Removal is equally simple:
sudo pacman -R code
Method 2: Install the actual Microsoft's VS Code
✅ Popular Microsoft VS Code that is used by most people ✅ Access to all proprietary features and extensions in the marketplace ❌ Installation may take effort if you don't have an AUR helper
If you don't care too much about ethics, open source principles and just want to code without thinking it too much, go with VS Code.
There are a couple of VS Code offerings available in the AUR but the official one is this.
Before installing it, you should remove Code OSS
sudo pacman -R code
If you have an AUR helper like yay already installed, use it like this:
yay -S visual-studio-code-bin
Otherwise, install yay first and then use it to install the desired package.
Don't be deceived by the pretty looking screenshot above. I was using a different theme in VS Code.
Removal
You can use your AUR helper or the super reliable pacman command to remove Microsoft VS Code from Arch Linux.
sudo pacman -R visual-studio-code-bin
I let you enjoy your preferred version of VS Code on Arch Linux. Please feel free to use the comment section if you have questions or suggestions.
On Linux, there are man pages that come preloaded with any distribution. The man pages are basically help pages which you can access using the terminal.
You get an instruction manual when you purchase a new gadget, right? It is just like that.
If you want to know what a command does, just use the 'man' keyword followed by the command you would like to know about. While it may seem pretty straightforward, the user experience is a bit dull, as it is all a bunch of text without any decorations or any other features.
There are some man page alternatives that have tried to modernize the user experience, or give a specific focus to the man pages for particular users. Let me share my quick experience with them.
Love cheat sheets? So, you do not have to waste your time scrolling through a barrage of descriptions? That's what TLDR helps you with.
It gives short and actionable information for commands to follow.
TLDR working
Key Features:
Community-maintained help pages.
Simpler, more approachable complement to traditional man pages.
Help pages focused on practical examples
TL;DR stands for "Too Long; Didn't Read". It originated as Internet slang, where it is used to indicate that a long text (or parts of it) has been skipped as too lengthy.
Installation
🚧
You cannot have tldr and tealdeer installed at the same time.
Alright, if you are like me, and probably not looking for anything fancy, but just a colorful man page, you can use the Most pager.
Most as Pager
MOST is a powerful paging program. Supports multiple windows and can scroll left and right. It keeps the same good-old man page look with added colors.
Install
sudo apt install most
sudo dnf install most
sudo pacman -Syu most
Once installed, edit ~/~.bashrc:
nano ~/.bashrc
To add the line:
export PAGER='most'
For the latest most versions, color may not appear by default. In that case, below line to ~/.bashrc.
Considering you are using a distribution powered by GNOME desktop, you just need to search for the GNOME Help app from the menu. You can also access the same via the terminal using the command yelp.
Using GNOME Help (Yelp) to view man pages
Press CTRL to open the search bar and type the command that you want when using the terminal interface.
man:<command>
# For example
man:man
Or, if you are in a browser, go to the address bar (CTRL+L). Here, enter man:man. When asked to open the link in help, click on it.
AI is everywhere, even in your terminal. The proximity of AI in the tool lets you quickly use them.
There are a few terminals that come with built-in AI agents to help you get all sorts of help; from simple command suggestion to full-fledged deployment plans.
You may use them too if you are an AI aficionado. Warp is one such terminal which is not open source but hugely popular among modern Linux users.
While you have It's FOSS along with the traditional man pages to learn what most commands do on Linux, there are alternatives to man pages which could enhance your learning experience.
If you prefer a GUI, GNOME Help should be helpful or any similar equivalent pre-installed on your distribution. For terminal-based solutions, there are a couple you can try. Take a look at the feature set they offer, and install what you like the most.
What do you prefer the most? Let me know in the comments below!
However, there is a small catch when it comes to compatibility. If you have used several Obsidian-specific plugins, then your notes may not be fully compatible in other plain markdown editors.
In this article, we will take a look at Plugins in Obsidian, how you can install it, and also some essential plugins that can make your learning more effective.
But first, a quick heads-up: Obsidian offers two types of plugins:
Core Plugins: These are officially developed and maintained by the Obsidian team. While limited in number, they are stable and deeply integrated.
Community Plugins: Created by users in the Obsidian community, these plugins offer a wide variety of features, although they aren’t officially supported by the core team.
🚧
Note that some plugins may make your Markdown notes fully readable only in Obsidian. This can be a vendor lock in. Use plugins only according to your needs.
Using the core plugins
Core plugins are officially built by Obsidian. They will come pre-installed. So, naturally, that is the recommended method of installation when it comes to plugins.
Core plugins are displayed in Obsidian settings page. Click on the settings gear icon at the bottom of the Obsidian app window to go to the settings.
Click on the Settings gear
In the settings, select Core Plugins to view the Core plugins.
Select Core Plugins
Most of the core plugins are enabled when you install the Obsidian app. But some plugins will be disabled by default.
I have included a brief description under each plugin to know what the plugin does and enable/disable as needed.
I’ve found that community plugins are one of the best ways to boost Obsidian’s capabilities. There’s a massive collection to choose from, and at the time of writing this, there are 2,430 community plugins available for installation.
These plugins are built by third-party developers and go through an initial review process before being listed.
However, since they have the same level of access as Obsidian itself, it’s important to be cautious. If privacy and security are essential for your work, I suggest doing a bit of homework before installing any plugin, just to be safe.
Disable the restricted mode
To protect you from unofficial plugins, Obsidian starts with a restricted mode, where the community plugins are disabled. To install community plugins, you need to disable the restricted mode first, just like the auto blocker in some Android phones to block app installations from unauthorized sources.
Go to the Obsidian settings and select the Community Plugins option. Here, click on the "Turn on community plugins" button.
Turn on community plugins
This will disable the restricted mode. And, you are all set! 😄
Install community plugins
Once the restricted mode is disabled, you can browse for community plugins and get them installed.
Click on the Browse button
Use the Browse button to go to the plugins page, as shown in the screenshot above. You will reach the plugins store, that lists 2000+ plugins.
Do not worry about the numbers, just search for what you need, or browse through some suggested options, just like I did.
Plugins Store
When you have spotted a plugin that matches your need, click on it. Now, to install that plugin, use the Install button.
Click on the Install button
Once installed, you can see two additional buttons called Enable and Uninstall. As the name suggests, they are for enabling a plugin or uninstalling a plugin.
Enable/Uninstall a plugin
This can be done more efficiently from the Obsidian settings. For this, go to the Settings → Community plugins → Installed plugins. Here, use the toggle button to enable a plugin.
Enable Plugins in Settings
This section lists all the installed community plugins. You can enable/disable, uninstall, access plugin settings, assign a keybinding, or donate to that particular plugin.
Manually install plugins
🚧
I do not recommend this method, since most of the plugins are available in Obsidian store and have gone through an initial review.
Even though not recommended, if you want to install a plugin, manually, for version compatibility or other personal reasons, make sure to source it from the official repositories or websites.
If it is on GitHub, go to the release page of the plugin GitHub repository and download main.js, manifest.json, and style.css files.
Download Plugin files
Now, create a directory with the name of the project in the <Your-obsidian-vault>/.obsidian/plugins directory. Press CTRL+H to view hidden files.
Paste plugin contents
In my case, I tried Templater. Next, I transfer the downloaded files to this project directory. Now, open Obsidian and go to the Settings → Community plugins and enable the new plugin.
Enable manually installed plugin
Install beta version of plugins
This is not for regular users, but for those who want to be testers and reviewers of beta plugins. I usually do this to test interesting things or help with the development of plugins I believe in.
We are using the BRAT (Beta Reviewers Auto-Update Tool) to install and update beta versions of Obsidian plugins.
First, install the BRAT plugin from the Obsidian plugins store and enable it.
Install BRAT Plugin
Now, go to the GitHub repository of the plugin you want to install the beta version of. Copy the URL of the repository.
Select the BRAT plugin from Settings → Community plugins and click on the “Add beta plugin” button.
Click on the "Add beta plugin" button
Here, add the GitHub URL, select a version from the list, and click on the Add Plugin button.
Add URL and select version
You can see that the plugin has been added with BRAT. Since we selected a specific version, it is shown as frozen and cannot be updated. Select Latest as version to get updates.
Beta plugin added using BRAT
Update plugins
To update community plugins, go to Obsidian settings and select Community plugins.
Here, click on the Check for updates button.
If there is an update available, it will notify you.
There is an update available for one plugin.
Click on Update All to update all the plugins that have an update available. Or, scroll down and update individual plugins by clicking on the Update button.
Move community plugins
You can copy selected or all plugins from your directory to another vault to avoid installing everything from scratch.
Go to the <your-obsidian-vault>/.obsidian/plugins directory. Now, copy directories of those plugins you want to use in another vault.
Copy those directories to your new plugin directory for your other vault (or the newer vault) <your-new-vault>/.obsidian/plugins directory.
If there is no plugins directory in the new vault, create one. Once you open the new vault, you will be asked to trust the plugins.
If it is you, who copied all the folders and no others are involved, click on the "Trust author and enable plugins" button.
Or you can use the "Browse Vault in restricted mode" and then enable the plugins by going to Settings → Community plugins → Turn on Community plugins → Enable plugins.
Plugin security notification
In both cases, you don't have to install the plugin from scratch.
Don't forget to enable the plugins through Settings → Community plugins to start using them.
Remove a plugin
Removing a plugin is easy. Go to the community plugins in settings and click on the delete button (bin icon) adjacent to the plugin you want to remove.
Remove a plugin
Or, if you just want to disable all community plugins, you can turn on the restricted mode. Click on the Turn on and reload button in community plugins settings.
Turn on restricted mode
So, if you turn off the restricted mode, all the installed plugins will be enabled. Pretty easy, I know, right?
Another way to remove plugins is to delete specific folders in the plugins directory, but it is unnecessary unless you are testing something specific.
🚧
Don't use this method for everything since it is safer to do so from within Obsidian.
Go to the <your-obsiidian-vault>/.obsidian/plugins directory and remove the directory that has the name of the plugin you want to remove.
Now open Obsidian and you won't see that plugin. Voila!
Enjoy using Obsidian
I have shared many more Obsidian tips to improve your experience with this wonderful too.
It took me way longer than I’d like to admit to wrap my head around MCP servers.
At first glance, they sound like just another protocol in the never-ending parade of tech buzzwords decorated alongside AI.
But trust me, once you understand what they are, you start to see why people are obsessed with them.
This post isn’t meant to be the ultimate deep dive (I’ll link to some great resources for that at the end). Instead, consider it just a lil introduction or a starter on MCP servers.
And no, I’m not going to explain MCP using USB-C as a metaphor, if you get that joke, congrats, you’ve clearly been Googling around like the rest of us. If not… well, give it time. 😛
Its purpose is to improve how AI models interact with external systems, not by modifying the models themselves, but by providing them structured, secure access to real-world data, tools, and services.
An MCP server is a standalone service that exposes specific capabilities such as reading files, querying databases, invoking APIs, or offering reusable prompts, in a standardized format that AI models can understand.
Rather than building custom integrations for every individual data source or tool, developers can implement MCP servers that conform to a shared protocol.
This eliminates the need for repetitive boilerplate and reduces complexity in AI applications.
Quite a bit. Depending on how they’re set up, MCP servers can expose:
Resources – Stuff like files, documents, or database queries that an AI can read.
Tools – Actions like sending an email, creating a GitHub issue, or checking the weather.
Prompts – Predefined instructions or templates that guide AI behavior in repeatable ways.
Each of these is exposed through a JSON-RPC 2.0 interface, meaning AI clients can query what's available, call the appropriate function, and get clean, structured responses.https://www.anthropic.com/
So... how does an MCP server actually work?
MCP servers follow a well-defined architecture intended to standardize how AI models access external tools, data, and services.
Each part of the system has a clear role, contributing to a modular and scalable environment for AI integration.
Host Applications These are the environments where AI agents operate, such as coding assistants, desktop apps, or conversational UIs.
They don’t interact with external systems directly, but instead rely on MCP clients to broker those connections.
MCP Clients The client is responsible for managing the connection between the AI agent and the MCP server. It handles protocol-level tasks like capability discovery, permissions, and communication state.
Clients maintain direct, persistent connections to the server, ensuring requests and responses are handled correctly.
MCP Servers The server exposes defined capabilities such as reading files, executing functions, or retrieving documents using the Model Context Protocol.
Each server is configured to present these capabilities in a standardized format that AI models can interpret without needing custom integration logic.
Underlying Data or Tooling This includes everything the server is connected to: file systems, databases, external APIs, or internal services.
The server mediates access, applying permission controls, formatting responses, and exposing only what the client is authorized to use.
This separation of roles between the model host, client, server, and data source, allows AI applications to scale and interoperate cleanly.
Developers can focus on defining useful capabilities inside a server, knowing that any MCP-compatible client can access them predictably and securely.
Wait, so how are MCP Servers different from APIs?
Fair question. It might sound like MCP is just a fancy wrapper around regular APIs, but there are key differences:
Feature
Traditional API
MCP Server
Purpose
General software communication
Feed AI models with data, tools, or prompts
Interaction
Requires manual integration and parsing
Presents info in model-friendly format
Standardization
Varies wildly per service
Unified protocol (MCP)
Security
Must be implemented case-by-case
Built-in controls and isolation
Use Case
Backend services, apps, etc.
Enhancing AI agents like Claude or Copilot or Cursor
Basically, APIs were made for apps. MCP servers were made for AI.
Want to spin up your own self-hosted MCP Server?
While building a custom MCP server from scratch is entirely possible, you don’t have to start there.
There’s already a growing list of open-source MCP servers you can clone, deploy, and start testing with your preferred AI assistant like Claude, Cursor, or others.
mcpservers.org is an amazing website to find open-source MCP Servers
If you're interested in writing your own server or extending an existing one, stay tuned. We’re covering that in a dedicated upcoming post, we'll walk through the process step by step in an upcoming post, using the official Python SDK.
Make sure you’re following or better yet, subscribe, so you don’t miss it.
Want to learn more on MCP?
Here are a few great places to start:
I personally found this a good introduction to MCP Servers
And there you have it, a foundational understanding of what MCP servers are, what they can do, and why they’re quickly becoming a cornerstone in the evolving landscape of AI.
We’ve only just scratched the surface, but hopefully, this introduction has demystified some of the initial complexities and highlighted the immense potential these servers hold for building more robust, secure, and integrated AI applications.
Stay tuned for our next deep dive, where we’ll try and build an MCP server and a client from scratch with the Python SDK. Because really, the best way to learn is to get your hands dirty.
Imagine Oh My Zsh but for Bash. The Bash-it framework lets you enjoy a beautiful bash shell experience. I am just surprised that it is not called Oh My Bash 😜
Remember your favorite tech websites like Anand Tech or magazines like Linux Voice? They don't exist anymore.
In the age of AI Overview in search engines, more and more people are not even reaching the websites from where AI is 'copying' the text. As a result, your favorite websites continue to shut down.
More than ever, now is the most crucial time to save your favorite websites from AI onslaught.
If you like what we do and would love to support our work, please become It's FOSS Plus member. It costs $24 a year, i.e. $2 a month. Even a burger costs more than $2. For skipping a burger a month, you get an ad-free reading experience with the satisfaction of helping the desktop Linux community.
How about an open source, decentralized alternative to the likes of Discord and Slack? Peersuite is a self-hostable peer-to-peer workspace that isn't user data hungry.
In file managers like Nemo, Nautilus, etc., you can easily create file duplicates by pressing the CTRL key and dragging the file to a blank space in the window.
If you drop a file while pressing the CTRL key when in another folder, the file will be copied to that directory.
Use CTRL+Z to undo the file duplication. During this, your file manager will ask you whether you want to delete the copied file.
🤣 Meme of the Week
The man's got a Debian-flavored beard. 😆
🗓️ Tech Trivia
On May 18, 1998, the U.S. Department of Justice sued Microsoft, alleging that the company was illegally monopolizing the web browser market by integrating its Internet Explorer browser into its Windows operating system.
Working with code often involves repetition, changing variable names, updating values, tweaking class names, or adding the same prefix across several lines.
If you find yourself making the same changes again and again, line by line, then multi-cursor editing in Visual Studio Code can help simplify that process.
In this part of our ongoing VS Code series, we’ll take a closer look at this feature and how it can make everyday tasks quicker and more manageable.
Why use multiple cursors?
Multi-cursor editing lets you place more than one cursor in your file so you can edit several lines at once.
Instead of jumping between lines or writing the same change repeatedly, you can type once and apply that change across multiple places.
Here are a few common situations where it comes in handy:
Renaming a variable or function in multiple places.
Adding or removing the same snippet of code across several lines.
Editing repeated structures (like object keys, class names, or attribute values).
Commenting out a bunch of lines quickly.
Once you start using it, you’ll notice it helps reduce small repetitive tasks and keeps your focus on the code itself.
Placing multiple cursors: mouse and keyboard
There are two main ways to place multiple cursors in VS Code using the mouse or keyboard shortcuts.
Let’s start with the mouse-based approach, which is more visual and straightforward for beginners.
Then, we’ll move on to keyboard shortcuts, which are faster and more efficient once you’re comfortable.
Method 1: Using the mouse
To place cursors manually using your mouse:
Hold down Alt (Windows/Linux) or Option (Mac), then click anywhere you want to insert a new cursor.
Each click places a new blinking cursor. You can now type, delete, or paste, and the change will reflect at all cursor positions simultaneously.
To cancel all active cursors and return to a single one, press Esc.
This method is handy for quick edits where the lines aren’t aligned or when you want more control over cursor placement.
Method 2: Using keyboard shortcuts
The mouse method is a good starting point, but learning keyboard shortcuts can save more time in the long run.
Below are a few keyboard-driven techniques to add and manage multiple cursors efficiently.
Add Cursors Vertically in a Column
When you want to add cursors above or below the current line to edit a block of similar lines (like inserting or deleting the same code at the beginning of each line), use this shortcut:
Ctrl+ Alt + Up/Down arrow keys.
This aligns cursors in a vertical column, making it easier to apply the same action to adjacent lines.
Select the next occurrence of the current word
To select and edit repeated words one by one such as variable names or function calls, place your cursor on the word and use: Ctrl + D
Each press selects the next matching word and adds a cursor to it. You can press it repeatedly to continue selecting further matches.
Select all occurrences of a word in the file
If you want to update every instance of a word across the file at once, for example, replacing a class name or a repeated property, use: Ctrl + Shift + L
This selects all matching words and places a cursor at each one. It’s powerful, but use with care in large files to avoid unintentional edits.
Editing with multiple cursors
Once your cursors are in place, editing works just like usual:
Type to insert text across all cursors.
Use Backspace or Delete to remove characters.
Paste snippets — they get applied to each cursor position.
Standard commands like cut, copy, undo, and redo all function as expected.
Just keep an eye on alignment. If cursors are placed unevenly across lines, your edits might not be consistent.
Multi-cursor editing is one of those small but effective features in VS Code that can make repetitive tasks less of a chore.
You don’t need to learn all the shortcuts right away. Start simple, try placing cursors with Ctrl + D or selecting multiple lines vertically and build from there.
As you become more comfortable, these techniques will become second nature and help you focus more on writing logic and less on repeating edits.